Bosch HMV9302 Use & Care Manual - Page 15
Sensor Operating, Instructions, Sensor Cooking Guide, Adding Or Subtracting, Sensor Cook Time, - glass
 |
UPC - 825225830412
View all Bosch HMV9302 manuals
Add to My Manuals
Save this manual to your list of manuals |
Page 15 highlights
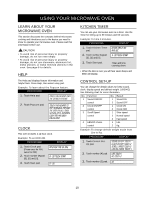
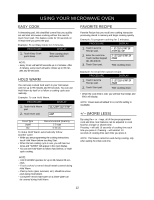
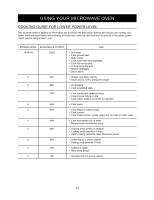
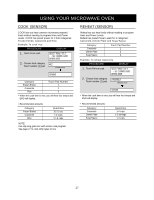
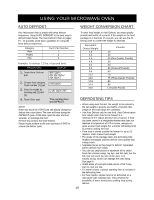
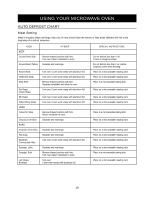
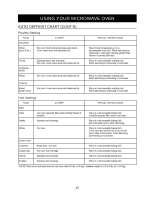
USING YOUR MICROWAVE OVEN SENSOR OPERATING INSTRUCTIONS Sensor Cook allows you to cook most of your favorite foods without selecting cooking times and power levels. The oven automatically determines required cooking time for each food item. The display will indicate SENSING during the initial sensing period. When the internal sensor detects a certain amount of humidity coming from the food, it will tell the oven how much longer to heat. The display will show the remaining heating time. For best results for cooking by Sensor, following these recommendations: 1. Food cooked with the sensor system should be at normal storage temperature. 2. Glass TURNTABLE and outside of container should be dry to assure best cooking results. 3. Foods should always be covered loosely with microwavable plastic wrap, waxed paper or a lid. 4. Do not open the door or touch the Stop/Clear pad during the sensing time. When sensing time is over, the oven beeps twice and the remaining cooking time will appear in the display window. At this time you can open the door to stir, turn, or rearrange the food. SENSOR COOKING GUIDE Appropriate containers and coverings help assure good Sensor cooking results. 1. Always use microwavable containers and cover them with lids or vented plastic wrap. 2. Never use tight-sealing plastic covers. They can prevent steam from escaping and cause food to overcook. 3. Match the amount to the size of the container. Fill containers at least half full for best results. 4. Be sure the outside of the cooking container and the inside of the microwave oven are dry before placing food in the oven. Beads of moisture turning into steam can mislead the sensor. ADDING OR SUBTRACTING SENSOR COOK TIME If the SENSOR function is too long or too short, you can increase or decrease the cook time by 10 seconds after choosing the function. You can only increase or decrease cook time when sensor is displayed. Example: If you want to add to the Sensor Cook casserole cooking time. PROCEDURE DISPLAY 1. Touch Cook pad. select menu 1 to 3 - - see cooking guide behind door 2. Choose food category. Touch number [2] pad. casserole (Display once) sensing 3. Touch number [9] pad. more Cook Time Less Normal More Touch Pad Number 7 8 9 POPCORN (SENSOR) POPCORN lets you pop 3.0 and 3.5 ounce bags of commercially packaged microwave popcorn. Pop only one package at a time. If you are using a microwave popcorn popper, follow manufacturer's instructions. Example: To pop popcorn. PROCEDURE DISPLAY 1. Touch Popcorn pad. popcorn (Display once) sensing • When the cook time is over, you will hear four beeps and END will display. CAUTION • DO NOT leave microwave oven unattended while popping corn. 15
-
 1
1 -
2
-
3
-
4
-
5
-
6
-
7
-
8
-
9
-
 10
10 -
 11
11 -
 12
12 -
 13
13 -
 14
14 -
 15
15 -
 16
16 -
 17
17 -
 18
18 -
 19
19 -
 20
20 -
21
-
22
-
23
-
24
-
25
-
26
-
27
-
28
-
29
-
30
-
31
-
32
-
33
-
34
-
35
-
36
 |
 |