Bosch NEM5666UC Instructions for Use - Page 9
Getting familiar with the appliance, Operation
 |
View all Bosch NEM5666UC manuals
Add to My Manuals
Save this manual to your list of manuals |
Page 9 highlights
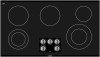
Getting familiar with the appliance In this section we describe the control panel, elements and displays. Control panel These instructions apply to more than one cooktop, your appliance might vary slightly. Page 2 contains a list of models and dimensions. Knob positions Off Cooking element turned off 1-9 Heat levels $ Heat setting for inner ring of a dual element ð Heat setting for inner and outer ring of a dual element Light Indicators $ Cooktop is turned on On/Off ® Cooking element is turned on NOTICE: Always keep the control knobs clean and dry. Moisture and dirt can affect proper functioning. Heating elements Element $ Single element ð Dual element Turning on and off Single elements have only one size cooking surface. Always use cookware of a suitable size. The size of these elements can be matched to your pan size. Using the inner and outer ring: Turn the knob to the left. Using only the inner ring: Turn the knob to the right. Operation Setting the cooktop This section will show you how to set the elements. The table contains details on the heat settings for a variety of dishes. Setting the element Adjust the heat setting of the elements using the knob: Push in and turn the knob to the desired temperature. Heat level 1 = minimum power Heat level 9 = maximum power When the element turns on, the power-on indicator lights up. Turning off Turn the control knob to OFF. When all control knobs are in the OFF position, the cooktop is turned off. Note: The heat is turned on and off to regulate the temperature of the element; this means that the red glow below the element is not always visible. When you select a low heat setting, the element turns off for longer intervals, while at a higher setting these intervals are very short. Even at the highest level, the element turns on and off. 9
-
 1
1 -
2
-
3
-
 4
4 -
 5
5 -
 6
6 -
 7
7 -
 8
8 -
 9
9 -
 10
10 -
 11
11 -
 12
12 -
 13
13 -
 14
14 -
15
-
16
-
17
-
18
-
19
-
20
-
21
-
22
-
23
-
24
-
25
-
26
-
27
-
28
-
29
-
30
-
31
-
32
-
33
-
34
-
35
-
36
-
37
-
38
-
39
-
40
 |
 |
