Bosch NGM5054UC Use & Care Manual (all languages) - Page 8
Sealed Burners, Burner Caps - .. model #
 |
UPC - 825225858362
View all Bosch NGM5054UC manuals
Add to My Manuals
Save this manual to your list of manuals |
Page 8 highlights
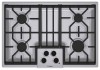
2 3 4 7 1 12 3 456 5 Figure 3: Model NGM5654UC / NGM5624UC / NGM5664UC / NGM8654UC 1. Left front surface burner (12,000 BTUs) 2. Left rear surface burner (12,000 BTUs) 3. Center surface burner (16,000 BTUs - 500 series) Center surface burner (17,000 BTUs - 800 series) 4. Right rear surface burner (5,500 BTUs) 5. Right front surface burner (12,000 BTUs) 6. Burner "On" Indicator Light 7. Serial Number/Data Plate Location (right front underneath) • Flames shoot out of burners. • Burners do not ignite. • Burner flames light unevenly. • Burner emits gas odor. WARNING: To prevent flare-ups and avoid creation of harmful by-products, do not use the cooktop without all burner caps and all burner grates properly positioned. Sealed Burners Your new cooktop has sealed gas burners. There are no burner parts under the cooktop to clean, disassemble or adjust. Your cooktop has three different burner sizes; small, medium, and large. Match the corresponding letters on the burner cap and burner base. See "Burners Caps" on page 7. Burner Caps The burner cap is porcelainized steel. The burner caps must be properly placed for the cooktop to function properly. If the burner cap is not properly placed, one or more of the following problems may occur: • Burner flames are too high. WARNING: To prevent burns, do not touch burner caps or grates while hot. Turn the cooktop off and allow the burners to cool. Placing Burner Caps Each cap has a letter (A, D, or F) cast in the underside of the cap that corresponds to a letter (A, D, or F) cast in the burner base that is attached to the appliance. • Place each burner cap on its correct burner base per its corresponding letter designation. See figure "Burners Caps" on page 7. • Place burner cap gently on top of base so that the prongs of the burner base fit snugly into the groove of the burner cap. English 6
-
 1
1 -
2
-
 3
3 -
 4
4 -
 5
5 -
 6
6 -
 7
7 -
 8
8 -
 9
9 -
 10
10 -
 11
11 -
 12
12 -
 13
13 -
14
-
15
-
16
-
17
-
18
-
19
-
20
-
21
-
22
-
23
-
24
-
25
-
26
-
27
-
28
-
29
-
30
-
31
-
32
-
33
-
34
-
35
-
36
-
37
-
38
-
39
-
40
-
41
-
42
-
43
-
44
-
45
-
46
-
47
-
48
-
49
-
50
-
51
-
52
-
53
-
54
-
55
-
56
-
57
-
58
-
59
-
60
-
61
-
62
-
63
-
64
 |
 |
