Bosch SGE68U55UC Installation Instructions - Page 13
Attaching the Toe Panel
 |
View all Bosch SGE68U55UC manuals
Add to My Manuals
Save this manual to your list of manuals |
Page 13 highlights
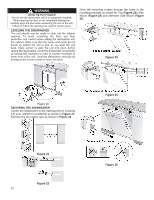
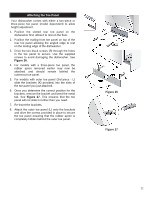
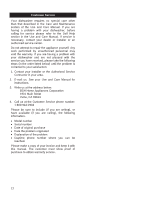
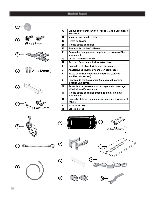
Attaching the Toe Panel Your dishwasher comes with either a two-piece or three-piece toe panel (model dependent) to allow height adjustment. 1. Position the slotted rear toe panel on the dishwasher first. Allow it to rest on the floor. 2. Position the mating front toe panel on top of the rear toe panel allowing the angled edge to rest on the mating edge of the dishwasher. 3. Drive the two black screws (B) through the holes in the toe panel to secure. Use the supplied screws to avoid damaging the dishwasher. See Figure 26. 4. For models with a three-piece toe panel, the rubber apron removed earlier may now be attached and should remain behind the outermost toe panel. 5. For models with outer toe panel (3rd piece - L) slide the brackets (K) provided, into the slots of the toe panel you just attached. 6. Once you determine the correct position for the brackets, remove the bracket and bend the metal tab. See Figure 27. This ensures that the toe panel will not slide in further than you need. 7. Re-insert the brackets. 8. Attach the outer toe panel (L) onto the brackets and drive the screws provided in place to secure the toe panel ensuring that the rubber apron is completely hidden behind the outer toe panel. Figure 26 Figure 27 11
-
 1
1 -
2
-
3
-
4
-
5
-
6
-
7
-
 8
8 -
 9
9 -
 10
10 -
 11
11 -
 12
12 -
 13
13 -
 14
14 -
 15
15 -
 16
16 -
 17
17 -
 18
18 -
19
-
20
-
21
-
22
-
23
-
24
-
25
-
26
-
27
-
28
 |
 |
