Bosch SHV88PW53N Instructions for Use - Page 11
Operating panel, Dishwasher interior, components, Display indicators, Menu overview - manual
 |
View all Bosch SHV88PW53N manuals
Add to My Manuals
Save this manual to your list of manuals |
Page 11 highlights
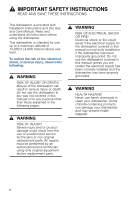
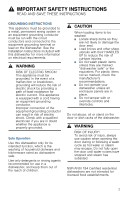
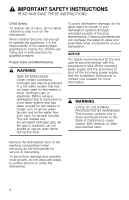
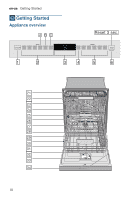
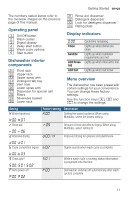
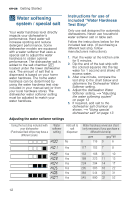
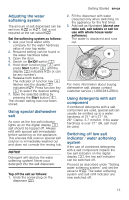
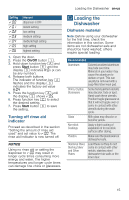
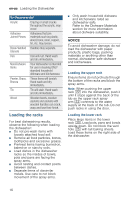
Getting Started en-us The numbers stated below refer to the overview images on the previous page of this manual. Operating panel ( On/Off button 0 Wash cycles 8 Digital display @ Delay start button H Wash cycle options P Start button Dishwasher interior components 1* Third rack 12 Upper rack 1: Upper spray arm 1B Detergent tab tray 1J Vent hole 1R Lower spray arm 1Z Dispenser for special salt 1b Filters 1j Silverware basket 9" Lower rack 9* Rinse aid dispenser 92 Detergent dispenser 9: Lock for detergent dispenser 9B Rating plate Display indicators ‹:‹‹ Clean Sanitize Add Rinse Aid Add Salt -------- Cycle time remaining Lights up when dishes are clean Lights up when sanitation requirements are met Lights up when rinse aid is low Lights up when salt is low Menu overview The dishwasher has been preset with certain settings for your convenience. You can change these factory settings. Use the function keys #, + and 3 to change the settings. Setting • Water hardness Rinse aid Intensive drying Factory setting Description •:‹‹ Setting the water hardness. When using Multitabs, select the lowest setting. §:‹† Amount of rinse aid affects drying. When using Multitabs, select setting 0. š:‹‹ / Off Improved drying for glasses and plasticware. Cycle completion signal ›:‹ƒ Signal sounds when wash cycle is complete. TimeLight® Auto power off While a wash cycle is running, status information is projected onto the floor. Dishwasher switches off automatically after wash cycle is complete. -------- 11
-
 1
1 -
2
-
3
-
4
-
5
-
 6
6 -
 7
7 -
 8
8 -
 9
9 -
 10
10 -
 11
11 -
 12
12 -
 13
13 -
 14
14 -
 15
15 -
 16
16 -
17
-
18
-
19
-
20
-
21
-
22
-
23
-
24
-
25
-
26
-
27
-
28
-
29
-
30
-
31
-
32
-
33
-
34
-
35
-
36
-
37
-
38
-
39
-
40
-
41
-
42
-
43
-
44
-
45
-
46
-
47
-
48
-
49
-
50
-
51
-
52
-
53
-
54
-
55
-
56
-
57
-
58
-
59
-
60
-
61
-
62
-
63
-
64
-
65
-
66
-
67
-
68
-
69
-
70
-
71
-
72
-
73
-
74
-
75
-
76
-
77
-
78
-
79
-
80
-
81
-
82
-
83
-
84
-
85
-
86
-
87
-
88
-
89
-
90
-
91
-
92
-
93
-
94
-
95
-
96
-
97
-
98
-
99
-
100
-
101
-
102
-
103
-
104
 |
 |