Bosch WAS20160UC Installation Instructions - Page 1
Bosch WAS20160UC - Axxis Series Front Load Washer Manual
 |
UPC - 825225855620
View all Bosch WAS20160UC manuals
Add to My Manuals
Save this manual to your list of manuals |
Page 1 highlights
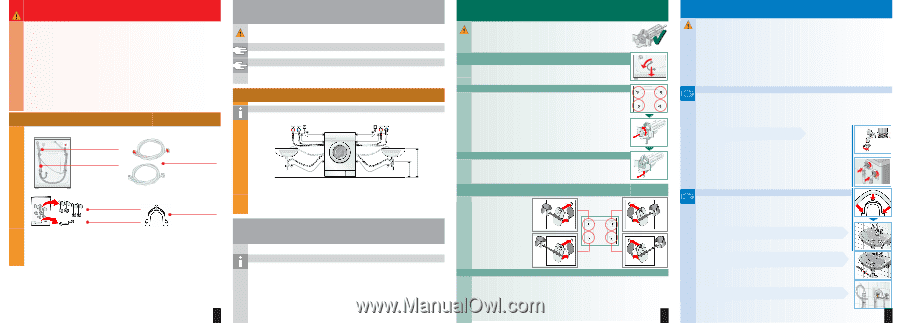
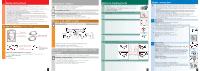
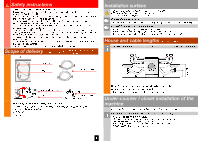
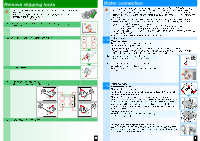
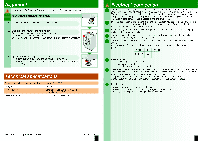
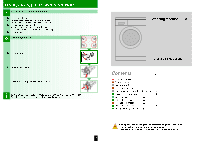
Safety instructions - The washing machine is heavy. Lift with caution. - Frozen hoses can tear/burst. Do not install the washing machine outdoors or in an area exposed to freezing conditions. - These installation instructions are intended for use by qualified installers. In addition to these instructions, if installing the washing machine: In the United States comply with the National Electric Code, ANSI/NFPA70 - latest edition/State and municipal and/or local regulations. In Canada comply with the Canadian Electric Code C22.1 - latest edition/provincial and municipal and/or local regulations. - If the washing machine is located in a room which will be exposed to temperatures below freezing, or if it is located in a cabin that is being shut down for the winter, any residual water in the pump or water inlet hose(s) must be drained. - Take care not to damage the washing machine. Do not hold on to protruding parts (e.g. door) when lifting. - In addition to the safety information listed here, the local water end electricity supplier may have special requirements. - If in doubt, have the appliance connected by an authorized technician. Scope of delivery depending on model Moisture in the drum is due to end inspection. Standard Power cord Drainage hose Water supply hoses Covers with hose holder Wrench Elbow for fixing the waste water hose Additionally needed depending on connection - 1 hose clamp Ğ 0,94 in.Ć1,57 in. (commercially available) for connection to siphon -> Page 4; Water connection. Useful tool - Level for alignment. Installation surface - Stability is important so that the machine does not "walk"! - The installation surface must be solid and level. - Soft floors/floor coverings are not suitable. For installation on a base - Fasten the washing machine feet with retaining tabs* (*Order no. WMZ 2200, WX 9756). For installation on a wooden joist floor - Install the washing machine in a corner if at all possible. - Screw a waterproof wooden plate (min. 1,18 in. thick) on the floor. - Fasten the washing machine feet with retaining tabs* (*Order no., see above) House and cable lengths depending on model LeftĆside connection or RightĆside connection Remove shipping locks - Before first use be sure to completely remove the 4 shipping locks and keep them. - For later shipping be sure to reinstall the shipping locks Ć prevents damage to the machine -> Page 6. - Save screws and sleeves. 1. Remove hoses from the elbow and holder (depending on model). Remove elbow. 2. Loosen all 4 shipping lock screws and remove. 51 in. 57 in. 53 in. 39 in. max.: 39 in. 37 in. 58 in. Note: When using the hose holder, possible hose lengths are reduced! Available commercially or from customer service: - Longer supply hose (approx. 86,61 in.), for standard model UnderĆcounter / closet installation of the machine UnderĆcounter / inĆcabinet installation before connecting to power supply. Installation in kitchen cabinetsą(underĆcounter or inĆcabinet) - Cubicle width of 23,62 in. is required. - Only install the washing machine under a continuous counter top which is securely fastened to the neighboring cabinets. - If installing the washer in a closet, observe the minimum distances: Side: 0 in., rear: 1,97 in., top: 0 in., front: 2,76 in.. 3. Remove sleeves. 4. Install covers with hose holders. Lock tightly using pressure on the catch hooks. 5. Fix the hoses in the hose holders. 1 Water connection - The washing machine must only be operated with cold and hot (max. 140 °F/60°C) tap water. Do not connect the appliance to the mixer tap of an unpressurized hotĆwater boiler. - To prevent water damage, the hot and cold water valves should be accessible when the washing machine is in place and should always be turned off when the washing machine is not in use. - If installing the washing machine in a new building or a building in which the plumbing system was recently installed or upgraded, flush the lines before installing the washing machine to remove any sand, dirt or residue. - The connection points are under full water pressure. Check seal with tap fully open. - To prevent leakage or water damage, follow the instructions in this chapter! - Do not use a used inlet hose. Only use the inlet hose supplied or one which was purchased from an authorized dealer. - If in doubt, have the appliance connected by a technician. Water supply Water inlet hoses: Attention: do not kink, crush, modify or cut through (strength is no longer guaranteed). Optimum water pressure should be between: 14,5 to 145 p.s.i. (1Ć10 bar) - When the tap is turned on, the water flow is at least 2,2 U.S. gallons (8 liters) per minute. - If the water pressure is higher, install a pressure reducing valve. 1. Connect water supply hoses to the taps. 3/4" Tighten plastic screwĆfittings by hand only. 2. Carefully turn on the taps and check that the connection points are not leaking. Attention: screw connection is under water mains pressure. Water drainage Water drainage hose: Attention: do not kink or stretch. Height difference between installation area and outlet: 0 Ć max. 39 in. Drainage into a sink/bath tub: Attention: Secure the drainage hose to prevent it from slipping out of the sink. Attention: The plug must not be in the plug hole. When the water is being pumped out of the washing machine, check that the water drains away quickly enough. Do not insert the end of the drainage hose into the pumped off water! There is a risk that water will be drawn back into the washing machine! Drainage into a siphon: Attention: Secure connection point with hose clip, ∅ 0,9 in. Ć 1,6 in. (dealer). Drainage into a standpipe or in wall installation: Use the UĆbracket. Attach the UĆbracket to the end of the hose and insert end of hose into standpipe or wall drain. Use a strap or cable tie connected to UĆbracket to hold hose in place. 3 4
-
 1
1 -
 2
2 -
 3
3 -
 4
4 -
 5
5 -
 6
6
 |
 |