Bosch WFMC530CUC Pedestal Installation Instructions - Page 6
Caution - washing machines
 |
View all Bosch WFMC530CUC manuals
Add to My Manuals
Save this manual to your list of manuals |
Page 6 highlights
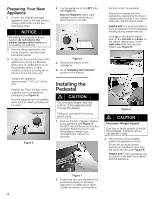
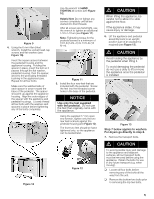
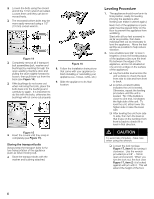
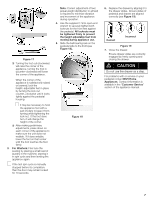
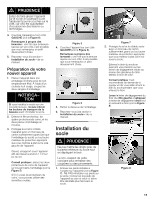
q Loosen the bolts using the closed end of the 17mm wrench provided. Loosen them until they can be reĆ moved freely. q The recessed bottom bolts may be more easily removed using a 1/2" (13 mm) socket wrench. Figure 14 q Completely remove all 4 transport bolt assemblies (bolt, washer and bushings) by reaching through the open washing machine door and pulling the drum slightly forward to loosen, then pull them out from the back (see Figure 14). q If the bushings do not come out when removing the bolts, place the bolts back into the bushings and carefully try again. It is important to do this with the bolts, otherwise the bushings will not come out properly. Figure 16 8. Follow the Installation Instructions that came with your appliance to finish installing or reinstalling your appliance (i.e., hoses, vents, etc.) 9. Slide the appliance to its final location. Figure 15 q Insert the covers until they snap in completely (see Figure 15). Storing the transport bolts Always keep the transport bolts for fuĆ ture transportation of the appliance (such as when moving out). q Store the transport bolts with the washer and bushing attached. Leveling Procedure 1. The appliance should now be in its final position, ready for leveling (moving the appliance after leveling can make it unlevel again.) Each foot of the appliance or pedĆ estal must be placed firmly on the floor to prevent the appliance from wobbling. Start with all four feet screwed in as far as possible, then back individual feet out as necessary to level the appliance. Move the feet as little as possible to help reduce vibration. 2. Use a bubble level (24" or less in length) to check the leveling status of the appliance (be sure the level fits between the edges of the appliance, and is not elevated at one end on a ridge on the surface of the appliance.) q Lay the bubble level across the unit worktop to check the level from side to side and from front to back. q A center-located bubble indicates the unit is leveled. Otherwise, repeat the leveling procedure until the unit is leveled. Tip: if the bubble is closer to one end, it indicates the high side of the unit. To level the unit, either lower the higher side or raise the lower side. q After leveling the unit from side to side, then turn the level so that it lays on the worktop from front to back to check if it is level in that direction. d CAUTION To avoid risk of injuries -Take care when using the wrench. q Loosen the lock nut (see Figure 17, item 1) by turning it clockwise. Use the wrench provided (or a 5/8" - 16mm open end wrench). When you turn the lock nut, the foot (see Figure 17, item 2) it is locked against will turn with it. This will extend the height of the foot. 6
-
 1
1 -
 2
2 -
 3
3 -
 4
4 -
 5
5 -
 6
6 -
 7
7 -
 8
8 -
 9
9 -
 10
10 -
 11
11 -
 12
12 -
13
-
14
-
15
-
16
-
17
-
18
-
19
-
20
-
21
-
22
-
23
-
24
 |
 |
