Bosch WTVC5330US Installation Instructions - Page 3
Notice, Warning - parts
 |
UPC - 825225874416
View all Bosch WTVC5330US manuals
Add to My Manuals
Save this manual to your list of manuals |
Page 3 highlights
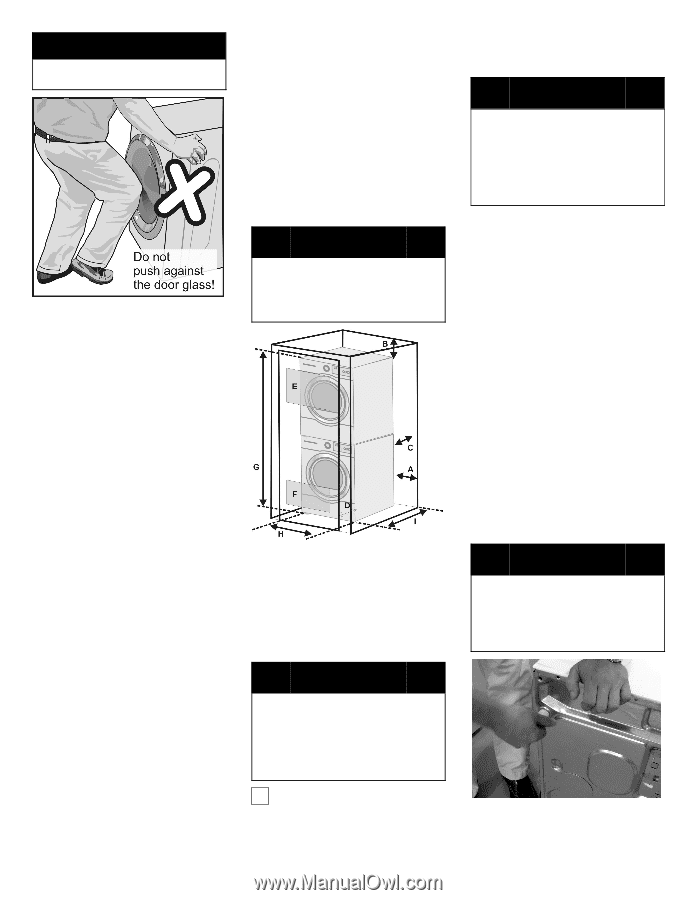
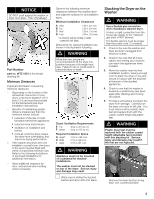
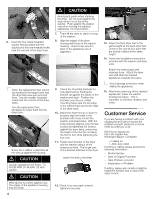
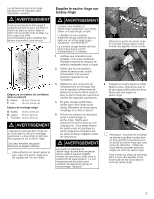
NOTICE DO NOT push against the washer or dryer door glass. Risk of breakage! Part Number part no. WTZ 1601 is the simple stacking kit. Minimum Distances Important information concerning minimum distances: - Depending on the location of the exhaust air connection of your dryer, a minimum distance of 5 ¼ inch (13.4 cm) must be provided for ducts/brackets (see dryer installation instructions). - Benefits of maintaining greater distance (clearances) than the minimum shown include: S reduction of the risk of mold formation behind the appliances. S reduced noise transmission S facilitation of installation and service. S more air cools the dryer, keeps the dryer from overheating, and improves drying performance. - If the washer and dryer are to be installed in a small room, the doors of the room must be fitted with vents of a specified minimum size. Refer to the following illustrations of enclosed installations for additional information. - Allow additional clearance for door, wall and window molding where necessary. Observe the following minimum clearances between the washer/dryer and adjacent surfaces for all installation types. Minimum Installation Clearances A Sides B Top C Rear* D Front 0.25 in. (6.4 mm) 0.25 in. (6.4 mm) 5.25 in. (13.4 cm) 0.50 in. (12.8 mm) * as close to wall as venting or water connection will allow. Dimensions for stacked installation are shown in the illustration following. d WARNING More than two people are recommended to lift the dryer into position because of its weight and size. Failure to do so could result in personal injury or death. Closet Ventilation Requirements E Top F Bottom 48 sq. in. (310 sq. cm) 24 sq. in. (155 sq. cm) Required Installation Space G Height* 74.50 in. (189.3 cm) H Width 27.50 in. (69.9 cm) I Depth 37.25 in. (85.1 cm) d WARNING Appliance must not be mounted on a pedestal for stacked installations. The washer must not be stacked on top of the dryer. Serious injury and damage may result. i Utilize care in sliding the stacked washer and dryer units into place. Stacking the Dryer on the Washer d WARNING Use a flexible gas connection when installing a stacked dryer. A hard, or rigid connection from the house gas supply to the stacked" gas dryer is NOT allowed. The flexible gas line must be longer than the power cord (1.5 meters). 1. Check to be sure the washer and dryer are both unplugged from electrical outlets. 2. Check to be sure that all hoses, cables and venting duct sections can reach the appliances when installed. 3. Move the washer near the final installation position, leaving enough room to stack the dryer on top and secure it in place with the brackets at the back of the stacked appliances. 4. Check to see that the washer is leveled as a preliminary step (level again after stacking and moving into place). 5. Provide a soft surface to protect the dryer from damage. Carefully turn the dryer over onto its left side. You must remove all four plastic dryer feet and replace them with the rubber coated height adjustable feet. d WARNING Plastic dryer feet must be replaced with the rubber coated height adjustable feet provided with this stacking kit. Serious injury and damage may result if the feet are not replaced. Remove the dryer feet by turning each one counterclockwise. 3
-
 1
1 -
 2
2 -
 3
3 -
 4
4 -
 5
5 -
 6
6 -
 7
7 -
 8
8 -
 9
9 -
10
-
11
-
12
 |
 |