Bose L1 Compact Portable Line Array Multilingual Owners Guide - Page 14
Setting the Channel 1 microphone controls, Setting the Channel 2 controls
 |
View all Bose L1 Compact Portable Line Array manuals
Add to My Manuals
Save this manual to your list of manuals |
Page 14 highlights
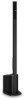
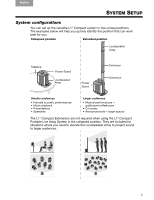
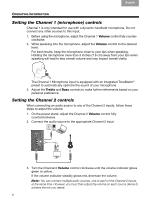
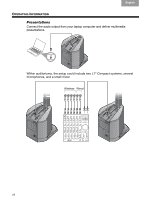
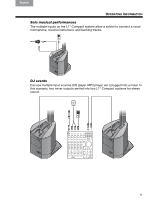
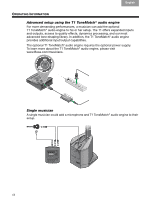
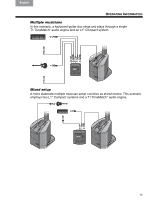
TAB TAB TAB TAB 4, 11 TAB 3, 10 TAB 2, 9, 16 English OPERATING INFORMATION Setting the Channel 1 (microphone) controls Channel 1 is only intended for use with a dynamic handheld microphone. Do not connect any other sources to this input. 1. Before using the microphone, adjust the Channel 1 Volume control fully counterclockwise. 2. While speaking into the microphone, adjust the Volume control to the desired level. For best results, keep the microphone close to your lips when speaking. Holding the microphone more than 3 inches (7.6 cm) away from your lips when speaking will lead to less overall volume and may impact overall clarity. The Channel 1 Microphone Input is equipped with an integrated ToneMatch® preset to automatically optimize the sound of your microphone. 3. Adjust the Treble and Bass controls to make further refinements based on your personal preference. Setting the Channel 2 controls When connecting an audio source to any of the Channel 2 inputs, follow these steps to adjust the volume. 1. On the power stand, adjust the Channel 2 Volume control fully counterclockwise. 2. Connect the audio source to the appropriate Channel 2 input. 3. Turn the Channel 2 Volume control clockwise until the volume indicator glows green or yellow. If the volume indicator steadily glows red, decrease the volume. Note: You can connect multiple audio sources, one to each of the Channel 2 Inputs, at the same time. However, you must then adjust the volume on each source device to achieve the mix you desire. 8
-
 1
1 -
2
-
3
-
4
-
5
-
6
-
7
-
8
-
 9
9 -
 10
10 -
 11
11 -
 12
12 -
 13
13 -
 14
14 -
 15
15 -
 16
16 -
 17
17 -
 18
18 -
 19
19 -
20
-
21
-
22
-
23
-
24
-
25
-
26
-
27
-
28
-
29
-
30
-
31
-
32
-
33
-
34
-
35
-
36
-
37
-
38
-
39
-
40
-
41
-
42
-
43
-
44
-
45
-
46
-
47
-
48
-
49
-
50
-
51
-
52
-
53
-
54
-
55
-
56
-
57
-
58
-
59
-
60
-
61
-
62
-
63
-
64
-
65
-
66
-
67
-
68
-
69
-
70
-
71
-
72
-
73
-
74
-
75
-
76
-
77
-
78
-
79
-
80
-
81
-
82
-
83
-
84
 |
 |