Bose Lifestyle 30 Series II Owner's guide - Page 19
Setting radio channel spacing for dual voltage and 120V systems, Installing the batteries in
 |
View all Bose Lifestyle 30 Series II manuals
Add to My Manuals
Save this manual to your list of manuals |
Page 19 highlights
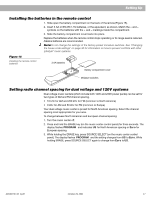
Setting Up Installing the batteries in the remote control 1. Slide open the battery compartment on the back of the remote (Figure 15). 2. Insert 3 AA or IEC-R6 1.5V batteries, or the equivalent, as shown. Match the + and - symbols on the batteries with the + and - markings inside the compartment. 3. Slide the battery compartment cover back into place. Replace the batteries when the remote control stops operating or its range seems reduced. Alkaline batteries are recommended. Note:Do not change the settings of the factory-preset miniature switches. See "Changing the house code settings" on page 32 for information on how to prevent conflicts with other Lifestyle® music systems. Figure 15 Installing the remote control batteries 3 AA batteries Battery compartment cover Miniature switches Setting radio channel spacing for dual voltage and 120V systems Dual voltage music centers (which include both 120V and 230V power packs) can be set for two types of AM and FM channel spacing. • 10 kHz for AM and 200 kHz for FM (common to North America) • 9 kHz for AM and 50 kHz for FM (common to Europe) Your dual voltage music center is preset for North American spacing. Select the channel spacing most appropriate for your area. To change between North American and European channel spacing: 1. Turn the music center off. 2. Press and hold the ERASE key (on the music center control panel) for three seconds. The display flashes PROGRAM and indicates US for North American spacing or Eur o for European spacing. 3. While holding the ERASE key, press SOURCE SELECT (on the music center control panel). The display flashes PROGRAM and the setting changes from US to Eur o. While holding ERASE, press SOURCE SELECT again to change from Eur o to US . AM199736_06_V.pdf October 29, 2001 17
-
 1
1 -
2
-
3
-
4
-
5
-
6
-
7
-
8
-
9
-
10
-
11
-
12
-
13
-
 14
14 -
 15
15 -
 16
16 -
 17
17 -
 18
18 -
 19
19 -
 20
20 -
 21
21 -
 22
22 -
 23
23 -
 24
24 -
25
-
26
-
27
-
28
-
29
-
30
-
31
-
32
-
33
-
34
-
35
-
36
-
37
-
38
-
39
-
40
-
41
-
42
-
43
 |
 |
