Bose Lifestyle 5 Owner's guide - Page 10
Connecting, additional, powered, speakers, Connections, Lifestyle°
 |
View all Bose Lifestyle 5 manuals
Add to My Manuals
Save this manual to your list of manuals |
Page 10 highlights
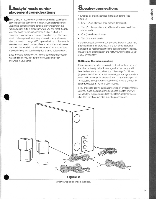
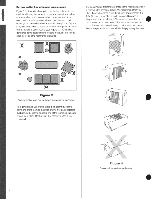
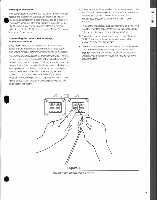
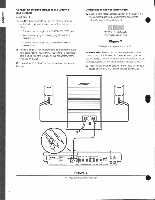
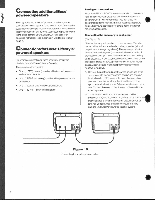
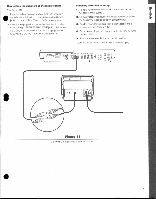
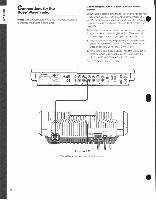
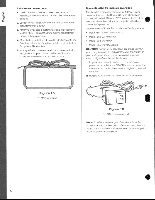
Connecting additional Bose" powered speakers Youmay adda second Bose' powered speaker system to your Lifestyle' music system. To connect an additional speaker system to your Lifestyle' music center, follow the instnictions in the previous section, but connect your second speaker system tothemusic center's SPEAKERSB OUTPUT jacks.For operating instructions, see "Listening in two different roans," Page 25. Connections for Bose Lifestyle° powered speakers For complete information on these speakers, consult the Lifestyle' powered speakers owner's guide. The speaker carton contains: • One (1) LEFT (powered) speaker with attached power cord and audio input cable • One(1)RIGHT(accessory) speaker with speaker terminals on the back • One(1) speaker cordwith two(2)conductors • One (1)50-foot (15 m) extension cable. CCCCC Setting up the speakers Place the LEFT' and RIGHT speakers as labeled on the left and right sides of your room, respectively. If you wish to use the speakers with aNorvideomonitor,you can place the speakers beside the monitor. They will not affect the picture quality. See your Bose' dealer for details about a variety of mounting accessories. Connecting the speakers to each other (See Figure 10) Note that the supplied speaker cordhas two wires. The wire marked with a stripe or a red collar is always positive (+), and the plain one is always negative (-). These correspond to the positive(red)andnegative(black) terminalson thebacksof the speakers. Always connect each wire to its corresponding terminal(positive to positive, negative tonegative).Tolengthen the supplied speaker cord, splice in cord of similar or thicker gauge. Again, be sure to connect positive to positive and negative to negative. 1. Connect the positive and negative wires on one end of the speaker cord to the corresponding positive and negative terminalson theLEFT speaker. Tomake the connection, push each terminal tab down, then insert the end of the appropriate wire into the hole. Release the tab to secure the wire. Connect the wires on the other end of the cord to the RIGHT speaker. 2. Check the connections to be sure they are positive to positive(+ to +)and negativetonegative(-to-).Make sure that no strands of wire from any terminal touch any other terminal. Bridged wires create short circuits that may damage your Lifestyle' powered speaker system. Figure 10 Connecting the speakers to each other. 10
-
 1
1 -
2
-
3
-
4
-
 5
5 -
 6
6 -
 7
7 -
 8
8 -
 9
9 -
 10
10 -
 11
11 -
 12
12 -
 13
13 -
 14
14 -
 15
15 -
16
-
17
-
18
-
19
-
20
-
21
-
22
-
23
-
24
-
25
-
26
-
27
-
28
-
29
-
30
-
31
-
32
-
33
-
34
-
35
 |
 |
