Boss Audio BV9372BI User Manual - Page 4
Basic Function, Wiring Diagram - car
 |
View all Boss Audio BV9372BI manuals
Add to My Manuals
Save this manual to your list of manuals |
Page 4 highlights
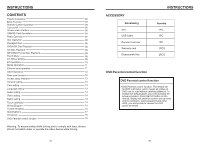
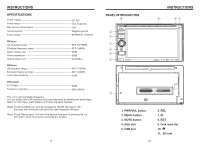
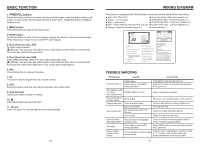
BASIC FUNCTION 1. PWR/VOL button Press this button will turn on power, during working longer press this button will turn off power, on any mode, shortly press will return main menu, rotate this button will adjust volume level. 2. MENU button Press this button to back to the main menu. 3. MUTE button Press this button to shut off sound output, repress this button to resume sound output; Press this button longer to turn on/off TFT LCD display. 4. Dual (front and rear) AUX To input external audio. Warning: You can only use either front or rear AUX at a time. Never connect both front and rear AUX at the same time. 5. Dual (front and rear) USB Insert USB removable device so as to read audio/video files. Warning: You can only use either front or rear USB at a time. Never connect both front and rear USB at the same time! This could cause malfunctions. 6. REL Press this button to release the panel. 7. IR To receive infrared signal from the remote control. 8. RST Press this button and this unit will be restored to the initial state. 9. Disk load slot Opening for disks to enter or retreat. 10. Press this button can eject the disc. 11. SD slot Insert SD card, the unit will play the files automatically. 03 WIRING DIAGRAM This player is equipped with ISO standard connector, please follow below instruction: ● Red - ACC ON (+12V) ● Grey/Grey black - Right front speaker (+/-) ● Yellow - 12 V Constant ● White/White black - Left front speaker (+/-) ● Black - Ground wire ● Purple/Purple black - Right rear speaker (+/-) ● Blue - Power Antenna / Remote Amp Turn On ● Green/Green black - Left rear speaker (+/-) ● Orange - Back-Up Camera Trigger (+) ● Parking Brake (-) E 5 DF V-OUT1 RL RR V-OUT2 C A M SW V-IN AUX-L AUX-R G3 G2 G1 G6 G5 G4 G9 G8 G7 ANT D -Media E1-Black Learning SWC GND E2-Brown Learning SWC E3- White Learning SWC E4-Dark grey with Red /White tip Front RCA output (Right Red Left White) E5-Rear USB Plug E6-BT MIC ANT-FM/AM antenna G1 - Red Rear RCA R output G2 - White Rear RCA L output G3 - Yellow VIDEO-OUT1 G4 - Brown Subwoofer output G5 - Yellow Rear view input G6 - Yellow VIDEO -OUT2 G7 - Red AUX R Audio input G8 - White AUX L Audio input G9 - Yellow Video input 1 3 5 7 9 1113 15 F 2 4 6 8 10 12 14 16 5 1.Black GND battery 2.Yellow BATT battery + 3.Red ACC switch control 4.Braking Wire 5.NC 6.CCD control 7.BlueANTRadio automaticantenna 8.NC 9.Purple RR+ rear right speaker + 10.Purple/black RR- rear right speaker - 11.Grey FR+ front right speaker + 12. Grey/black FR- front right speaker - 13.White FL+ front left speaker + 14.White/black FL- front left speaker - 15.Green RL+ rear left speaker + 16. Green/black RL- rear left speaker - TROUBLE SHOOTING PROBLEM CAUSE SOLUTION Check fuse Cannot power on Some factors cause MPU wrong operation Change fuse same as the old one Press RES button on the panel by penpoint, then, power on After ignition switch off, setting Change battery or fuse information all lose Poor performance Weak signal of radio station Cannot load disk There is a disk inside Disc is scratched Put wrong side of disc into Cannot play disc the unit Lens is dirty Reset information and save Move the car to another place, then research Remove disc before inserting another one Change new disc Insert in the disk with sign side up Clean lens by lens clean disc Cannot switch language/subtitle No image Cannot watch image during driving There is only one language/ subtitle in disc If disc is not with multi-language/subtitle, it cannot switch language/subtitle Other factors cause MPU wrong operation Press [RES] button on the panel by penpoint, then, power on Park the car in a safe place, put the car stall It's not allowed to watch image in " P " postion, pull up the hand brake, during driving parking brake wire must be grounded 16
-
 1
1 -
 2
2 -
 3
3 -
 4
4 -
 5
5 -
 6
6 -
 7
7 -
 8
8 -
 9
9 -
 10
10
 |
 |