Boss Audio MR6W User Manual - Page 2
Installation
 |
View all Boss Audio MR6W manuals
Add to My Manuals
Save this manual to your list of manuals |
Page 2 highlights
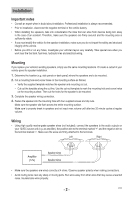
Installation Important notes • Consult an expert when in doubt about installation. Professional installation is always recommended. • Prior to installation, disconnect the negative terminal of the vehicle battery. • When installing the speakers, take into consideration the risks that can arise from devices being torn away in the case of an accident. Therefore, make sure the speakers are firmly secured and the mounting area is sufficiently stable. • If you must modify the vehicle for the speaker installation, make sure you do not impair the safety and structural integrity of the vehicle. • Before you drill or cut any holes, investigate your vehicle's layout very carefully. Take special care when you work near the fuel tank, fuel lines, hydraulic lines and electrical wiring. Mounting If you replace your vehicle's existing speakers, simply use the same mounting locations. Or create a cutout in your vehicle panel for speaker installation. 1. Determine the location (e.g. side panels or dash panel) where the speakers are to be mounted. 2. Cut a mounting hole and screw holes on the mounting surface as follows: • Verify the supplied template matches the speaker and mounting cut-out. • Cut out the template along the cut line. Use the cut-out template to mark the mounting hole and screw holes on the mounting surface. Then cut the holes for the speaker to be mounted. 3. Complete the speaker wiring connection. 4. Fasten the speaker into the mounting hole with four supplied screws and clip nuts. Make sure the speaker sits flush across the entire mounting surface. Make sure to properly break in speakers and not reach max volume until after two 20 minute cycles at regular volume. Wiring • Using high quality marine-grade speaker wires (not included), connect the speakers to the audio outputs on your 12VDC source unit (e.g. an amplifier), the positive wire to the terminal marked "+" and the negative wire to the terminal marked "-". Make sure the wires are firmly attached to the terminals. Left Right Amplifier (12V) Speaker wires Speaker wires • Make sure the speakers are wired correctly at 4 ohms. Observe speaker polarity when making connections. • Avoid routing wires near any sharp or moving parts. Run wires away from other wires that may cause unwanted noise. Insulate bare wires properly. - 2 - 0722
-
 1
1 -
 2
2
 |
 |
