Bowflex Xceed Assembly Manual - Page 11
Install Pulley, Install Squat Pulley Frame - assembly manual
 |
View all Bowflex Xceed manuals
Add to My Manuals
Save this manual to your list of manuals |
Page 11 highlights
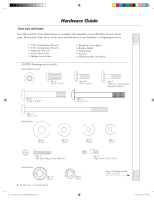
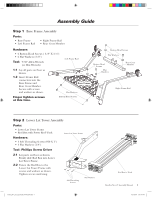
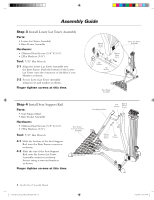
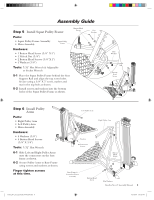
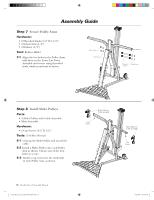
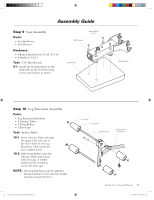
Assembly Guide Step 5 Install Squat Pulley Frame Parts: • Squat Pulley Frame Assembly • Main Assembly Squat Pulley Frame Hardware: • 1 Button Head Screw (3/8" X 5") • 1 Nylock Nut (3/8") • 2 Button Head Screws (3/8" X 1") • 4 Washers (3/8") Tools: 7/32" Hex Wrench & Adjustable or Socket Wrench 5-1 Place the Squat Pulley Frame behind the Seat Support Rail and align the top screw holes. Secure using a 3/8" X 5" screw, washer and nut in the top hole as shown. 5-2 Install screws and washers into the bottom holes of the Squat Pulley Frame as shown. Button Head Screws Flat Washers Flat Washers Nylock Nut Button Head Screw Step 6 Install Pulley Arms Parts: • Right Pulley Arm • Left Pulley Arm • Main Assembly Hardware: • 4 Washers (3/8") • 4 Button Head Screws (3/8" X 3/4") Tools: 7/32" Hex Wrench 6-1 Slide Left and Right Pulley Arms onto the connectors on the base frame as shown. 6-2 Secure Pulley Arms to Base Frame using screws and washers as shown. Finger tighten screws at this time. Left Pulley Arm Right Pulley Arm Washers Button Head Screws Button Head Screw Base Frame & Lower Lat Tower Assembly Button Head Screw Flat Washers Bowflex Xceed™ Assembly Manual 9 Costco_BFX_Xceed_AM_RevB 082206.indd 11 8/23/2006 3:30:23 PM
-
 1
1 -
2
-
3
-
4
-
5
-
 6
6 -
 7
7 -
 8
8 -
 9
9 -
 10
10 -
 11
11 -
 12
12 -
 13
13 -
 14
14 -
 15
15 -
 16
16 -
17
-
18
-
19
-
20
 |
 |
