Brother International 2600CN Driver Setup Guide for Macintosh - English - Page 2
Driver Installation Guide, For USB Users - hl printer
 |
UPC - 012502601579
View all Brother International 2600CN manuals
Add to My Manuals
Save this manual to your list of manuals |
Page 2 highlights
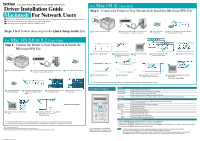
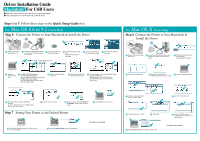
Driver Installation Guide Macintosh® For USB Users Follow the instructions in this guide for your operating system. Some illustrations are based on the HL-2600CN series. Steps 1 to 5 Follow these steps in the Quick Setup Guide first. For Mac OS 8.6 to 9.2 Users Only Step 6 Connect the Printer to Your Macintosh & Install the Driver For Mac OS X Users Only Step 6 Connect the Printer to Your Macintosh & Install the Driver 1 Make sure the printer power button is on. 2 Connect the USB interface cable to your Macintosh, and then connect it to your printer. 3 Insert the CD-ROM into your CD-ROM drive. 4 Double-click the Start Here! icon. Follow the instructions on the screen. 5 Click the Install Software icon on the Menu screen. 6 Follow the instructions on the screen. The illustrations are based on Mac OS 9.04. 1 Make sure the printer power button is on. 2 Connect the USB interface cable to your Macintosh, and then connect it to your printer. 3 Insert the CD-ROM into your CD-ROM drive. Open the Mac OS X folder. 7 Open the Macintosh HD icon. 8 For Mac OS 8.6 to 9.04 Users: Open the Apple Extras folder. Open the Apple LaserWriter Software folder. For Mac OS 9.1 to 9.2 Users: Open the Applications (Mac OS 9) folder. Open the Utilities folder. 9 Open the Desktop Printer Utility icon. 10 Select Printer (USB), and then click the OK button. 11 Click the Change... button in PostScriptTM Printer Description (PPD) file. Select Brother HL-2600CN BR-Script3 or HL-3450CN BR-Script3, and then click the Select button. 4 Open your language folder. 5 Double-click the Install icon. Follow the instructions on the screen. 6 Open the Macintosh HD icon. 12 Click the Change... button in USB Printer Selection. Select HL-2600CN series or HL-3450CN series, and then click the OK button. 13 Click the Create... button. 14 Enter your printer name (HL-2600CN or HL-3450CN), and then click the Save button. 15 Select Quit from the File menu. Step 7 Setting Your Printer as the Default Printer 1 Click the HL-2600CN series or HL-3450CN series icon on the Desktop. 2 Select Set Default Printer from the Printing menu. The setup is now complete. 7 Open the Applications folder. Open the Utilities folder. 8 Open the Print Center icon. 9 Click the Add Printer... button. 10 Select USB. 11 Select HL-2600CN series or HL-3450CN series, and then click the Add button. 12 Select Quit Print Center from the Print Center menu. The setup is now complete.
-
 1
1 -
 2
2
 |
 |
