Brother International 5100c Users Manual - English - Page 39
Is Step A Ok?, Yes 2.no, Cleaning, Press Fax Start - print head
 |
UPC - 012502565826
View all Brother International 5100c manuals
Add to My Manuals
Save this manual to your list of manuals |
Page 39 highlights
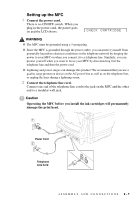
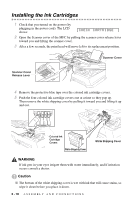
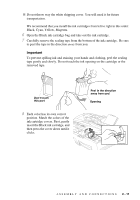
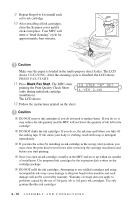
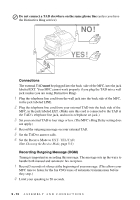
9 Repeat Steps 6 to 8 to install each color ink cartridge. 10 After installing all ink cartridges, close the Scanner cover until it clicks into place. Your MFC will enter a "head cleaning" cycle for approximately four minutes. Caution Make sure the paper is loaded in the multi-purpose sheet feeder. The LCD shows CLEANING. After the cleaning cycle is finished, the LCD shows PRESS FAX START. 11 Press Black Fax Start. The MFC starts printing the Print Quality Check Sheet (only during initial ink cartridge installation). The LCD shows: IS STEP "A" OK? 1.YES 2.NO 12 Follow the instructions printed on the sheet. Caution I DO NOT remove ink cartridges if you do not need to replace them. If you do so, it may reduce the ink quantity and the MFC will not know the quantity of ink left in the cartridge. I DO NOT shake the ink cartridges. If you do so, the ink may spill when you take off the sealing tape. If ink stains your body or clothing, wash with soap or detergent immediately. I If you mix the colors by installing an ink cartridge in the wrong color position, you must clean the print head several times after correcting the cartridge installation and before you start printing. I Once you open an ink cartridge, install it in the MFC and use it up within six months of installation. Use unopened ink cartridges by the expiration date written on the cartridge package. I DO NOT refill the ink cartridges. Attempting to use refilled cartridges and using incompatible inks may cause damage to the print head in this machine and such damage will not be covered by warranty. Warranty coverage does not apply to problems caused by the use of 3rd party ink or 3rd party ink cartridges. Use only genuine Brother ink cartridges. 2 - 12 A S S E M B L Y A N D C O N N E C T I O N S
-
 1
1 -
2
-
3
-
4
-
5
-
6
-
7
-
8
-
9
-
10
-
11
-
12
-
13
-
14
-
15
-
16
-
17
-
18
-
19
-
20
-
21
-
22
-
23
-
24
-
25
-
26
-
27
-
28
-
29
-
30
-
31
-
32
-
33
-
 34
34 -
 35
35 -
 36
36 -
 37
37 -
 38
38 -
 39
39 -
 40
40 -
 41
41 -
 42
42 -
 43
43 -
 44
44 -
45
-
46
-
47
-
48
-
49
-
50
-
51
-
52
-
53
-
54
-
55
-
56
-
57
-
58
-
59
-
60
-
61
-
62
-
63
-
64
-
65
-
66
-
67
-
68
-
69
-
70
-
71
-
72
-
73
-
74
-
75
-
76
-
77
-
78
-
79
-
80
-
81
-
82
-
83
-
84
-
85
-
86
-
87
-
88
-
89
-
90
-
91
-
92
-
93
-
94
-
95
-
96
-
97
-
98
-
99
-
100
-
101
-
102
-
103
-
104
-
105
-
106
-
107
-
108
-
109
-
110
-
111
-
112
-
113
-
114
-
115
-
116
-
117
-
118
-
119
-
120
-
121
-
122
-
123
-
124
-
125
-
126
-
127
-
128
-
129
-
130
-
131
-
132
-
133
-
134
-
135
-
136
-
137
-
138
-
139
-
140
-
141
-
142
-
143
-
144
-
145
-
146
-
147
-
148
-
149
-
150
-
151
-
152
-
153
-
154
-
155
-
156
-
157
-
158
-
159
-
160
-
161
-
162
-
163
-
164
-
165
-
166
-
167
-
168
-
169
-
170
-
171
-
172
-
173
-
174
-
175
-
176
-
177
-
178
-
179
-
180
-
181
-
182
-
183
-
184
-
185
-
186
-
187
-
188
-
189
-
190
-
191
-
192
-
193
-
194
-
195
-
196
-
197
-
198
-
199
-
200
-
201
-
202
-
203
-
204
-
205
-
206
-
207
-
208
-
209
-
210
-
211
-
212
-
213
 |
 |
