Brother International 7050C Users Manual - English - Page 217
Cleaning the Ink Heads, Installing or Replacing Ink Cartridges
 |
UPC - 012502564096
View all Brother International 7050C manuals
Add to My Manuals
Save this manual to your list of manuals |
Page 217 highlights
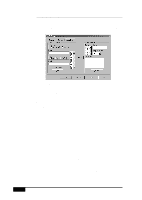
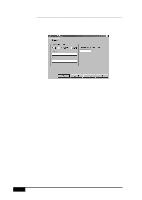
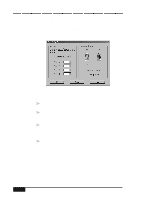
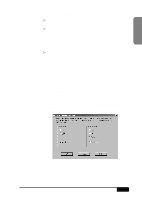
Remote Setup See Cleaning the Ink Cartridges p. 2-15 Cleaning the Ink Heads 1 Click the Clean Ink Heads button to print the Head Cleaning Page. 2 Compare the section of thin, diagonal, horizontal, color lines at the top of the page with those at the bottom of the page. (The top lines printed before cleaning; the bottom lines printed after cleaning.) See if there are any breaks in the lines at the bottom of the page. A broken line indicates clogged ink nozzles. 3 If the lines at the bottom of the page have fewer breaks or better print quality than the top lines, repeat Steps 1 and 2 two or more times. If the print quality is satisfactory after running the test three times, the ink nozzles are clean-OR- If the print quality is not improved, you will have to clean the ink cartridges manually. Installing or Replacing Ink Cartridges Each ink cartridge has its own correct position. The Color ink cartridge must be in the left-slot and the Black (or Photo) ink cartridge must be in the right-slot. Match the color indicators on the ink cartridge and the cartridge carrier. To install or replace ink cartridges, click the Install/Remove Cartridges... button. The Installed Cartridge Condition screen will appear: Click the OK button to save your settings. BROTHER CONTROL PANEL 21- 13
-
 1
1 -
2
-
3
-
4
-
5
-
6
-
7
-
8
-
9
-
10
-
11
-
12
-
13
-
14
-
15
-
16
-
17
-
18
-
19
-
20
-
21
-
22
-
23
-
24
-
25
-
26
-
27
-
28
-
29
-
30
-
31
-
32
-
33
-
34
-
35
-
36
-
37
-
38
-
39
-
40
-
41
-
42
-
43
-
44
-
45
-
46
-
47
-
48
-
49
-
50
-
51
-
52
-
53
-
54
-
55
-
56
-
57
-
58
-
59
-
60
-
61
-
62
-
63
-
64
-
65
-
66
-
67
-
68
-
69
-
70
-
71
-
72
-
73
-
74
-
75
-
76
-
77
-
78
-
79
-
80
-
81
-
82
-
83
-
84
-
85
-
86
-
87
-
88
-
89
-
90
-
91
-
92
-
93
-
94
-
95
-
96
-
97
-
98
-
99
-
100
-
101
-
102
-
103
-
104
-
105
-
106
-
107
-
108
-
109
-
110
-
111
-
112
-
113
-
114
-
115
-
116
-
117
-
118
-
119
-
120
-
121
-
122
-
123
-
124
-
125
-
126
-
127
-
128
-
129
-
130
-
131
-
132
-
133
-
134
-
135
-
136
-
137
-
138
-
139
-
140
-
141
-
142
-
143
-
144
-
145
-
146
-
147
-
148
-
149
-
150
-
151
-
152
-
153
-
154
-
155
-
156
-
157
-
158
-
159
-
160
-
161
-
162
-
163
-
164
-
165
-
166
-
167
-
168
-
169
-
170
-
171
-
172
-
173
-
174
-
175
-
176
-
177
-
178
-
179
-
180
-
181
-
182
-
183
-
184
-
185
-
186
-
187
-
188
-
189
-
190
-
191
-
192
-
193
-
194
-
195
-
196
-
197
-
198
-
199
-
200
-
201
-
202
-
203
-
204
-
205
-
206
-
207
-
208
-
209
-
210
-
211
-
 212
212 -
 213
213 -
 214
214 -
 215
215 -
 216
216 -
 217
217 -
 218
218 -
 219
219 -
 220
220 -
 221
221 -
 222
222 -
223
-
224
-
225
-
226
-
227
-
228
-
229
-
230
-
231
-
232
-
233
-
234
-
235
-
236
-
237
-
238
-
239
-
240
-
241
-
242
-
243
-
244
-
245
-
246
-
247
-
248
-
249
-
250
-
251
-
252
-
253
-
254
-
255
-
256
-
257
-
258
-
259
-
260
-
261
-
262
-
263
-
264
 |
 |
