Brother International ADS-3300W BR-Receipts Users Guide Windows - Page 8
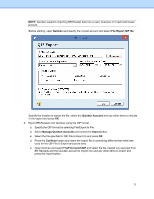
Delimited by, Comma, Space, with double quotes, Continue, Export to QIF, Export to QuickBooks
 |
View all Brother International ADS-3300W manuals
Add to My Manuals
Save this manual to your list of manuals |
Page 8 highlights
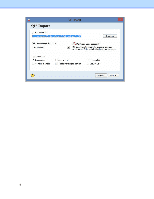
• Delimited by - Under Delimited by, select Comma, Tab, or Space to choose the character that will separate fields in the exported file. • Select with double quotes to have the information for each field enclosed in quotation marks. d. When you select export to QIF, a dialog box will open to let you manage Quicken Accounts first. You can import available Quicken accounts, or you can edit or delete accounts. When the Quicken accounts are ready, enter a file name and click Continue to finish. NOTE: In order to export to a QIF file, you must first create a QIF file using the Export to QIF setting in Quicken. e. When you select Export to QuickBooks, you must enter Debit Account and Credit Account details to continue. 6. Export to Cloud To export to cloud, do one of the following: • Right-click a receipt box or folder and choose Export to Cloud from the context menu. • Select a receipt box or folder and click on the toolbar. • Choose Export to Cloud from the File menu to open the BOL log in dialog box. Enter an e-mail address and password to connect your Brother Online (BOL) account. appears, indicating that you can now send receipt images to the cloud from your local computer. You can click to monitor the uploading status. When you export successfully, will appear in the status bar. NOTE: If you select a receipt box to upload, all the folders in this receipt box will be uploaded. 7. Create Reports Reports let you see where receipts originated, how goods and services were paid for, and who is responsible for receipts. For more information, see Creating Reports. 8. Set up the Quicken Export File for BR-Receipts 4
-
 1
1 -
2
-
 3
3 -
 4
4 -
 5
5 -
 6
6 -
 7
7 -
 8
8 -
 9
9 -
 10
10 -
 11
11 -
 12
12 -
 13
13 -
14
-
15
-
16
-
17
-
18
-
19
-
20
-
21
-
22
-
23
-
24
-
25
-
26
-
27
-
28
-
29
-
30
-
31
-
32
 |
 |
