Brother International BA-10 Network Users Manual - English - Page 25
Control, circuit, board, adjustments
 |
View all Brother International BA-10 manuals
Add to My Manuals
Save this manual to your list of manuals |
Page 25 highlights
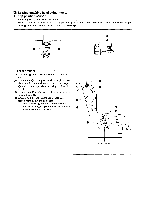
6. Control circuit board adjustments VR1 adjustment (carrier motor speed) ON S9* CROSSOVER STITCHES go° C(4` NBNULL F-57/1. TROUBLE brother BA-10 on00000000i OCHOODOC0006 e gP,22222. 0000000 1. Remove the screws and remove the feeder cover Q. 0 0 00 2. Turn the feeder panel switch (0 off. 3. Hold feeder panel switch depressed and press the power switch. 4. The button transport arm will work, and the trouble indicator Q will indicate the carrier motor speed as shown below. Trouble lamp Q out Slow Trouble lamp Q blinking Normal Trouble lamp Q on Fast 5. If the carrier motor speed is slow, turn VR1 Q right to increase the speed; if motor speed is fast, turn VR1 to the left to decrease the speed. Repeat step and continue adjusting until a "Normal" speed is indicated by a blinking trouble indicator. * Sewing is not possible immediately after this adjustment. First bet the sewing machine power switch to off and then on again to sew. * Be sure to reset feeder panel switch Q to ON again.
-
 1
1 -
2
-
3
-
4
-
5
-
6
-
7
-
8
-
9
-
10
-
11
-
12
-
13
-
14
-
15
-
16
-
17
-
18
-
19
-
 20
20 -
 21
21 -
 22
22 -
 23
23 -
 24
24 -
 25
25 -
 26
26 -
 27
27 -
 28
28 -
 29
29 -
 30
30 -
31
-
32
-
33
-
34
-
35
 |
 |
