Brother International BAS-300G Basic Instruction Manual - English - Page 15
<BAS-300G>, <BAS-311G, 326G>, Move the work clamp arm all the way
 |
View all Brother International BAS-300G manuals
Add to My Manuals
Save this manual to your list of manuals |
Page 15 highlights
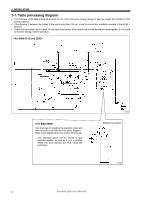
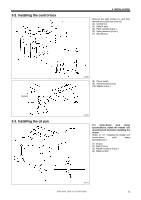
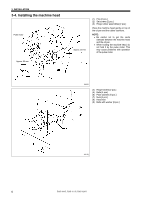
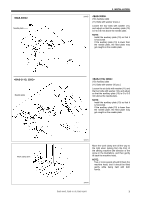
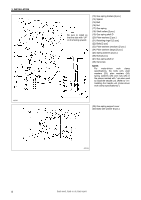
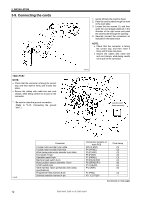
Needle plate 3. INSTALLATION 2698B (10) Auxiliary plate (11) Bolts with washer [4 pcs.] Loosen the four bolts with washer (11), and adjust so that the auxiliary plate (10) is 0 to 0.5 mm above the needle plate. NOTE: Install the auxiliary plate (10) so that it is horizontal. If the auxiliary plate (10) is lower than the needle plate, the feed plate may get caught on the needle plate. Needle plate (10) Auxiliary plate (11) Bolts with washer [10 pcs.] Loosen the six bolts with washer (11) and the four bolts with washer (12), and adjust so that the auxiliary plate (10) is 0 to 0.5 mm above the needle plate. NOTE: Install the auxiliary plate (10) so that it is horizontal. If the auxiliary plate (10) is lower than the needle plate, the feed plate may get caught on the needle plate. Work clamp arm 2697B Move the work clamp arm all the way to the right when looking from the front of the sewing machine (the direction of the arrow in the illustration), and then gently tilt back the machine head. NOTE: Two or more people should tilt back the machine head, and it should be tilted gently while being held with both hands. 2969B BAS-300G, BAS-311G, BAS-326G 7
-
 1
1 -
2
-
3
-
4
-
5
-
6
-
7
-
8
-
9
-
 10
10 -
 11
11 -
 12
12 -
 13
13 -
 14
14 -
 15
15 -
 16
16 -
 17
17 -
 18
18 -
 19
19 -
 20
20 -
21
-
22
-
23
-
24
-
25
-
26
-
27
-
28
-
29
-
30
-
31
-
32
-
33
-
34
-
35
-
36
-
37
-
38
-
39
-
40
-
41
-
42
-
43
-
44
 |
 |
