BAS-311F-0, 311F-L, 326F-0
CONTENTS
1. NAME OF MAJOR PARTS
..........................................................................................................
1
2. SPECIFICATIONS
...................................................................................................................................
2
3. INSTALLATION
...........................................................................................................................................
3
3-1. Table processing diagram
...............................................................................................................................................
4
3-2. Positioning
..........................................................................................................................................................................
4
3-3. Installing the control box
..................................................................................................................................................
5
3-4. Installing the rubber cushions
........................................................................................................................................
6
3-5. Installing the oil pan
..........................................................................................................................................................
6
3-6. Installing the cushions
......................................................................................................................................................
7
3-7. Installing the switching plate
...........................................................................................................................................
7
3-8. Installing the machine head
............................................................................................................................................
8
3-9. Tilting the sewing machine head
...................................................................................................................................
9
3-10. Connecting the ground wire
.......................................................................................................................................
11
3-11. Connecting the cords (Installing the operation panel)
..........................................................................................
11
3-12. Installing the belt cover
................................................................................................................................................
14
3-13. Installing the foot switch
...........................................................................................................................................
14
3-14. Installing the spool stand
.............................................................................................................................................
14
3-15. Installing the eye guard
...............................................................................................................................................
15
3-16. Installing the programmer (option)
............................................................................................................................
16
3-17. Installing the work clamp lifter connecting rod (BAS-311F-0 solenoid type only)
..................................
16
3-18. Installing the feed base cover supports (BAS-311F-L, 326F-0)
.........................................................................
17
3-19. Installing the X feed base cover (BAS-311F-L, 326F-0)
...................................................................................
17
3-20. Connecting the tubes (pneumatic type only)
..........................................................................................................
18
3-20-1. Installing the air unit
...................................................................................................................................................
19
3-20-2. Adjusting the speed controller
................................................................................................................................
19
4. LUBRICATION
..............................................................................................................................................
20
5. CORRECT OPERATION
.................................................................................................................
21
5-1. Selecting the needle and thread
..................................................................................................................................
21
5-2. Installing the needle
........................................................................................................................................................
21
5-3. Threading the upper thread
..........................................................................................................................................
22
5-4. Winding the lower thread
..............................................................................................................................................
23
5-5. Replacing the bobbin case and threading the thread
.............................................................................................
24
5-6. Sewing conditions and thread tension
.......................................................................................................................
24
5-6-1. Sewing conditions
.....................................................................................................................................................
24
5-6-2. Lower thread tension
................................................................................................................................................
25
5-6-3. Upper thread tension
................................................................................................................................................
25
5-6-4. Thread take-up spring height
...................................................................................................................................
25
5-6-5. Thread take-up spring tension
..................................................................................................................................
25
5-6-6. Adjusting arm thread guide R
....................................................................................................................................
25
6. USING THE OPERATION PANEL
....................................................................................
26
6-1. Explanation of panel
.......................................................................................................................................................
26
6-2. Using the floppy disk
......................................................................................................................................................
28
6-3. Using the program R/W (Read/Write) switch
...........................................................................................................
30
6-4. Using the TEST switch (Checking the sewing pattern)
..........................................................................................
31
6-5. Using the emergency stop switch
...............................................................................................................................
32
6-6. Adjusting the sewing SPEED control
.......................................................................................................................
33
6-7. Changing the X-SCALE and Y-SCALE settings
......................................................................................................
33

 1
1 2
2 3
3 4
4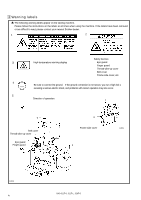 5
5 6
6 7
7 8
8 9
9 10
10 11
11 12
12

