Brother International BAS-612 Instruction Manual - English
Brother International BAS-612 Manual
 |
View all Brother International BAS-612 manuals
Add to My Manuals
Save this manual to your list of manuals |
Brother International BAS-612 manual content summary:
- Brother International BAS-612 | Instruction Manual - English - Page 1
AUTOMATIC LOCK STITCH POCKET WELT SEWER (FOR FLAP ATTACHMENT) AUTOMATIC LOCK STITCH SLANT POCKET WELT SEWER (FOR FLAP ATTACHMENT) brother INSTRUCTION MANUAL BAS-610 BAS-611 BAS-612 xb - Brother International BAS-612 | Instruction Manual - English - Page 2
start and sewing end due to needle bar engage-and -disengage movement. 3 :/-7,.xiAki, Condense stitching YO: 1•0 V-backtack sewing X :/ -7" 2 &to -Do -C gmfaq,e, R < 71:5 o X Please refer to instruction manual for condense stitching. - Brother International BAS-612 | Instruction Manual - English - Page 3
> 26 26 27 CENTER KNIFE POSITION ADJUSTMENT 28 CORNER KNIFE POSITION ADJUSTMENT 29 _4•P SENSOR SENSITIVITY ADJUSTMENT (BAS-611,BAS-612) 30 - _ -g the flap sensor sensitivity> 30 ustments> 31 - Brother International BAS-612 | Instruction Manual - English - Page 4
TROUBLE 32 32 32 33 TO TIMER SWITCH CONTROL 48 PROGRAMING THE CARRIAGE FEED RESET TIMER 50 MEMORY INITIALIZATION 51 ERROR CODES 52 TROUBLE-SHOOTING 53 - Brother International BAS-612 | Instruction Manual - English - Page 5
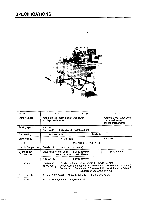
Flap sewing Slant-welting Needle Needle Gauge size Seam length t. ocket size) Stich length =:.frrer supply : - e-isions 151-610 151-611 151-612 Automatic lock stitch pocket welt sewer (for flap attachment) Automatic lock stitch slant pocket welt sewer (for flap attachment) 2,500 sp (variable - Brother International BAS-612 | Instruction Manual - English - Page 6
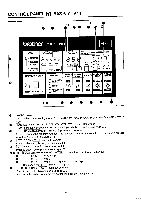
PROGRA MMING NUMBEF AUTOMATIC • MANUAL • PROGRAM • KNFE CHANGE & CYCLE PGM. 12 34 5 ©OOOO SELECT - SET - CLEAR -CYCLE PGM 0 SEAM LENGT OBBIN OUNTER SE =410 BOBBIN COUNTER I • r r r I • M/M E SET r I- 1 I Ie I I OOO SELECT NO.1 NO.2 NO.3 EMERGENCY STOP I TROUBLE CORNER KNIFE CENTER KNIFE - Brother International BAS-612 | Instruction Manual - English - Page 7
FEED forward/backward switch Set to ADVANCE to move the carriage feed away from the operator. Use simultaneously with THREAD TRIMMER switch Use in either MANUAL or AUTOMATIC mode when the carriage feed is at the thread trimming position. Set to UPPER to lower the needle thread knife unit and then - Brother International BAS-612 | Instruction Manual - English - Page 8
CONTROL PANEL [2] BAS-612 22 • IL' I On BAS-61 SLANT PROGRAM L CT SEAM LENGTH SIDE R 0 o== LO = S M/M WER M/M MODE DiOMATI • 0 • CE SET SELECT I I 1101 NO.2 NO.3 EMERGENCY STOP BOBBIN COUNTER SET TROUBLE O UPPER THREAD BREAKAGE O BOBBIN EMPTY O PROGRAMMING ERROR CORNER KNIFE O CENTER - Brother International BAS-612 | Instruction Manual - English - Page 9
correction. 0 : The center knife moves to the extreme outer position. 9 The center knife S moves to the extreme 0 9 inner position. 9 0 BAS-611 and BAS-612 only (IP FLAP SENSOR - LEFT indicator The indicator illuminates when the left flap sensor detects the material. 4) I FLAP SENSOR - RIGHT - Brother International BAS-612 | Instruction Manual - English - Page 10
. 0€ INSTALLATION [1] 1. Setting-up the table • Set the machine table level. Loosen nut 0 and adjust the height by turning caster 0 . • Lock the casters so that the table will not move. Lower lever to lock caster 0 . To move the table again, lower lever 0 . 2. Connecting the treadle • Remover - Brother International BAS-612 | Instruction Manual - English - Page 11
5. Adjusting the air pressure O Open Close 1. The standard operating air pressure is 5 kg/cm2. Adjust the air pressure by turning handle 2. If water collects in bottle 0 close air cock 0 and then turn drain cock 0 slowly in the arrowed direction to drain the water. * Be sure to close drain cock 0 - Brother International BAS-612 | Instruction Manual - English - Page 12
Lubrication [2] Before initial use of the machine or after a long period of no use, be sure to add a drop or two of oil at the arrowed points. ( I O • • -8- - Brother International BAS-612 | Instruction Manual - English - Page 13
CORRECT OPERATION [1] 6 (.6 e e 1. Set power switch 0 to ON. 2. Place empty bobbin 0 onto bobbin winder shaft 0 . 3. Thread the thread from the spool stand as illustrated and wind the thread end around bobbin 0 for five to six turns. 4. Move lever in the arrowed - Brother International BAS-612 | Instruction Manual - English - Page 14
will flash. 2. Press EMERGENCY STOP switch 0 (an alarm will sound twice). Carriage feed 0 will move to the home position. 3. Set MODE selector 0 to MANUAL 4. Set CARRIAGE FEED switch 0 to FORWARD to advance the carriage feed. * To fast-advance the carriage feed to the thread trimming position, set - Brother International BAS-612 | Instruction Manual - English - Page 15
[Threading the needle threads] • Thread the needle threads. ft F. I6 • ►►►► ► 0 ► 7 di -11- - Brother International BAS-612 | Instruction Manual - English - Page 16
50 mm of thread through the hole at the end of tension spring 4. Insert the bobbin case into the rotary hook. .0 . 0 . 9 BAS-612 B 0 50mm e 1. Insert bobbin 0 into bobbin case 0 . 4 2. Thread the thread through notch A and then under tension spring . 3. Thread the thread through notches - Brother International BAS-612 | Instruction Manual - English - Page 17
plates. 2. Set CARRIAGE FEED switch 0 to BACKWARD to return the carriage feed. * To fast-return the carriage feed to the home position, set MODE selector 0 MANUAL. to any position but CARRIAGE FEED FORWARD MODE AUTOMATIC - Brother International BAS-612 | Instruction Manual - English - Page 18
has operated. • Set the MODE selector either to AUTOMATIC or to MANUAL. 1. Press treadle 0 backwards to raise padding 0 to operate the carriage feed. * If the MODE selector is set to MANUAL, the carriage feed will operate without actual sewing. * The sequence of carriage feed - Brother International BAS-612 | Instruction Manual - English - Page 19
• When running a flap program, the machine will not operate on pressing the start switch unless the flap presser lowers. • For standard sewing, the machine will operate on pressing the start switch after the folding plate has operated. 1. Press treadle 0 backward to raise - Brother International BAS-612 | Instruction Manual - English - Page 20
MARKING LIGHT ADJUSTMENT Adjust the focus before positioning the material. 1. Set power switch 0 to ON to turn on the marking lights. 2. Loosen screw 0 and move lens hood 0 up or down until the "+" mark is projected sharply on the material. * Adjust the sewing start position - Brother International BAS-612 | Instruction Manual - English - Page 21
is set to OFF without moving the selector. 5. Set MODE selector 0 to AUTOMATIC to sew. Program 7 100 125 MODE r`s-A,diPNRUOMGBREARMMING AUTOMATIC • MANUAL • PROGRAM 12 345 00000 SELECT -SET--CLEAR- • KNIFE CHANGE & CYCLE PGM. "UM -CYCLE RCM.- °SEAM BOBBIN `-'LENGTH COUNTER SET IInsnm - Brother International BAS-612 | Instruction Manual - English - Page 22
Program) • Flap sewing programming is not available for BAS-610 machines. • Set the MODE selector to the flap (see page 15 for setting a flap). 5. Press start switch Q . MODE 'PROGRAMMING NUMBER • AUTOMATIC • MANUAL • PROGRAM • PONE OWGE & CYCLE PGM. 1234 5 O a) SELECT - SET - CLEAR - L - CYCLE - Brother International BAS-612 | Instruction Manual - English - Page 23
6. The carriage feed advances 40 mm after the flap sensor detects the flap edge. The BOBBIN COUNTER DISPLAY shows "40.0" as the distance of travel after detecting the material edge. 7. Operate CARRIAGE FEED FORWARD/BACKWARD switch 0 to move the carriage feed so that the flap edge is at the sewing - Brother International BAS-612 | Instruction Manual - English - Page 24
0 PROGRAMMING (Inputting a Cycle Sewing Program) • CYCLE PGM. allows a maximum of any six combinations from program numbers 1 to 5 . • See the preceding pages to set standard or flap sewing programs for program numbers 1 to 5 . To seta 1 -> 2 -> 1 -› 3 sewing - Brother International BAS-612 | Instruction Manual - English - Page 25
. The sewing program sequence is shown on the SEAM LENGTH and BOBBIN COUNTER displays. MODE _ApROGRAMMING ATANUMBER L • AUTOMATIC 1 2 3 4 5 - • MANUAL • PROGRAM © 0 000 SELECT - SET - CLEAR -1 • KNIFE CHANGE - & CYCLE PGM. - CYCLE PGM.- iw ac--)) SEAM \=-'-' LENGTH i -, I / S >-< I BOBBIN - Brother International BAS-612 | Instruction Manual - English - Page 26
II II II II IrrE I LI L S Ef j 5 • • BAS -612 P WER SLANT PROGRAM EEL ICT SEAM LENGTH SIDE I R 00000 S E MANUAL • PROGRAM • KNEE CHANGE CYCLE PGIA. 1 2 3 4 5 Or O O SELECT SET - CLEAR I I- CYCLE PGM. S >- M/M SET SELECT 0 0 0 NOT NO.2 NO.3 EMERGENCY STOP BOBBIN COUNTER SET TROUBLE - Brother International BAS-612 | Instruction Manual - English - Page 27
than 10 mm. LI. - > l Own 1. 1.mm 4 mm S "L 100m11 E txother BAB-612 0 POWER SLANT PROGRAM SELECT SEAM LENGTH SIDE j R L C S mime N. in o S M/M E I I M/M MODE 'PROGRAMMING NUMBER • AUTOMATIC MANUAL • PROGRAM 1 ,2 3 4 5 -0 0 0 SELECT SET -CLEAR • KNEE CHANGE & CYCLE PGM. 1-- CYCLE - Brother International BAS-612 | Instruction Manual - English - Page 28
if EMERGENCY STOP switch 0 is pressed at steps 5 to 7 with the carriage feed at halt. 0 MODE et,PROGRAMMING II, NUMBER • AUTOMATIC • MANUAL • PROGRAM 12 34 5 0 0 0 © ©I SELECT - SET - CLEAR • KNIFE CHANGE & CYCLE PGM. -CYCLE PGM.-1 O I EMERGENCY STOP STACKER ON BOBBIN COUNTER SET OFF - Brother International BAS-612 | Instruction Manual - English - Page 29
(see pages 20 and 34). 5. Position the material. 5. Press start switch 0 . The machine will carry out the selected automatic sewing programs. MODE AUTOMATIC MANUAL • PROGRAM • KNIFE CHANGE Si CYCLE PGM. EMERGENCY STOP BIN COUNTER SET CORNER KNIFE CENTER KNIFE STACKER ON ON ON OFF OFF OFF - Brother International BAS-612 | Instruction Manual - English - Page 30
on the BOBBIN COUNTER display). The flashing BOBBIN COUNTER SET indicator will go off. 1 MODE om PROGRAMMING NUMBER • AUTOMATIC • MANUAL • PROGRAM • KNIFE CHANGE & CYCLE PGM. 1 2 3 4 5 O O ©go LI SELECT - SET - CLEAR1 __ - CYCLE PGM. -4. (n)SEAM _•AB0B8 N ',=1LENGTH >,f'--(COUNTER SET BOBBIN - Brother International BAS-612 | Instruction Manual - English - Page 31
1. Bobbin thread tension e • The bobbin thread tension varies with the material and thread. Turn tension regulating screw 0 to adjust the tension. The standard tension is 40 to 50 g for medium-thick to thick materials when sewing with #50 spun yarn. O 2. Needle - Brother International BAS-612 | Instruction Manual - English - Page 32
CENTER KNIFE POSITION ADJUSTMENT • Adjust the center knife positional correction value to suit the material thickness. The higher the center knife position number, the farther inside the knife is positioned. Ex.: To change the sewing-start value S from 0 to 3 and the sewing-end value E from 0 to 4 - Brother International BAS-612 | Instruction Manual - English - Page 33
knife will not operate if the CORNER KNIFE switch is set to ON with the CENTER KNIFE switch set to OFF. LMODE AUTOMATIC MANUAL • PROGRAM • KNIFE CHANGE IL CYCLE PGM. 6=-,\ PROGRAMMING ty NUMBER 12 34 5 0 0 0 0 0 SELECT .- SET - CLEAR CYCLE PGM 69 SEAM n, B0BB N `"-9- LENGTH `="C0UNTER SET BOBBIN - Brother International BAS-612 | Instruction Manual - English - Page 34
FLAP SENSOR SENSITIVITY ADJUSTMENT (BAS-611, BAS-612) 1. Set MODE selector 0 to PROGRAM and set the seam length to 190 mm. 2. Set MODE selector 0 to MANUAL. 3. Position the material so as not to cause wear to the rubber cushion on the back of the carriage - Brother International BAS-612 | Instruction Manual - English - Page 35
11 1. With the reflector positioned below the sensor, turn sensitivity controls 0 and 0 to obtain the boundary position where FLAP SENSOR indicators 6) and 43 are between on and off. 2. Turn the controls another 45° clockwise from the boundary position. 3. Position a piece - Brother International BAS-612 | Instruction Manual - English - Page 36
indicator illuminating> EMERGENCY STOP * BOBS N COUNTER SET TROUBLE UPPER THREAD BREAKAGE O BOBBIN EMPTY (v",.-.r-.-mji PROGRAMMING of work pieces for the bobbin (see page 261. 2. Set MODE selector 0 to MANUAL 3. Set CARRIAGE FEED switch 0 to FORWARD to advance the carriage feed. 4. Replace - Brother International BAS-612 | Instruction Manual - English - Page 37
36 to 190 mm for a gauge width of 16 to 20 mm). • BAS-612 machines: The indicator will illuminate if the following are programmed: Seam length of less • An indicator illuminating in the AUTOMATIC or MANUAL mode Trouble has occurred in the input data. Input the data in the PROGRAM mode. ON - Brother International BAS-612 | Instruction Manual - English - Page 38
•=ij - am. . I ° "t,: S >-----C E Mari SET - a - . SELECT CD 0 0 NO.1 NO.2 N0.3 [ MODE 43FtitCaa1MMING ©Nil% ©COVER RET 0.10. BOBBIN COUNTER • AUTOMATIC • MANUAL • PR0GRMA • KNEE CHANGE & CYCLE PGM. 12 345 00000 SELECT - SET - CLEAR - CYCLE PGM.- i g I a, S >---44 li fi Wm E SET - Brother International BAS-612 | Instruction Manual - English - Page 39
[1] (Machine Head) < Fitting a needle > BAS-610 BAS-611 BAS- 612 • Loosen screw 0 and insert needle Q all needle and rotary hook point] with the arm Rotary hook point -\\ Needle 8 (rf Max. 0.05 mm Guide plate 0 1. Loosen screws A , B , C and D and move the rotary hook base 0 sideways - Brother International BAS-612 | Instruction Manual - English - Page 40
STANDARD ADJUSTMENTS [2] [Clearance between the rotary hook and needle plate] 0 T 0.6 to 0.9 mm • Loosen setscrews 0 and adjust the clearance between rotary hook 0 and needle plate 0 to 0.6 to 0.9 mm by moving rotary hook 0 vertically. [Needle bar lift stroke and needle bar height] Needle to 1.5 - Brother International BAS-612 | Instruction Manual - English - Page 41
CARRIAGE FEED ADJUSTMENTS [1] 1. Set the carriage feed to the stop position. Move the carriage feed and make sure that the needle and the carriage feed are parallel as illustrated below: O O arallel (Adjustment) * Loosen bolts Q and move - Brother International BAS-612 | Instruction Manual - English - Page 42
CARRIER FEED ADJUSTMENTS [2] < Carriage feed height adjustment> • Make sure that the carriage feed height is about 20 mm at the front edge at the home position. 20mm O- 20mm (Adjustment) Loosen nut 0 and adjust the height with bolt 0 . Loosen the bolt to raise the carriage feed and tighten the - Brother International BAS-612 | Instruction Manual - English - Page 43
to leave the same clearance to the front and rear under the bottom of binder 0 . 3. Make sure that the clearance between the bottom of cloth guide and the top of binder 0 is approximately 1 mm. (Adjustment) Loosen nut Q and adjust bolt Q) . Tighten bolt (ID to raise the binder and loosen the - Brother International BAS-612 | Instruction Manual - English - Page 44
corner knife 0 will be lowered. The carriage feed will move to the stop position and then the alarm will sound once. MODE AUTOMATIC MANUAL . PROGRAM . EWE CHANGE r CYCLE PGM. EMERGENCY STOP 0 BOBBIN COUNTER SET Align the edges. (Cautions on installation) • If the air supply is not turned - Brother International BAS-612 | Instruction Manual - English - Page 45
knife bracket unit Q * Be careful not to loosen the screws too far, otherwise the knife bracket unit will come into contact with slide guide 0 . To fit the knives: 1. Loosen screws and move knives S in the arrowed directions; fit the knives according to the sewing pattern. 2. A maximum deviation - Brother International BAS-612 | Instruction Manual - English - Page 46
• PROGRAM • KNIFE CHANGE al CYCLE PGM. CARRIAGE FEED FORWARD 1. Set MODE selector 0 to MANUAL. 2. Set CARRIAGE FEED switch to FORWARD and move the carriage feed to a position convenient for knife replacement. 3. Set power switch to OFF. 4. Remove screw Q and - Brother International BAS-612 | Instruction Manual - English - Page 47
• PROGRAM • KNIFE CHANGE & CYCLE PGM. CARRIAGE FEED FORWARD BACKWARD 01/ Needle plate .0 9 1. Set MODE selector 0 to MANUAL. 2. Set CARRIAGE FEED switch Q to FORWARD to advance the carriage feed. 3. Set power switch 9 to OFF. 4. Remove slide plates R and L 0 . 5. Tilt the machine head. 6. Loosen - Brother International BAS-612 | Instruction Manual - English - Page 48
plate (align the knife tip with the center knife guide bottom). Turn the power switch to ON and make sure that the center knife decrease center knife durability. 1. Set MODE selector 0 to MANUAL. 2. Set CARRIAGE FEED switch 0 to FORWARD to advance the carriage feed. - Brother International BAS-612 | Instruction Manual - English - Page 49
PARTS REPLACEMENT FOR SINGLE WELTING MODE AUTOMATIC MANUAL • PROGRAM • KNIFE CHANGE & CYCLE PGM. 6- ,./ 1. Set MODE selector ID to MANUAL and advance the carriage feed to the thread trimming position. 2. Replace the binder assembly for double - Brother International BAS-612 | Instruction Manual - English - Page 50
OFF ON PSW-12 OFF OFF ON ON OFF OFF ON ON PSW-13 OFF OFF OFF OFF ON ON ON ON (mm) 1.8 2.0 2.2 2.4 2.6 2.8 3.0 3.2 * When the BAS-612 is used, the V back-stitching will start even if the PSW-14 is set. Fraying prevention PSW-14 ON: (Backstitch) OFF: (Condensed) SW 2 SW4 SW1 - Brother International BAS-612 | Instruction Manual - English - Page 51
35 36 37 38 n 7 7 Li HE 7--7! OFF * For the BAS-612, use the machine with the PSW-31 off. * For the BAS-612, use the machine with the PSW-31 off. Gauge BAS-61O611 PSW-31 ON: 8, 10, 12, 14 mm OFF: 16, 18, 20 mm BAS-612 8 - 20 mm Operation after thread breakage PSW-32 PSW - Brother International BAS-612 | Instruction Manual - English - Page 52
has operated. • Set the MODE selector either to AUTOMATIC or to MANUAL. • Input programs with the MODE selector set to AUTOMATIC. U)ON c\I ROOR999; ,„ O F F BAS -_610 1 234 567 8 0 0 Neutral BAS-6 1 1 0 0 0 1. Press treadle 0 backwards to raise padding cloth presser foot - Brother International BAS-612 | Instruction Manual - English - Page 53
sewing. Press SET switch 0 to program „ I I Treadle I:Mtn( BAS-812 PERKY YEALOCTGC SLANT PROGRAM r „ MODE (ioLEsAlaM'm© CWOTIPER SET * I- LI . CO) 0 In NO I NOS NCR EMERGENCY S OP TROUBLE CORNER CENTER CARRIAGE KNIFE KNIFE STACKER TRIMMER KAMM COUNTER SET BIZROCr 0 ICON EVPIT - Brother International BAS-612 | Instruction Manual - English - Page 54
is available only with dip switch SW33 off and the stacker switch on. bother BAS -61 SLANT PROGRAM SELECT SEAM LENGTH SIDE R 0 oo Cno= L 0 ooED 0 S L M/' 0 POWER E M/M MODE O NUMBER 11 • AUTOMATIC • MANUAL • PROGRAM • KNIFE CHANGE & CYCLE PGM. 12 34 5 ©OOOO SELECT - SET - CLEAR - CYCLE PGM - Brother International BAS-612 | Instruction Manual - English - Page 55
MEMORY INITIALIZATION • Use this to initialize or clear the memory of back-up data necessary for sewing. 1. Set the power switch to OFF. Set switch 3-8 on the main circuit board to ON. 2. Set the power switch to ON. The memory will be completely cleared and standard data will be written. When - Brother International BAS-612 | Instruction Manual - English - Page 56
turning on the power or during sewing. Please contact your Brother dealer if error display cannot be reset. Contents of the codes are as below: E-1-** Switch-related error EA-** Sensor-related error E-2-** Machine-related error E-6-** Error related to thread breakage E-3-** Error related to - Brother International BAS-612 | Instruction Manual - English - Page 57
TROUBLE-SHOOTING Phenomenon Cause Bent needle, blunt tip Needle thread breaks H Incorrect needle fitting Incorrect threading Excessive needle thread tension Incorrect clearance between rotary hook and - Brother International BAS-612 | Instruction Manual - English - Page 58
BROTHER INDUSTRIES, LTD. NAGOYA, JAPAN 151-610.611 612 S93611-102 19918 H C? Printed in Japan/Gedruckt in Japan/Imprime au Japon/Impreso en Japon
-
 1
1 -
 2
2 -
 3
3 -
 4
4 -
 5
5 -
 6
6 -
 7
7 -
8
-
9
-
10
-
11
-
12
-
13
-
14
-
15
-
16
-
17
-
18
-
19
-
20
-
21
-
22
-
23
-
24
-
25
-
26
-
27
-
28
-
29
-
30
-
31
-
32
-
33
-
34
-
35
-
36
-
37
-
38
-
39
-
40
-
41
-
42
-
43
-
44
-
45
-
46
-
47
-
48
-
49
-
50
-
51
-
52
-
53
-
54
-
55
-
56
-
57
-
58
 |
 |
brother
AUTOMATIC
LOCK
STITCH
POCKET
WELT
SEWER
(FOR
FLAP
ATTACHMENT)
AUTOMATIC
LOCK
STITCH
SLANT
POCKET
WELT
SEWER
(FOR
FLAP
ATTACHMENT)
INSTRUCTION
MANUAL
xb
BAS
-610
BAS
-611
BAS
-612