Brother International CE8080PRW Users Manual - English - Page 10
Brother International CE8080PRW Manual
 |
View all Brother International CE8080PRW manuals
Add to My Manuals
Save this manual to your list of manuals |
Page 10 highlights
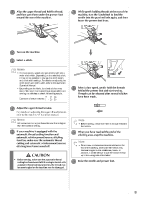
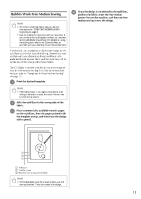
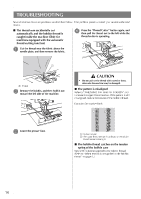
h Align the upper thread and bobbin thread, and then pass them under the presser foot toward the rear of the machine. m While gently holding threads at the rear of the machine, turn the handwheel to feed the needle into the punched hole again, and then lower the presser foot lever. i j Turn on the machine. Select a stitch. Memo • For best results, select a longer stitch length and a wider stitch width. Depending on the selected stitch, it may not be possible to change the stitch length and stitch width settings. For details on adjusting the stitch length and stitch width, refer to the machine's Operation Manual. • Depending on the fabric, bunched stitches may result. We recommend selecting a simple stitch and sewing trial stitches to check the sewing results. Examples of simple stitches: , , n Select a low speed, gently hold the threads behind the presser foot and start sewing. Threads can be released after several stitches have been made. k Adjust the upper thread tension. For details on adjusting the upper thread tension, refer to the machine's Operation Manual. Memo We recommend an upper thread tension that is higher than the standard setting. l Note • Before sewing, check that there is enough thread in the bobbin. o If your machine is equipped with the automatic thread cutting function and automatic reinforcement/reverse stitching function, make sure the automatic thread cutting and automatic reinforcement/reverse stitching have been turned off. When you have reached the end of the stitching area, stop the machine. Note • Do not sew reinforcement/reverse stitches at the end of the stitching, otherwise the threads may become tangled or the needle may break. In addition, it will be difficult to pull the bobbin thread up to the wrong side of the fabric. p CAUTION • Before sewing, make sure the automatic thread cutting has been turned off. If sewing is started with automatic thread cutting turned on, the thread may become tangled or the machine may be damaged. Raise the needle and presser foot. 9
-
 1
1 -
2
-
3
-
4
-
 5
5 -
 6
6 -
 7
7 -
 8
8 -
 9
9 -
 10
10 -
 11
11 -
 12
12 -
 13
13 -
 14
14 -
 15
15 -
16
 |
 |
