Brother International CP2160P Operation Manual - Page 4
Names of Machine Parts
 |
View all Brother International CP2160P manuals
Add to My Manuals
Save this manual to your list of manuals |
Page 4 highlights
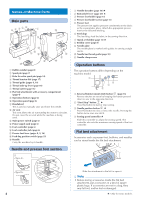
Names of Machine Parts Main parts 65 432 1 I A 7 8 E B 0 9C D H G F 1 Bobbin winder (page 8) 2 Spool pin (page 7) 3 Hole for extra spool pin (page 14) 4 Thread tension dial (page 17) 5 Thread guide (pages 8, 10) 6 Thread take-up lever (page 10) 7 Thread cutter (page 16) 8 Flat bed attachment with accessory compartment (page 4) 9 Operation buttons (page 4) 0 Operation panel (page 6) A Handwheel This is used to manually raise and lower the needle. B Air vent This vent allows the air surrounding the motor to circulate. Do not cover the air vent while the machine is being used. C Main power switch (page 6) D Power supply jack (page 6) E Foot controller (page 6) F Foot controller jack (page 6) G Presser foot lever (pages 8, 9, 16) H Feed dog position switch (page 21) I Handle Carry the machine by its handle. Needle and presser foot section 1 2 3 4 5 6 7 A 0 9 8 4 1 Needle threader (page 10) ★ 2 Buttonhole lever (page 20) ★ 3 Presser foot holder (page 15) 4 Presser foot holder screw (page 15) 5 Presser foot The presser foot applies pressure consistently on the fabric as the sewing takes place. Attach the appropriate presser foot for the selected stitching. 6 Feed dogs The feed dogs feed the fabric in the sewing direction. 7 Quick-set bobbin (page 11) ★ 8 Bobbin cover (page 8) 9 Needle plate The needle plate is marked with guides for sewing straight seams. 0 Needle bar thread guide (page 10) A Needle clamp screw Operation buttons The operation buttons differ depending on the machine model. 1 4 3 2 1 Reverse/Reinforcement stitch button (page 16) Reverse stitches are sewn by keeping this button pressed down to sew in the opposite direction. 2 "Start/Stop" button ★ Press this button to start or stop sewing. 3 Needle position button ★ Press this button to raise or lower the needle. Pressing the button twice sews one stitch. 4 Sewing speed controller ★ Slide this controller to adjust the sewing speed. The controller also sets the maximum sewing speed of the foot controller. Flat bed attachment Accessories such as presser foot, bobbins, and needles can be stored inside the flat bed attachment. Slide the attachment to the left to open it. Note • Before storing accessories inside the flat bed attachment, put accessories in a kind of zipper plastic bags. If accessories are not in a bag, they may fall out, and be lost or damaged. ★: Only for some models.
-
 1
1 -
 2
2 -
 3
3 -
 4
4 -
 5
5 -
 6
6 -
 7
7 -
 8
8 -
 9
9 -
 10
10 -
11
-
12
-
13
-
14
-
15
-
16
-
17
-
18
-
19
-
20
-
21
-
22
-
23
-
24
-
25
-
26
-
27
-
28
-
29
-
30
-
31
-
32
 |
 |
