Brother International DCP 165C Quick Setup Guide - English - Page 2
Install Optional Applications supported by Reallusion, Inc - download software
 |
UPC - 012502620440
View all Brother International DCP 165C manuals
Add to My Manuals
Save this manual to your list of manuals |
Page 2 highlights
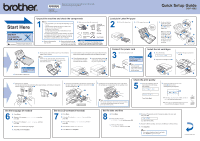
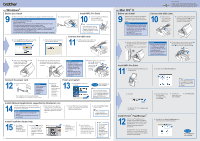
For Windows® Before you install 9 a. Make sure that your computer is ON and you are logged on with Administrator rights. Important • DO NOT connect the USB cable yet. • Close any applications. • Make sure there are no memory cards or a USB Flash memory drive inserted. • The screen may differ depending on the operating system. • The supplied CD-ROM includes ScanSoft™ PaperPort™ 11SE. • This software supports Windows® 2000 (SP4 or greater), XP (SP2 or greater), XP Professional x64 Edition and Windows Vista®. Update to the latest Windows® Service Pack before installing MFL-Pro Suite. • For Windows Vista®, when the User Account Control screen appears, click Allow. b. Unplug the machine. Install MFL-Pro Suite 10 a. Insert the supplied CD-ROM into your CD-ROM drive. Choose your language. Note If the Brother screen does not appear automatically, go to My Computer (Computer), doubleclick the CD-ROM icon, and then double-click start.exe. b. Click Install MFL-Pro Suite, and click Yes if you accept the license agreements. c. Follow the on-screen instructions until this screen appears: Connect the USB cable 11 a. Lift the scanner cover until it locks securely into the open position. b. Connect the USB cable to the USB socket marked with a symbol. The USB socket is inside the machine as shown. c. Carefully route the USB cable through the cable channel and out the back of the machine. Connect the cable to your computer. Important • DO NOT connect the machine to a USB port on a keyboard or a non-powered USB hub. Connect the machine directly to your computer. • Make sure that the cable does not restrict the cover from closing, or an error may occur. d. Lift the scanner cover to release the lock a. Gently push the scanner cover 1 support down b and close the scanner 2 3 cover c. Connect the power cord 12 a. Connect the power cord. Important DO NOT cancel any of the screens. It may take a few minutes for installation to complete. The installation will continue automatically. The installation screens appear one after another. b. When the On-Line Registration screen appears, make your selection and follow the on-screen instructions. Finish and restart 13 a. Click Finish to restart your computer. Finish The installation is now complete. Note If an error message appears during the software installation, run the Installation Diagnostics located in Start/All Programs/ Brother/DCP-XXXX (where DCP-XXXX is your model name). Install Optional Applications supported by Reallusion, Inc 14 FaceFilter Studio lets you edit your photo data and add photo effects such as red eye reduction or skin tone enhancement. Important • The computer must be connected to the internet. • The machine must be ON and connected to the computer. a. Open the main menu again by ejecting and then reinserting the CD-ROM or by double-clicking the start.exe program from the root folder. b. The CD-ROM main menu will appear. Choose your language and then click Additional Applications. c. Click the FaceFilter Studio button to install. Note You can also install BookScan&Whiteboard Suite from the main menu. Install FaceFilter Studio Help 15 a. Go to Start/ All Programs/ Reallusion/ FaceFilter Studio on your computer. b. Click the button on the upper right corner of the screen, and then click Check for updates to go to the Reallusion update web page. c. Click the Download button and choose a folder to save the file in. d. Close FaceFilter Studio, double-click the downloaded file from the folder you specified, and then follow the on-screen instructions to install. Note To view FaceFilter Studio Help, go to Start/ All Programs/ Reallusion/ FaceFilter Studio/ FaceFilter Studio Help on your computer. For Mac OS® X Before you install 9 Make sure your machine is connected to the power and your Macintosh® is ON. You must be logged on with Administrator rights. Important • Make sure there are no memory cards or a USB Flash memory drive inserted. • For Mac OS® X 10.2.0 to 10.2.3 users, upgrade to Mac OS® X 10.2.4 or greater. (For the latest information for Mac OS® X, visit http://solutions.brother.com/) What is Innobella™? Innobella™ is a range of genuine consumables offered by Brother. The name "Innobella™" derives from the words "Innovation" and "Bella" (meaning "Beautiful" in Italian) and is a representation of the "innovative" technology providing you with beautiful and long lasting print results. Connect the USB cable 10 a. Lift the scanner cover until it locks securely into the open position. b. Connect the USB cable to the USB socket marked with a symbol. The USB socket is inside the machine as shown below. c. Carefully route the USB cable through the cable channel and out the back of the machine. d. Connect the cable to your Macintosh®. Important • DO NOT connect the machine to a USB port on a keyboard or a non-powered USB hub. Connect the machine directly to your Macintosh®. • Make sure that the cable does not restrict the cover from closing, or an error may occur. e. Lift the scanner cover to release the lock a. Gently push the scanner cover support down b and close the scanner cover c. 1 2 3 Install MFL-Pro Suite 11 a. Insert the supplied CD-ROM into your CD-ROM drive. b. Double-click the Start Here OSX icon. Note It may take a few minutes for installation to complete. After the installation, click Restart. c. Click OK. d. For Mac OS® X 10.2.4 to 10.2.8 users, click Add and then choose USB. e. Choose your model name, and then click Add. f. Quit Print Center. For Mac OS® X 10.3.x or greater users, go to step 12. Install Presto!® PageManager® 12 When Presto!® PageManager® is installed, OCR capability is added to Brother ControlCenter2. With Presto!® PageManager®, you can easily scan, share and organize photos and documents. For Mac OS® X 10.2.4 to 10.3.8 users, follow the on-screen instructions, and download the software from the Brother Solutions Center website. a. Double-click the Presto! PageManager icon and follow the on-screen instructions. Finish The installation is now complete.
-
 1
1 -
 2
2
 |
 |
