Brother International DCP 385C Quick Setup Guide - English - Page 1
Brother International DCP 385C - Color Inkjet - All-in-One Manual
 |
UPC - 012502620457
View all Brother International DCP 385C manuals
Add to My Manuals
Save this manual to your list of manuals |
Page 1 highlights
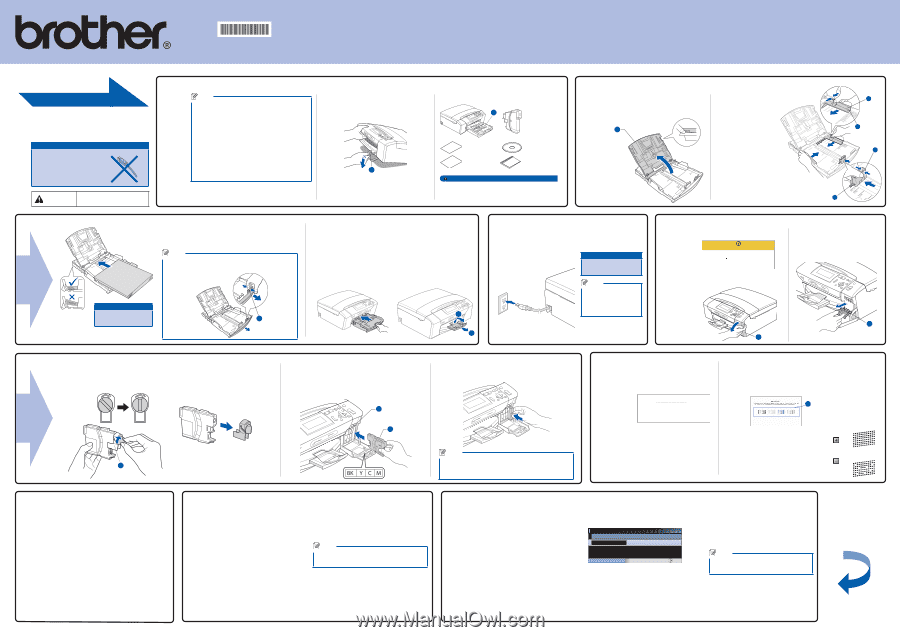
LX0142001 USA/CAN Printed in China Before you can use the machine, read this Quick Setup Guide for the correct setup and installation. Quick Setup Guide DCP-385C Start Here Important DO NOT connect the USB cable yet. Warnings tell you what to do to WARNING prevent possible personal injury. Unpack the machine and check the components 1 Note • The components of your box may differ depending on your country. • Save all packing materials and the box in case for any reason you must ship your machine. • A USB cable is not included. You need to purchase a USB 2.0 cable that is no more than 6 feet (2 meters) long. Your machine has a USB 2.0 Full-speed interface. This interface is compatible with USB 2.0 Hi-Speed; however, the maximum data transfer rate will be 12 Mbits/s. The machine can also be connected to a computer that has a USB 1.1 interface. a. Remove the protective tape and film. b. Remove the green protective packing a by lifting the front of the machine and then pulling down on the packing part. 1 c. Remove the plastic bag b containing the ink cartridges from on top of the paper tray. d. Make sure you have all components. Starter Ink 2 Cartridges [x4] Black Yellow Cyan Magenta Accessory Order Form CD-ROM Quick Setup Guide User's Guide WARNING Plastic bags are used in the packaging of your machine. To avoid danger of suffocation, please keep these bags away from babies and children. Load plain Letter/A4 paper 2 a. Pull out the paper tray. b. Lift the paper tray cover a. 1 c. Press and slide the paper side guides a and paper length guide b to fit the paper size. Make sure that the triangular marks c on the paper side guides a and paper length guide b line up with the mark for the paper size you are using. e. Gently put the paper into the paper tray. Check that the paper is flat in the tray. Note When you use Legal size paper, press and hold the universal guide release button a as you slide out the front of the paper tray. Important Do not push the paper in too far. 1 d. Fan the stack of paper well. f. Gently adjust the paper side guides to the paper with both hands. Make sure the paper side guides touch the edges of the paper. g. Close the paper tray cover and slowly push the paper tray back into the machine. h. Pull out the paper support a until it clicks, and then unfold the paper support flap b. 2 1 Connect the power cord 3 a. Connect the power cord. Important DO NOT connect the USB cable yet. Note The control panel warning LED will stay on until you have installed the ink cartridges. Install the ink cartridges 4 a. The LCD shows: No Cartridge Install Ink Black b. Open the ink cartridge cover a. 1 1 3 2 3 c. Remove the green protective part a. 1 d. Unpack the ink cartridge. Turn the green knob on the protective yellow cap clockwise until it clicks to release the vacuum seal, then remove the cap a. e. Install each ink cartridge in the direction of the arrow on the label. Take care to match the color of the lever a with the cartridge color b. 1 f. Gently push the ink cartridge until it clicks. After all the ink cartridges are installed close the ink cartridge cover. Check the print quality 5 a. When the preparation process has finished, the LCD shows this message. Set Paper and Press Start b. Check the quality of the four color blocks a on the sheet. (black/yellow/cyan/magenta) 1 OK 2 Press Color Start. o If all lines are clear and visible, press Note (Yes) to finish the quality check. Poor The machine will prepare the ink tube system for printing. o If you can see missing short lines, press 1 This process will take approximately four minutes. (No) and follow the steps on the LCD. Do not turn off the machine. Set the language (If needed) 6 a. Press Menu. b. Press a or b to choose Initial Setup. Press OK. c. Press a or b to choose Local Language. Press OK. d. Press a or b to choose your language. Press OK. e. Press Stop/Exit. Set the LCD contrast (If needed) 7 a. Press Menu. b. Press a or b to choose General Setup. Press OK. c. Press a or b to choose LCD Settings. Press OK. e. Press d or c to choose Light, Med or Dark. Press OK. f. Press Stop/Exit. Note You can also adjust the angle of the display by lifting it. d. Press a or b to choose LCD Contrast. Set the date and time 8 a. Press Menu. b. Press a or b to choose Initial Setup, and then press OK. c. Press a or b to choose Date&Time, and then press OK. d. Press a or b repeatedly to enter the last two digits of the year, and then press OK. Date&Time Year:20 08 MENU Input & Press OK (e.g. Enter 08 for 2008.) e. Repeat for Month and Day, and Hours and Minutes in 24-hour format. f. Press Stop/Exit. Note If you make a mistake and want to start again, press Stop/Exit to go back to step a. Turn the sheet over.
-
 1
1 -
 2
2
 |
 |