Brother International DreamWeaver„ VQ3000 Quick Setup Guide - English - Page 9
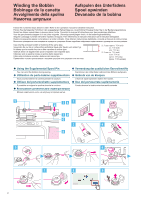
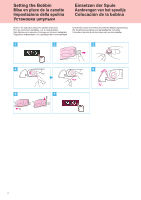
Utility Stitches, Points utilitaires, Punti utili, Nutzstiche, Naaisteken, Puntadas utiles
 |
View all Brother International DreamWeaver„ VQ3000 manuals
Add to My Manuals
Save this manual to your list of manuals |
Page 9 highlights
‹‹Utility Stitches When the machine is turned on, the opening movie is played. Touch the screen to display the Utility Stitch selection screen. Either "1-01 Straight stitch (Left)" or "1-03 Straight stitch (Middle)" is selected, depending on the setting selected in the settings screen. ‹‹Nutzstiche Nach dem Einschalten der Maschine wird der Eingangsfilm angezeigt. Berühren Sie den Bildschirm zur Anzeige des Auswahlbildschirms für den Nutzstich. Je nach Einstellung im Einstellungsbildschirm ist „1-01 Geradstich (Links)" oder „1-03 Geradstich (Mitte)" ausgewählt. ‹‹Points utilitaires Quand la machine est mise sous tension, la vidéo de démarrage commence. Touchez l'écran pour afficher l'écran de sélection Point utilitaire. Soit « 1-01 Point droit (Gauche) », soit « 1-03 Point droit (Milieu) » est sélectionné, selon le réglage sélectionné sur l'écran de réglage. ‹‹Naaisteken Wanneer u de machine aanzet, wordt de openingsfilm afgespeeld. Raak het scherm aan om het naaistekenoverzicht weer te geven. Afhankelijk van de geselecteerde instelling in het instellingenscherm wordt ofwel "1-01 Rechte steek (links)" of "1-03 Rechte steek (midden)" geselecteerd. ‹‹Punti utili All'accensione della macchina, viene riprodotto il filmato di apertura. Toccare lo schermo per visualizzare la schermata di selezione del punto utile. Viene selezionato "1-01 Punto diritto (Sinistra)" o "1-03 Punto diritto (Centro)", a seconda dell'impostazione selezionata nella schermata delle impostazioni. ‹‹Puntadas utiles Cuando se activa la máquina, se reproduce el vídeo de presentación. Toque la pantalla para visualizar la pantalla de selección de puntada con aplicaciones. Se seleccionará la "Puntada recta 1-01 (izquierda)" o la "Puntada recta 1-03 (medio)", según el ajuste seleccionado en la pantalla de ajustes. 1-01 1-03 7
-
 1
1 -
2
-
3
-
 4
4 -
 5
5 -
 6
6 -
 7
7 -
 8
8 -
 9
9 -
 10
10 -
 11
11 -
 12
12 -
 13
13 -
 14
14 -
15
-
16
-
17
-
18
-
19
-
20
 |
 |
