Brother International HL-1870n Driver Setup Guide for Mac - English - Page 2
OS 8.6 to 9.2, OS X 10.1 - driver download
 |
View all Brother International HL-1870n manuals
Add to My Manuals
Save this manual to your list of manuals |
Page 2 highlights
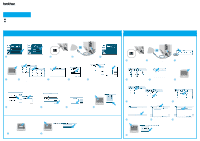
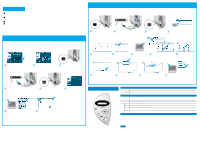
Driver Installation Guide Macintosh® For Network Users For HL-1850 users: If you are going to connect the printer to your network, purchase the optional Network board (NC-4100h). Before you continue, please ensure that the administrator has configured the network printer settings correctly referring to the Network Quick Setup Guide. Follow the instructions in this guide for your operating system. Some illustrations are based on the HL-1870N. Steps 1 to 4 Follow these steps in the Quick Setup Guide first. For Mac® OS 8.6 to 9.2 Users Only Step 5 Connect the Printer to Your Macintosh® & Install the BR-Script PPD File For Mac® OS X 10.1 Users Only Step 5 Connect the Printer to Your Macintosh® & Install the BR-Script PPD File Hub O I OFF ON 1 Turn off the printer power switch. 2 Connect the network interface cable to the printer, and then connect it to a free port on your hub. O I OFF ON 3 Turn on the printer power switch. 4 Insert the CD-ROM into the CD-ROM drive. Open the Mac OS X folder. 1 Click "Connect the interface cable & Install the driver/utility." 2 Select the Network interface cable. O I OFF ON 3 Turn off the printer power switch. 5 Open your language folder. 6 Double-click the PPD Installer icon. Follow the instructions on the screen. 7 Open the Macintosh HD icon. 8 Open the Applications folder. Open the Utilities folder. 9 Open the Print Center icon. Hub 4 Connect the network interface cable to the printer, and then connect it to a free port on your hub. O I OFF ON 5 Turn on the printer power switch. 6 Follow the instructions on the screen. The Setup is now complete. 7 Open the Chooser from the Apple menu. 8 Click the LaserWriter8 *1 icon, and then select BRN_xxxxxx_P1_AT. *2 Click the Create... button. Close the Chooser. *1 If the Apple LaserWriter8 Driver is not already installed on your system, you can download it from http://www.apple.com *2 xxxxxx are the last six digits of the Ethernet address. For more information, see Chapter 7 of the Network User's Guide. ©2002 Brother Industries, Ltd. ALL RIGHTS RESERVED Apple Macintosh, iMac, LaserWriter, and AppleTalk are trademarks of Apple Computer, Inc. Adobe PostScript and PostScript3 are trademarks of Adobe Systems Incorporated. All other brand and product names are trademarks or registereted trademarks of their respective holders. 0 Click the Add Printer... button. A Select AppleTalk. B Select BRN_xxxxxx_P1_AT*3, and then click the Add button. *3 xxxxxx are the last six digits of the Ethernet address. For more information, see Chapter 7 of the Network User's Guide. C Select Quit Print Center from the Print Center menu. The setup is now complete. Control Panel Data Back Reprint Set Job cancel Go For more information, see "CONTROL PANEL" in Chapter 3 of the User's Guide on the supplied CD-ROM. Data LED : Orange On Data remains in the printer buffer. Blinking Receiving or processing data. Off No remaining data. Buttons Go Job Cancel Reprint Menu Set Back Exit from the control panel menu, Reprint settings or clear error messages. Pause / Continue printing. Stop and cancel the printer operation in progress. Select the Reprint menu. Move forward through menus. Move backward through menus. Select the control panel menu. Set the selected menus and settings. Go back one level in the menu structure. Language Setting (Default setting is English) 1. Select the SETUP mode by pressing the + button, and then press the Set button. 2. Check that the LANGUAGE message appears, and then press the Set button. 3. Choose your language by pressing the + or - button, and then press the Set button. An asterisk mark (*) appears at the end of the display. (You can return to the READY status by pressing the Go button.) Note Please enhance the RAMDISK size when you want to use the Reprint functions without the optional HDD or CompactFlash. See "RAM expansion" in Chapter 4 of the User's Guide on the supplied CD-ROM.
-
 1
1 -
 2
2
 |
 |
