Brother International HL-L3280CDW Quick Setup Guide - Page 1
Brother International HL-L3280CDW Manual
 |
View all Brother International HL-L3280CDW manuals
Add to My Manuals
Save this manual to your list of manuals |
Page 1 highlights
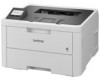
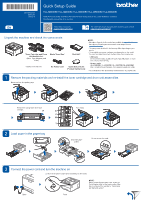
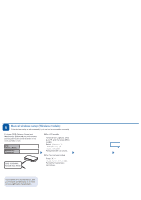
EN D027NP001-00 USA/CAN Version 0 Quick Setup Guide HL-L3220CDW / HL-L3240CDW / HL-L3280CDW / HL-L3295CDW / HL-L8245CDW Read the Product Safety Guide first, then read this Quick Setup Guide for the correct installation procedure. Not all models are available in all countries. Video setup instructions: support.brother.com/videos The latest manuals are available at the Brother support website: support.brother.com/manuals Unpack the machine and check the components Toner Cartridge and Drum Unit Assemblies* (Black, Cyan, Magenta, and Yellow) Waste Toner Box* * Installed in the machine AC Power Cord Belt Unit* Quick Setup Guide Product Safety Guide NOTE: • Manuals in Spanish for this model are available at support.brother.com. Manuales en Español para este modelo están disponibles en support.brother.com. • The components included in the box may differ depending on your country. • The available connection interfaces vary depending on the model. You must purchase the correct interface cable if you require one. • USB cable We recommend using a USB 2.0 cable (Type A/B) that is no more than 6 feet (2 meters) long. • Network cable (HL-L3240CDW / HL-L3280CDW / HL-L3295CDW / HL-L8245CDW) Use a straight-through Category 5 (or greater) twisted-pair cable. • The illustrations in this Quick Setup Guide show the HL-L3240CDW. 1 Remove the packing materials and re-install the toner cartridge and drum unit assemblies Remove all the blue packing tape. Remove the orange parts from each cartridge. x4 BK C M Y 2 Load paper in the paper tray Push firmly. Adjust the paper guides. Do not exceed this mark. 3 Connect the power cord and turn the machine on Location of the power button varies depending on the model. NOTE: Before connecting the power cord, locate the Serial Number label on the back or side of the machine. Record this number for Registration and Warranty support. Back Front
-
 1
1 -
 2
2
 |
 |