Brother International HL1450 Quick Setup Guide - English - Page 2
Parallel, Windows, Network - hl printer driver
 |
UPC - 012502600671
View all Brother International HL1450 manuals
Add to My Manuals
Save this manual to your list of manuals |
Page 2 highlights
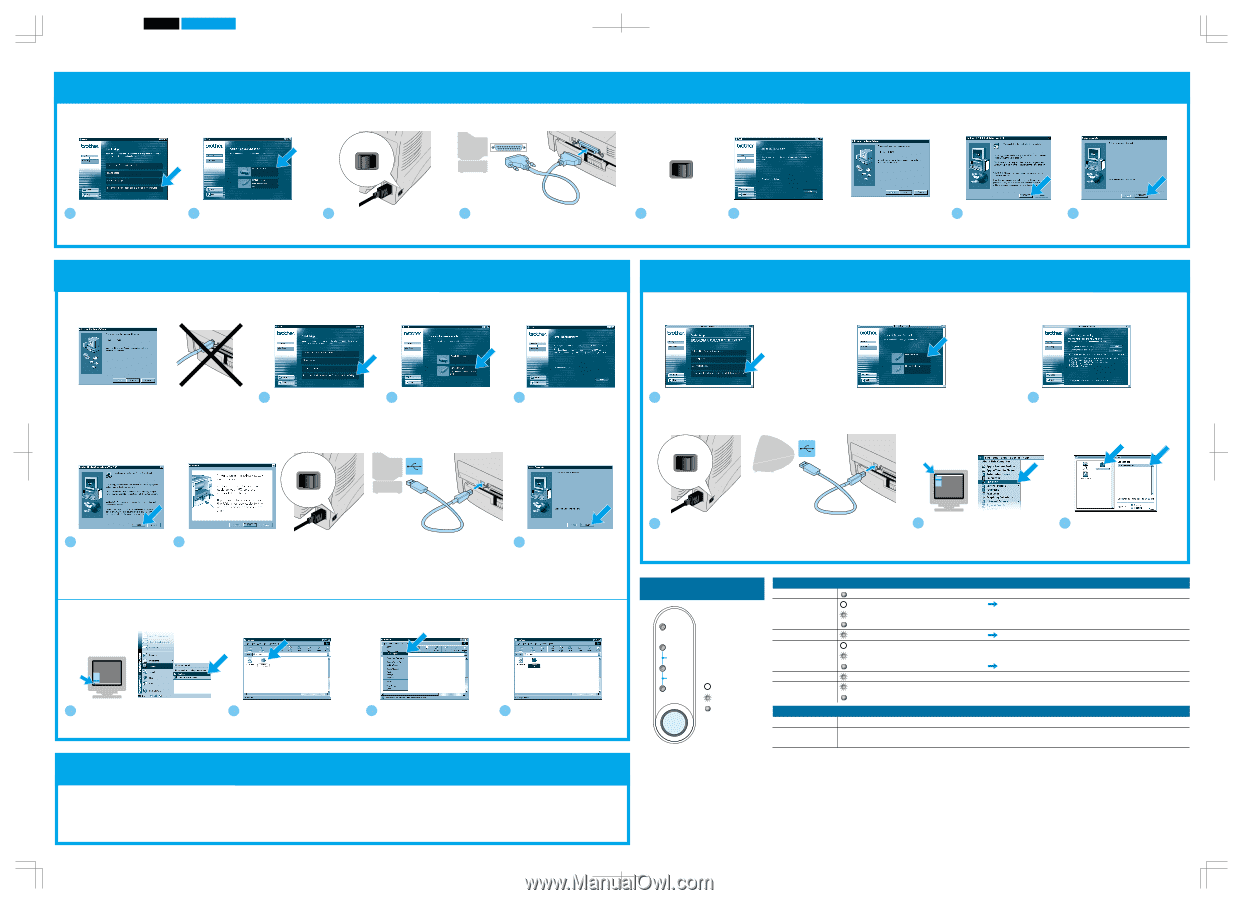
1470QSG Eng_back Black Pantone285 Follow the instructions for your interface cable and operating system. For Parallel interface cable users (For Windows® users only) Step 4 Connect the printer to your PC & Install the printer driver I O ON OFF I O ON OFF 1 Click "Connect the interface cable & install the driver / utilities." 2 Select the parallel interface cable. (HL-1230 users will not see this screen.) 3 Turn off the printer power switch. 4 Connect the interface cable to your PC, and then connect it to the printer. 5 Turn on the printer power switch. 6 Follow the instructions on the screen. CANCEL Note: If "Add New Hardware Wizard" appears, click the Cancel button. 7 Click the Next button. 8 Click the Finish button. The setup is now complete. For USB interface cable users (For Windows® users only) Step 4 Install the driver & Connect the printer to your PC CANCEL Note: When the "Add New Hardware Wizard" appears on your PC, click the Cancel button. Note: Make sure the USB interface cable is NOT connected to the printer, and then begin installing the driver. If you already connected the cable, remove it first. 1 Click "Connect the interface cable & install the driver / utilities." 2 Select the USB cable. 3 Follow the instructions on the screen. I O ON OFF 4 Click the Next button. 5 When this screen appears, make sure the printer power switch is on. Connect the USB interface cable to your PC, and then connect it to the printer. Click the Next button. 6 Click the Finish button. For Windows® 98/Me users: The setup is now complete. For Windows® 2000 users : Go to Step 5. Step 5 Setting your printer as the Default printer (For Windows® 2000 users only) 1 Click Start, Setting and Printers. 2 Select the Brother HL- 1440/1450/1470N series icon. 3 Click the File menu, and then select Set as Default printer. 4 The setup is now complete. For Network users (For HL-1470N users only) After the administrator has made the required settings, install the driver referring to the "Installing the Driver for Network Users" section of the Quick Network Setup Guide. For USB interface cable users (For Macintosh® users only) Step 4 Install the driver & Connect the printer to your Macintosh® 1 Click "Connect the interface cable & install the driver / utilities." Note: If this screen appears, select USB cable. 2 Follow the instructions on the screen, and restart your Macintosh®. I O ON OFF 3 Make sure the printer power switch is on. Connect the USB interface cable to your Macintosh®, and then connect it to the printer. 4 Open the Chooser from the Apple® menu on the Macintosh®. 5 Click the HL-1440/50/70N icon and select it. The setup is now complete. Control Panel LED Drum Ready Drum Ready Paper Alarm Toner Data Alarm Data LED is OFF LED is blinking LED is ON Ready + Alarm Alarm + Data Button Cancel printing Reprinting Near end of life Sleep mode Warming up (at 1 second intervals) Ready to print Printer error No data Receiving data Data remaining in memory Paper jam, paper misfeed or no paper Toner low (every 5 seconds) Toner empty Press the button to wake up the printer. Press the button to clear the error. Press the button to print any data in memory. Printer stops printing and ejects the paper. Printer will reprint the last job. When the Data LED is off, press and hold the button until all the LEDs light.
-
 1
1 -
 2
2
 |
 |