Brother International HS-2000 Users Manual - English - Page 9
Operation panel, Flat bed attachment - key machine
 |
View all Brother International HS-2000 manuals
Add to My Manuals
Save this manual to your list of manuals |
Page 9 highlights
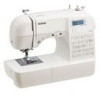
Operation panel The operation panel, located on the front of the sewing machine, allows you to select a stitch and specify how the stitch will be sewn. Flat bed attachment The accessories are stored in a compartment inside the flat bed attachment. Slide the flat bed attachment to the left to 1 a open it. a LCD (liquid crystal display) The number of the selected stitch (1), the presser foot to be used (2), the stitch length (mm) (3), and the stitch width (mm) (4) are displayed here. b Stitch selection keys Press the stitch selection keys, and then select the number for the stitch that you wish to use. For details, refer to "Selecting stitching" (page 27). c Stitch length adjustment key Press this key to adjust the stitch length. (Press the "-" side to reduce the stitch length; press the "+" side to increase the stitch length.) d Stitch width adjustment key Press this key to adjust the stitch width. (Press the "-" side to reduce the stitch width; press the "+" side to increase the stitch width.) a Flat bed attachment b Storage compartment Note ● Put the accessories in the bag, and then store the bag inside the compartment. If the accessories are not in a bag, they may fall out, and be lost or damaged. 7
-
 1
1 -
2
-
3
-
 4
4 -
 5
5 -
 6
6 -
 7
7 -
 8
8 -
 9
9 -
 10
10 -
 11
11 -
 12
12 -
 13
13 -
 14
14 -
15
-
16
-
17
-
18
-
19
-
20
-
21
-
22
-
23
-
24
-
25
-
26
-
27
-
28
-
29
-
30
-
31
-
32
-
33
-
34
-
35
-
36
-
37
-
38
-
39
-
40
-
41
-
42
-
43
-
44
-
45
-
46
-
47
-
48
-
49
-
50
-
51
-
52
-
53
-
54
-
55
-
56
-
57
-
58
-
59
-
60
-
61
-
62
-
63
-
64
-
65
-
66
-
67
-
68
-
69
-
70
-
71
-
72
 |
 |
