Brother International Innov-ís 2500D Users Manual - English - Page 30
Upper Threading
 |
View all Brother International Innov-ís 2500D manuals
Add to My Manuals
Save this manual to your list of manuals |
Page 30 highlights
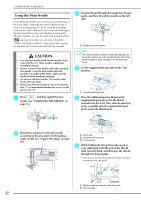
LOWER/UPPER THREADING Upper Threading c Press the "Needle Position" button to raise the needle. This section describes how to thread the machine and the needle. The machine is marked with numbers that indicate the threading order. 1 Getting Ready CAUTION • Be sure to thread the machine properly. Improper threading can cause the thread to tangle and break the needle, leading to injury. • When using accessories not included with this machine, attach the accessory to the machine after threading the machine. 8 12,13 11 10 9 14,15 7 4, 5 6 3 2,16 1 Note If you try to thread the needle with the needle threader lever without raising it, damage to the machine may result. d Pivot the spool pin so that it angles upward, and then place the spool of thread on the spool pin. * Make sure that the thread unwinds from the front. c a b a Turn on the machine. b Press the "Presser Foot Lifter" button to raise the presser foot. → The upper thread shutter opens so the machine can be threaded. a a Spool cap b Thread spool c Spool pin e Slide the spool cap as far as possible onto the spool pin, and then return the spool pin to its original position. CAUTION • If the thread spool and/or spool cap are set incorrectly, the thread may tangle on the spool pin and cause the needle to break. • Use the spool cap (large, medium, or small) that is closest in size to the thread spool. If a spool cap smaller than the thread spool is used, the thread may become caught in the slit on the end of the spool and cause the needle to break. a Upper thread shutter Memo This machine is equipped with an upper thread shutter, allowing you to check that the upper threading is performed correctly. 29
-
 1
1 -
2
-
3
-
4
-
5
-
6
-
7
-
8
-
9
-
10
-
11
-
12
-
13
-
14
-
15
-
16
-
17
-
18
-
19
-
20
-
21
-
22
-
23
-
24
-
 25
25 -
 26
26 -
 27
27 -
 28
28 -
 29
29 -
 30
30 -
 31
31 -
 32
32 -
 33
33 -
 34
34 -
 35
35 -
36
-
37
-
38
-
39
-
40
-
41
-
42
-
43
-
44
-
45
-
46
-
47
-
48
-
49
-
50
-
51
-
52
-
53
-
54
-
55
-
56
-
57
-
58
-
59
-
60
-
61
-
62
-
63
-
64
-
65
-
66
-
67
-
68
-
69
-
70
-
71
-
72
-
73
-
74
-
75
-
76
-
77
-
78
-
79
-
80
-
81
-
82
-
83
-
84
-
85
-
86
-
87
-
88
-
89
-
90
-
91
-
92
-
93
-
94
-
95
-
96
-
97
-
98
-
99
-
100
-
101
-
102
-
103
-
104
-
105
-
106
-
107
-
108
-
109
-
110
-
111
-
112
-
113
-
114
-
115
-
116
-
117
-
118
-
119
-
120
-
121
-
122
-
123
-
124
-
125
-
126
-
127
-
128
-
129
-
130
-
131
-
132
-
133
-
134
-
135
-
136
-
137
-
138
-
139
-
140
-
141
-
142
-
143
-
144
-
145
-
146
-
147
-
148
-
149
-
150
-
151
-
152
-
153
-
154
-
155
-
156
-
157
-
158
-
159
-
160
-
161
-
162
-
163
-
164
-
165
-
166
-
167
-
168
-
169
-
170
-
171
-
172
-
173
-
174
-
175
-
176
-
177
-
178
-
179
-
180
-
181
-
182
-
183
-
184
-
185
-
186
-
187
-
188
-
189
-
190
-
191
-
192
-
193
-
194
-
195
-
196
-
197
-
198
-
199
-
200
-
201
-
202
-
203
-
204
-
205
-
206
-
207
-
208
-
209
-
210
-
211
-
212
-
213
-
214
-
215
-
216
-
217
-
218
-
219
-
220
-
221
 |
 |