Brother International Innov-is 6750D Operation Manual Addendum - Page 5
Adjusting the Brightness of the LED, Pointer
 |
View all Brother International Innov-is 6750D manuals
Add to My Manuals
Save this manual to your list of manuals |
Page 5 highlights
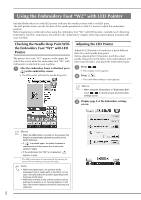
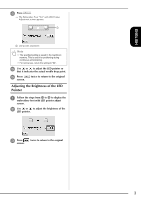
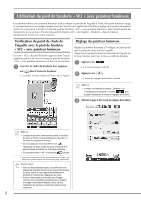
ENGLISH d Press . → The Embroidery Foot "W2" with LED Pointer Adjustment screen appears. a a LED pointer adjustment Note • The specified setting is saved in the machine's memory. This is useful for positioning during continuous embroidering. • For normal use, return the setting to "00". e Use or to adjust the LED pointer so that it indicates the actual needle drop point. f Press screen. twice to return to the original Adjusting the Brightness of the LED Pointer a Follow the steps from a to d to display the embroidery foot with LED pointer adjust screen. b Use or LED pointer. to adjust the brightness of the c Press screen. twice to return to the original 3
-
 1
1 -
 2
2 -
 3
3 -
 4
4 -
 5
5 -
 6
6 -
 7
7 -
 8
8 -
 9
9 -
 10
10 -
 11
11 -
12
-
13
-
14
-
15
-
16
-
17
-
18
-
19
-
20
-
21
-
22
-
23
-
24
-
25
-
26
-
27
-
28
 |
 |

3
ENGLISH
d
Press
.
→
The Embroidery Foot “W2” with LED Pointer
Adjustment screen appears.
a
LED pointer adjustment
e
Use
or
to adjust the LED pointer so
that it indicates the actual needle drop point.
f
Press
twice to return to the original
screen.
Adjusting the Brightness of the LED
Pointer
a
Follow the steps from
a
to
d
to display the
embroidery foot with LED pointer adjust
screen.
b
Use
or
to adjust the brightness of the
LED pointer.
c
Press
twice to return to the original
screen.
Note
•
The specified setting is saved in the machine’s
memory. This is useful for positioning during
continuous embroidering.
•
For normal use, return the setting to “00”.
a