Brother International Innov-is BQ2450 Instruction manual for spool stand
Brother International Innov-is BQ2450 Manual
 |
View all Brother International Innov-is BQ2450 manuals
Add to My Manuals
Save this manual to your list of manuals |
Brother International Innov-is BQ2450 manual content summary:
- Brother International Innov-is BQ2450 | Instruction manual for spool stand - Page 1
thread guide 8 from the right to the left. 4. Continue threading the machine according to the instructions in the machine's instruction manual. En cas d'utilisation de fil sur une bobine en forme de cône, utilisez le support de base de bobine 3. • En cas d'utilisation de grands cônes - Brother International Innov-is BQ2450 | Instruction manual for spool stand - Page 2
utilizar. 3. Pase el hilo por la guía del hilo 8 de derecha a izquierda. 4. Siga enhebrando la máquina según las instrucciones que aparecen en la Manual de instrucciones de la máquina. Para devanar el hilo en la bobina Para devanar el hilo en la bobina con el portaconos colocado, pase el
-
 1
1 -
 2
2
 |
 |
1
2
3
4
8
6
7
9
5
• Do not lift the handle of the machine while the spool stand is
installed.
• Do not push or pull the telescopic thread guide or spool pins with
extreme force, otherwise damage may result.
• Do not place any object other than spools of thread on the spool
support.
• Do not try to wind thread on the bobbin while sewing using the
spool stand.
• When winding thread on the bobbin, do not cross the bobbin
winding thread with the upper thread in the thread guides.
■
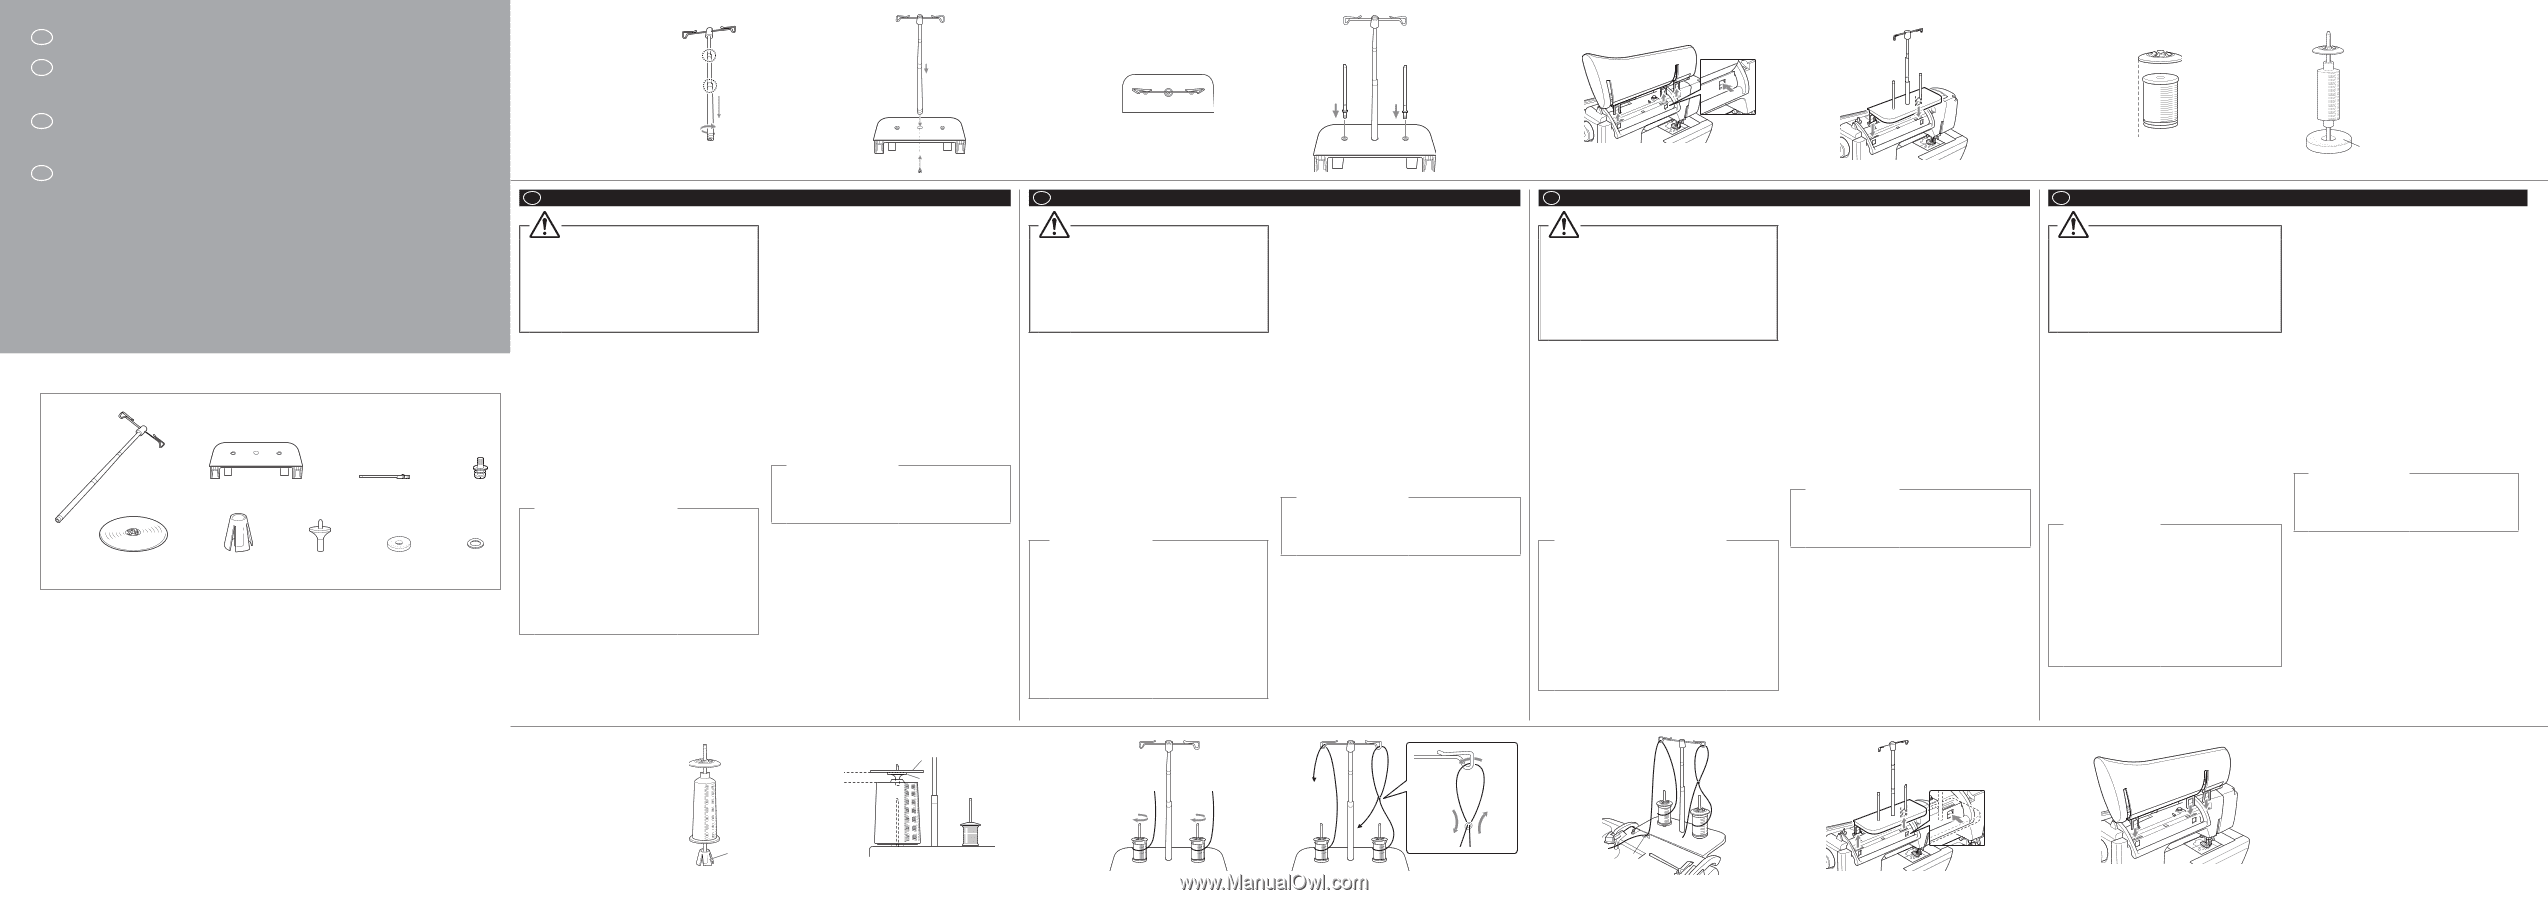
How to assemble
1. Fully extend the telescopic thread guide shaft, and then rotate the
shaft until the two internal stoppers click into place. <Fig.A>
2. Insert the telescopic thread guide into the round hole at the center
of the spool support, and then use a screwdriver (not included) to
securely tighten the screw
1
from the reverse side. <Fig.B>
Note: Make sure that the stoppers on the telescopic thread guide
shaft are firmly in place and that the top of the thread
guide is directly above the spool pins. In addition, check
that the shaft is securely tightened in the spool support.
<Fig.C>
3. Firmly insert the two spool pins into the two holes in the spool
support. <Fig.D>
4. Open the upper cover of the machine. From the back of the
machine, press in the upper cover latches, and then pull the
upper cover up to remove it from the machine. <Fig.E>
5. Insert the spool stand onto the notches of the machine. <Fig.F>
■
How to thread
About the thread spool and spool cap
• Be sure to use a spool cap that is slightly larger than the spool.
<Fig.G> If the spool cap that is used is smaller or much larger than
the spool, the thread may catch and sewing performance may
suffer.
• When using thread on a thin spool, place the enclosed felt
2
on
the spool pin, place the thread spool on the spool pin so that the
center of the spool is aligned with the hole at the center of the felt,
and then insert the spool cap onto the spool pin. <Fig.H>
• When using thread on a cone spool, use the spool holder
3
. <Fig.I>
• When using large cones of thread, attach the spool cap
4
to the
spool cap base
5
, and then place it on top of the spool so that it is
level with the top of the spool. <Fig.J> Depending on the amount of
thread on the spool, use the spool cap with the correct size (XL, L
or M). Spool cap (S) cannot be used with the spool cap base.
1. Place the spool on the spool pin so that the spool turns clockwise
when the thread feeds off, and then firmly insert the spool cap
onto the spool pin. <Fig.K>
Note: • When using 2 spools of thread, make sure that both
spools are feeding in the same direction.
• Make sure that the spools do not touch each other,
otherwise the thread will not feed off smoothly, the needle
may break, or the thread may break or become tangled.
In addition, make sure that the spools do not touch the
thread holder at the center.
• Make sure that the thread is not caught under the spool.
2. Pull the thread off the spool, and then pass it from the back to the
front through the thread guide at the top. <Fig.L
6
>
Note: • When using thread that quickly feeds off the spool, such
as metallic thread, use the enclosed ring to prevent the
thread from becoming entangled. Threading sequence;
Pulling the thread from the spool, place the thread
through the ring from the bottom up (
1
), into the thread
guide (
2
) and again through the ring from the top down
(
3
). <Fig. L
7
>
• Make sure that thread from adjacent spools do not
become entangled.
• After feeding the thread as instructed, wind any excess
thread back onto the spool, otherwise the excess thread
will become tangled.
• Wind up any unused thread.
3. Pass the thread through the thread guide
8
from the right to the
left. <Fig.M>
4. Continue threading the machine according to the instructions in
the machine’s instruction manual.
To wind thread on the bobbin
To wind thread on the bobbin while the spool stand is installed, pass
the thread from the spool through the thread guide on the telescopic
thread guide, pass the thread through the thread guide on top of
the machine, then the bobbin winding thread guide. Then, wind the
bobbin according to the instructions in the machine’s instruction
manual.
■
How to remove
1. From the back of the machine, press in the spool stand latches
(one on each side), and then pull the spool stand up to remove it
from the machine. <Fig.N>
2. Attach the upper cover to the machine. <Fig.O>
• Tragegriff der Maschine nicht anheben, wenn der
Garnrollenständer installiert ist.
• Teleskop-Fadenführung oder Garnrollenstifte nicht gewaltsam
drücken oder ziehen, dies könnte zu Beschädigungen führen.
• Keine anderen Gegenstände als Garnrollen auf den
Garnrollensockel setzen.
• Während des Nähens mit dem Garnrollenständer keinen
Unterfaden aufspulen.
• Beim Aufspulen der Unterfadenspule den Unterfaden nicht mit dem
Oberfaden in den Fadenführungen kreuzen.
■
Zusammenbau
1. Ziehen Sie den Schaft der ausziehbaren Fadenführung ganz
auseinander und drehen Sie den Schaft dann so, dass die beiden
Anschläge einrasten. <Abb. A>
2. Stecken Sie die ausziehbare Fadenführung in die Öffnung in der
Mitte des Garnrollenständersockels und ziehen Sie die Schraube
1
dann von der anderen Seite mit einem Schraubendreher fest.
<Abb. B>
Hinweis:
Achten Sie darauf, dass die Anschläge der ausziehbaren
Fadenführung eingerastet sind und dass das Oberteil
der Fadenführung direkt über den Garnrollenstiften
steht. Achten Sie auch darauf, dass der Schaft fest im
Garnrollenständersockel sitzt. <Abb. C>
3. Setzen Sie die zwei Garnrollenstifte in die zwei Löcher des
Garnrollenständersockels ein. <Abb. D>
4. Öffnen Sie die obere Abdeckung der Maschine. Drücken Sie auf
die oberen Riegel der Abdeckung an der Rückseite der Maschine
und ziehen Sie dann die Abdeckung nach oben und von der
Maschine ab. <Abb. E>
5. Stecken Sie den Garnrollenstift in die Kerben an der Maschine.
<Abb. F>
■
Einfädeln
Garnrolle und Garnrollenkappe
• Immer eine Garnrollenkappe verwenden, die etwas größer als die
Garnrolle ist. <Abb. G> Wenn die Garnrollenkappe kleiner oder viel
größer als die Garnrolle ist, kann sich der Faden verfangen und die
Nähleistung beeinträchtigen.
• Bei dünnen Garnrollen den mitgelieferten Filz
2
auf den
Garnrollenstift setzen, dann die Garnrolle so auf den Garnrollenstift
setzen, dass die Garnrollenmitte mit dem Loch im Filz ausgerichtet
ist, und dann die Garnrollenkappe auf den Garnrollenstift setzen.
<Abb. H>
• Bei konischen Garnrollen den Garnrollenhalter
3
verwenden. <Abb.
I>
• Bei großen konischen Garnrollen die Garnrollenkappe zuerst
4
auf den Garnrollenkappensockel
5
und dann so auf die
Garnrolle setzen, dass sie mit der Oberkante der Garnrolle
bündig ist. <Abb. J> Eine der Garnmenge auf der Garnrolle
entsprechende Garnrollenkappe (extragroß, groß oder mittel)
verwenden. Die Garnrollenkappe (klein) kann nicht mit dem
Garnrollenkappensockel verwendet werden.
1. Die Garnrolle so auf den Garnrollenstift setzen, dass der Faden
im Uhrzeigersinn abläuft, und dann die Garnrollenkappe fest auf
den Garnrollenstift setzen. <Abb.K>
Hinweis: • Wenn 2 Garnrollen verwendet werden, darauf achten,
dass die Fäden im Uhrzeigersinn ablaufen.
• Sicherstellen, dass sich die Spulen nicht gegenseitig
berühren, andernfalls wird der Faden nicht einwandfrei
abgespult, die Nadel kann abbrechen und der Faden
reißen oder sich verhaspeln. Darüber hinaus darauf
achten, dass die Garnrollen den Garnhalter in der
Mitte nicht berühren.
• Sicherstellen, dass sich der Faden nicht unter der
Garnrolle verfängt.
2. Den Faden von der Garnrolle ziehen und von hinten nach vorne
oben durch die Fadenführung fädeln. <Abb. L
6
>
Hinweis: • Wenn Sie Garn einsetzen, das schnell von der Spule
abwickelt, wie z. B. Metallicfaden, verwenden Sie den
mitgelieferten Ring, um ein Verwickeln des Fadens zu
vermeiden. Reihenfolge beim Einfädeln: Faden von
der Garnrolle hoch- und von unten durch den Ring
ziehen (
1
), in die Fadenführung (
2
) und wieder von
oben nach unten durch den Ring ziehen (
3
).
<Abb. L
7
>
• Sicherstellen, dass sich der Faden von benachbarten
Garnrollen nicht verhaspelt.
• Überschüssigen Faden nach dem Führen des Fadens
entsprechend der Anleitung zurück auf die Garnrolle
wickeln, andernfalls wird sich der überschüssige
Faden verhaspeln.
• Nicht benötigten Faden aufrollen.
3. Den Faden von rechts nach links durch die Fadenführung führen
8
. <Abb.M>
4. Fahren Sie mit dem Einfädeln der Maschine gemäß der Anleitung
in der Bedienungsanleitung der Maschine fort.
So spulen Sie Unterfaden auf
Zum Aufspulen des Unterfadens bei installiertem Garnrollenständer
führen Sie den Faden von der Garnrolle durch die Fadenführung an
der Teleskop-Fadenführung, durch die Fadenführung oben an der
Maschine und dann durch die Fadenführung zum Aufspulen des
Unterfadens. Spulen Sie dann den Unterfaden gemäß der Anleitung
in der Bedienungsanleitung der Maschine auf.
■
Abnehmen
1. Die Laschenverriegelungen (eine auf jeder Seite) des
Garnrollenständers an der Maschinenrückseite hineindrücken,
den Garnrollenständer hochziehen und von der Maschine
abnehmen. <Abb.N>
2. Die obere Abdeckung wieder an der Maschine anbringen.
<Abb.O>
• Ne soulevez pas la poignée de la machine lorsque le support pour
porte-bobines est installé.
• Ne tirez pas ou ne poussez pas violement le guide-fil télescopique
ou les broches porte-bobines car vous pourriez endommager la
machine.
• Ne placez aucun autre objet que des bobines de fil sur le support
de bobine.
• N’essayez pas de bobiner la canette lorsque vous cousez à l’aide
du support pour porte-bobines.
• Lors du bobinage de la canette, ne croisez pas le fil de la canette
avec le fil supérieur dans les guide-fils.
■
Instructions de montage
1. Allongez l’axe du guide-fil rétractable au maximum, puis tournez-
le jusqu’à ce que les deux butées internes soient en place (vous
devez entendre un déclic). <Fig. A>
2. Insérez le guide-fil rétractable dans le trou arrondi situé au centre
du support de bobine, puis serrez solidement la vis par l’arrière à
l’aide d’un tournevis
1
. <Fig. B>
Remarque: Assurez-vous que les butées situées sur l’axe du
guide-fil rétractable sont bien en place, et que le
haut du guide-fil se trouve juste au-dessus des
porte-bobines. Assurez-vous en outre que l’axe est
solidement serré sur le support de bobine. <Fig. C>
3. Insérez fermement les deux porte-bobines dans les deux trous du
support de bobine. <Fig. D>
4. Ouvrez le capot supérieur de la machine. Insérez par l’arrière
de la machine les boutons d’ouverture du capot supérieur, puis
soulevez le capot supérieur pour le retirer de la machine. <Fig.
E>
5. Insérez le support pour porte-bobines sur les encoches de la
machine. <Fig. F>
■
I
nstructions d’enfilage
A propos de la bobine de fil et du couvercle de bobine
• Veillez à utiliser un couvercle de bobine légèrement plus grand que
la bobine. <Fig. G> Si le couvercle de bobine utilisé est plus petit
ou beaucoup plus grand que la bobine, le fil risque de s’accrocher
et les performances de couture d’en être diminuées.
• En cas d’utilisation de fil sur une bobine fine, placez le feutre fourni
2
sur le porte-bobines, puis la bobine de fil sur le porte-bobines
en alignant le centre de la bobine sur l’orifice au centre du feutre et
insérez le couvercle de bobine sur le porte-bobines. <Fig. H>
• En cas d’utilisation de fil sur une bobine en forme de cône, utilisez le
support de base de bobine
3
. <Fig. I>
• En cas d’utilisation de grands cônes de fil, fixez le couvercle de
bobine
4
sur la base de couvercle de bobine
5
, puis placez-le au
sommet de la bobine de sorte qu’il soit au niveau du sommet de
la bobine. <Fig. J> En fonction de la quantité de fil que contient la
bobine, utilisez le couvercle de bobine de la taille appropriée (TG,
G ou M). Vous ne pouvez pas utiliser le couvercle de bobine (P)
avec la base de couvercle de bobine.
1. Placez la bobine sur le porte-bobine de sorte qu’elle tourne dans
le sens des aiguilles d’une montre lors de l’entraînement du fil,
puis insérez fermement le couvercle de bobine sur le porte-
bobine. <Fig. K>
Remarque: • En cas d’utilisation de deux bobines de fil, veillez
à ce que les deux bobines fonctionnement dans le
même sens.
• Veillez à ce que les bobines ne se touchent
pas entre elles car le fil ne serait pas entraîné
correctement et l’aiguille risque de casser ou le fil
de s’emmêler ou de casser également. En outre,
veillez à ce que les bobines ne touchent pas le
support de fil central.
• Veillez à ce que le fil ne soit pas bloqué sous la
bobine.
2. Tirez sur le fil de la bobine, puis faites-le passer d’arrière en avant
dans le guide-fil supérieur. <Fig. L
6
>
Remarque: • Lorsque vous utilisez du fil qui se déroule
rapidement, comme du fil métallique, utilisez
l’anneau fourni pour l’empêcher de s’emmêler.
Séquence d’enfilage : tirez le fil de la bobine vers le
haut, faites-le passer par l’anneau (
1
), puis par le
guide-fil (
2
) et de nouveau par l’anneau de haut en
bas (
3
). <Fig. L
7
>
• Veillez à ce que les fils de bobines adjacentes ne
s’emmêlent pas.
• Une fois le fil entraîné comme indiqué, rembobinez
l’excédent de fil sur la bobine car il risque de
s’emmêler.
• Bobinez tout fil inutilisé.
3.
Faites passer le fil dans le guide-fil
8
de droite à gauche. <Fig. M>
4. Continuez l’enfilage conformément aux instructions du manuel
d’instructions de la machine.
Bobinage de la cannette
Pour bobiner la canette lorsque le support du porte-bobines est
installé, tirez le fil de la bobine et passez-le dans le guide-fil sur le
guide-fil télescopique, dans le guide-fil au sommet de la machine,
puis dans le guide-fil de bobinage. Enfin, bobinez la canette
conformément aux instructions du manuel d’instructions de la
machine.
■
Instructions de retrait
1. Par l’arrière de la machine, appuyez sur les boutons de support
pour porte-bobines (un de chaque côté), puis tirez le support pour
porte-bobines vers le haut pour le retirer de la machine. <Fig.N>
2. Fixez le capot supérieur à la machine. <Fig.O>
• Haal het handvat van de machine niet omhoog terwijl het klosrek
isgeïnstalleerd.
• Behandel de telescopische draadgeleider of klospennen niet met
grote kracht; anders kunnen deze beschadigen.
• Plaats geen andere voorwerpen dan draadklossen op het
klosrek.
• Probeer geen draad op de spoel te winden terwijl u naait met het
klosrek.
• Wanneer u draad op de spoel windt, zorgt u dat de
spoelopwinddraad debovendraad niet kruist in de draadgeleiders.
■
Installatie
1. Trek de uitschuifbare draadgeleider volledig uit en draai de
schacht totdat de twee interne stoppers op hun plaats klikken.
<Fig. A>
2. Steek de uitschuifbare draadgeleider in het ronde gat midden in
de klossteun. Draai met een schroevendraaier de schroef stevig
vast
1
vanaf de andere kant. <Fig. B>
Opmerking: Zorg dat de stoppers op de uitschuifbare
draadgeleiderschacht stevig vastzitten en dat de
bovenkant van de draadgeleider direct boven de
klossteun zit. Controleer bovendien of de schacht
stevig vastzit in de klossteun. <Fig. C>
3. Steek de twee klospennen in de twee gaten in de klossteun.
<Fig. D>
4. Open het bovendeksel van de machine. Vanaf de achterkant
van de machine drukt u de grendels van het bovendeksel in.
Vervolgens trekt u het bovendeksel omhoog om het uit de
machine te nemen. <Fig. E>
5. Steek de kloshouder in de inkepingen van de machine. <Fig. F>
■
Inrijgen
Over de draadklos en kloskap
• Gebruik een kloskap die iets groter is dan de klos. <Fig. G> Als
de kloskap kleiner is of veel groter dan de klos, raakt de draad
mogelijk verstrikt. En dan naait de machine mogelijk niet goed.
• Wanneer u draad op een dunne klos gebruikt, plaatst u het
bijgeleverde vilt
2
op de klospen, en plaatst u de garenklos zo
op de klospen dat het midden van de klos tegenover het gat
middenin het vilt staat; vervolgens plaatst u de kloskap op de
klospen. <Fig. H>
• Wanneer u werkt met draad op een kegelvormige klos, gebruikt u de
klossteun
3
. <Fig. I>
• Wanneer u grote kegels draad gebruikt, bevestigt u kloskap
4
op de kloskapbasis
5
; vervolgens plaatst u deze boven op
de klos, op gelijke hoogte met de klos. <Fig. J> Naar gelang
de hoeveelheid draad op de klos, kiest u het juiste formaat
kloskap (XL, L of M). Kloskap (S) kunt u niet gebruiken met de
kloskapbasis.
1. Plaats de klos zo op de klospen dat de klos met de klok mee
draait wanneer de draad afwikkelt. Bevestig vervolgens stevig
de kloskap op de klospen. <Fig. K>
Opmerking: • Wanneer u 2 klossen draad gebruikt, moet u
zorgen dat beideklossen in dezelfde richting
afwikkelen.
• Zorg dat de klossen elkaar niet raken. Anders
wikkelt de draad niet soepel af. Dan breekt de
naald mogelijk, of de draad breekt en raakt
verstrikt. Zorg bovendien dat de klossen de
draadhouder in het midden niet raken.
• Zorg dat de draad niet vastzit onder de klos.
2. Trek de draad van de spoel en leid deze van achteren naar
voren door de draadgeleider boven. <Fig. L
6
>
Opmerking: • Wanneer u draad gebruikt die snel afwikkelt
van de spoel, zoals metallicdraad, gebruikt u de
bijgesloten ring om te voorkomen dat de draad
verstrikt raakt. Volgorde inrijgen: trek de draad
vanuit de klos van onderaf omhoog door de ring
(
1
), door de draadgeleider (
2
) en opnieuw van
bovenaf (
3
) door de ring. <Afb. L
7
>
• Zorg dat de draad van klossen ernaast niet
verstrikt raakt.
• Voer de draad in volgens de aanwijzingen en
wind overtollig draad terug op de klos. Anders
raakt deze overtollige draad verstrikt.
• Wind eventueel ongebruikte draad op.
3. Leid de draad van links naar rechts door de draadgeleider
8
.
<Fig. M>
4. Vervolg met het inrijgen van de machine volgens de
Gebruiksaanwijzing bij de machine.
Draad op de spoel winden
Als u draad op de spoel wilt winden terwijl het klosrek
is geïnstalleerd, leidt u de draad vanuit de klos door de
telescopische draadgeleider; vervolgens leidt u de draad door
de draadgeleider boven op de machine en vervolgens door de
draadgeleider voor spoelwinden. Vervolgens windt u de spoel op
volgens de aanwijzingen in de Gebruiksaanwijzing.
■
Verwijderen
1. Druk aan de achterkant van de machine de sluitingen van het
klosrek in (aan beide zijden één) en trek vervolgens het klosrek
omhoog om dit van de machine te verwijderen. <Fig.N>
2. Plaats het bovendeksel op de machine. <Fig.O>
■
Set contents / Packungsinhalt / Contenu / Inhoud pakket
C
D
E
G
2
H
3
I
4
5
J
K
6
7
2
1
3
L
8
M
N
1
B
A
F
SPOOL STAND INSTRUCTION MANUAL
GARNROLLENSTÄNDER
BEDIENUNGSANLEITUNG
MANUEL D’UTILISATION DU SUPPORT
POUR PORTE-BOBINES
INSTRUCTIES KLOSREK
The spool stand is useful when using thread on spools with a large diameter (cross-wound thread).
The spool stand can hold two spools of thread.
Der Garnrollenständer ist nützlich, wenn Garnrollen mit großem Durchmesser verwendet werden
(kreuzweise aufgespulter Faden). Der Garnständer kann zwei Garnrollen aufnehmen.
Le support pour porte-bobines est utile lors de l’enfilage de bobines de gros diamètre (enfilage
croisé). Le support pour porte-bobines peut contenir deux bobines de fil.
Het klosrek is nuttig wanneer u werkt met draad op klossen met een grote diameter (kruiswikkeldraad).
U kunt twee klossen draad installeren op het klosrek.
O
1
Telescopic thread guide (1) / Teleskop-Fadenführung (1) / Guide-fil télescopique (1) / Telescopische draadgeleider (1)
2
Spool support (1) / Garnrollensockel (1) / Support de bobine (1) / Klosdrager (1)
3
Spool pin (2) / Garnrollenstift (2) / Porte-bobine (2) / Klospen (2)
4
Screw (1) / Schraube (1) / Vis (1) / Schroef (1)
5
Spool cap (XL) (2) / Garnrollenkappe (extragroß) (2) / Couvercle de bobine (XL) (2) / Kloskap (XL) (2)
* Spool caps (L/M/S) are included with the machine.
* Garnrollenkappen (groß/mittel/klein) sind im Lieferumfang der Maschine enthalten.
* Les couvercles de bobine (G/M/P) sont fournis avec la machine.
* Kloskappen (L/M/S) worden bij de machine geleverd.
6
Spool holders (2) / Garnrollenhalter (2) / Supports de base de bobine (2) / Klossteunen (2)
7
Spool cap base (2) / Garnrollenkappensockel (2) / Base du couvercle de bobine (2) / Kloskapbasis (2)
8
Spool felt (2) / Garnrollenfi lz (2) / Feutre de bobine (2) / Klosvilt (2)
9
Ring (4) / Ring (4) / Anneau (4) / Ring (4)
EN
DE
FR
NL
EN
DE
FR
NL