Brother International Innov-is VM5200 Operation Manual - Page 20

Basic operations

Page 20 highlights

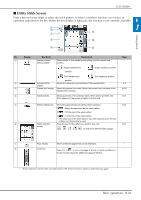
BBasic operations 1 Chapter Getting Ready TURNING THE MACHINE ON/OFF 19 Setting Your Machine for the First Time 20 LCD SCREEN 22 ■ Home Page Screen 22 ■ Utility Stitch Screen 23 ■ Key Functions 24 Using the Machine Setting Mode Key 26 ■ Selecting the "Eco Mode" or "Shutoff Support Mode 30 ■ Changing the Pointer Shape When a USB Mouse Is Used ........ 30 ■ Selecting the Initial Screen Display 30 ■ Choosing the Display Language 31 ■ Changing the Background Colors of the Embroidery Patterns 31 ■ Specifying the Size of Pattern Thumbnails 32 ■ Saving a Settings Screen Image to USB Media 33 Using the Sewing Machine Help Key 34 Using the Operation Guide Function 35 Using the Sewing Guide Function 36 Using the Pattern Explanation Function 37 LOWER THREADING 38 Winding the Bobbin 38 ■ Using the Supplemental Spool Pin 38 ■ Using the Spool Pin 41 ■ Untangling Thread from Beneath the Bobbin Winder Seat ...... 42 Setting the Bobbin 43 Pulling Up the Bobbin Thread 45 UPPER THREADING 46 Upper Threading 46 Using the Twin Needle Mode 49 Using Threads that Unwind Quickly 51 ■ Using the Spool Net 51 ■ Using the Vertical Spool Pin 52 CHANGING THE PRESSER FOOT 53 Removing the Presser Foot 53 Attaching the Presser Foot 53 Attaching the Presser Foot with the Included Adapter 53 ■ Attaching the Walking foot 54 CHANGING THE NEEDLE 55 ABOUT THE NEEDLE AND FABRIC 56 About the Needle 56 Fabric/Thread/Needle Combinations 57 BEFORE EMBROIDERING 58 Embroidery Step by Step 58 Attaching the Embroidery Foot "W 59 Using the Optional Embroidery Foot "W+" with LED Pointer 60 ■ Attaching the Embroidery Foot "W+" with LED Pointer .......... 60 ■ Checking the Needle Drop Point With the Embroidery Foot "W+" with LED Pointer 61 ■ Adjusting the LED Pointer 61 ■ Adjusting the Brightness of the LED Pointer 62 Attaching the Embroidery Unit 62 ■ About the Embroidery Unit 62 ■ Removing the Embroidery Unit 63 USING FUNCTIONS BY CONNECTING THE ACCESSORY TO THE MACHINE 65 Using USB Media or Embroidery Card Reader/ USB Card Writer Module 65 Connecting the Machine to the Computer 65 Using a USB Mouse 66 ■ Clicking a Key 66 ■ Changing Pages 66 Using the Optional Dual Feed Foot 67 ■ Attaching the Dual Feed Foot 67 ■ Attaching/detaching toe 67 ■ Using the Dual Feed Position Lever 68 ■ Adjusting the Amount of Fabric Feeding of the Dual Feed Foot 68

  • 1
  • 2
  • 3
  • 4
  • 5
  • 6
  • 7
  • 8
  • 9
  • 10
  • 11
  • 12
  • 13
  • 14
  • 15
  • 16
  • 17
  • 18
  • 19
  • 20
  • 21
  • 22
  • 23
  • 24
  • 25
  • 26
  • 27
  • 28
  • 29
  • 30
  • 31
  • 32
  • 33
  • 34
  • 35
  • 36
  • 37
  • 38
  • 39
  • 40
  • 41
  • 42
  • 43
  • 44
  • 45
  • 46
  • 47
  • 48
  • 49
  • 50
  • 51
  • 52
  • 53
  • 54
  • 55
  • 56
  • 57
  • 58
  • 59
  • 60
  • 61
  • 62
  • 63
  • 64
  • 65
  • 66
  • 67
  • 68
  • 69
  • 70
  • 71
  • 72
  • 73
  • 74
  • 75
  • 76
  • 77
  • 78
  • 79
  • 80
  • 81
  • 82
  • 83
  • 84
  • 85
  • 86
  • 87
  • 88
  • 89
  • 90
  • 91
  • 92
  • 93
  • 94
  • 95
  • 96
  • 97
  • 98
  • 99
  • 100
  • 101
  • 102
  • 103
  • 104
  • 105
  • 106
  • 107
  • 108
  • 109
  • 110
  • 111
  • 112
  • 113
  • 114
  • 115
  • 116
  • 117
  • 118
  • 119
  • 120
  • 121
  • 122
  • 123
  • 124
  • 125
  • 126
  • 127
  • 128
  • 129
  • 130
  • 131
  • 132
  • 133
  • 134
  • 135
  • 136
  • 137
  • 138
  • 139
  • 140
  • 141
  • 142
  • 143
  • 144
  • 145
  • 146
  • 147
  • 148
  • 149
  • 150
  • 151
  • 152
  • 153
  • 154
  • 155
  • 156
  • 157
  • 158
  • 159
  • 160
  • 161
  • 162
  • 163
  • 164
  • 165
  • 166
  • 167
  • 168
  • 169
  • 170
  • 171
  • 172
  • 173
  • 174
  • 175
  • 176
  • 177
  • 178
  • 179
  • 180
  • 181
  • 182
  • 183
  • 184
  • 185
  • 186
  • 187
  • 188
  • 189
  • 190
  • 191
  • 192
  • 193
  • 194
  • 195
  • 196
  • 197
  • 198
  • 199
  • 200
  • 201
  • 202
  • 203
  • 204
  • 205
  • 206
  • 207
  • 208
  • 209
  • 210
  • 211
  • 212
  • 213
  • 214
  • 215
  • 216
  • 217
  • 218
  • 219
  • 220
  • 221
  • 222
  • 223
  • 224
  • 225
  • 226
  • 227
  • 228
  • 229
  • 230
  • 231
  • 232
  • 233
  • 234
  • 235
  • 236
  • 237
  • 238
  • 239
  • 240
  • 241
  • 242
  • 243
  • 244
  • 245
  • 246
  • 247
  • 248
  • 249
  • 250
  • 251
  • 252
  • 253
  • 254
  • 255
  • 256
  • 257
  • 258
  • 259
  • 260
  • 261
  • 262
  • 263
  • 264
  • 265
  • 266
  • 267
  • 268
  • 269
  • 270
  • 271
  • 272
  • 273
  • 274
  • 275
  • 276
  • 277
  • 278
  • 279
  • 280
  • 281
  • 282
  • 283
  • 284
  • 285
  • 286
  • 287
  • 288
  • 289
  • 290
  • 291
  • 292
  • 293
  • 294
  • 295
  • 296
  • 297
  • 298
  • 299
  • 300
  • 301
  • 302
  • 303
  • 304
  • 305
  • 306
  • 307
  • 308
  • 309
  • 310
  • 311
  • 312

Chapter
1
B
Basic operations
Getting Ready
TURNING THE MACHINE ON/OFF
........................
19
Setting Your Machine for the First Time
...................................
20
LCD SCREEN
............................................................
22
Home Page Screen
...................................................................
22
Utility Stitch Screen
.................................................................
23
Key Functions
...........................................................................
24
Using the Machine Setting Mode Key
......................................
26
Selecting the “Eco Mode” or “Shutoff Support Mode”
.............
30
Changing the Pointer Shape When a USB Mouse Is Used
........
30
Selecting the Initial Screen Display
..........................................
30
Choosing the Display Language
................................................
31
Changing the Background Colors of the Embroidery
Patterns
....................................................................................
31
Specifying the Size of Pattern Thumbnails
...............................
32
Saving a Settings Screen Image to USB Media
..........................
33
Using the Sewing Machine Help Key
.......................................
34
Using the Operation Guide Function
........................................
35
Using the Sewing Guide Function
.............................................
36
Using the Pattern Explanation Function
....................................
37
LOWER THREADING
..............................................
38
Winding the Bobbin
..................................................................
38
Using the Supplemental Spool Pin
............................................
38
Using the Spool Pin
..................................................................
41
Untangling Thread from Beneath the Bobbin Winder Seat
......
42
Setting the Bobbin
....................................................................
43
Pulling Up the Bobbin Thread
...................................................
45
UPPER THREADING
................................................
46
Upper Threading
.......................................................................
46
Using the Twin Needle Mode
..................................................
49
Using Threads that Unwind Quickly
.........................................
51
Using the Spool Net
.................................................................
51
Using the Vertical Spool Pin
....................................................
52
CHANGING THE PRESSER FOOT
............................
53
Removing the Presser Foot
........................................................
53
Attaching the Presser Foot
........................................................
53
Attaching the Presser Foot with the Included Adapter
..............
53
Attaching the Walking foot
......................................................
54
CHANGING THE NEEDLE
.......................................
55
ABOUT THE NEEDLE AND FABRIC
.........................
56
About the Needle
......................................................................
56
Fabric/Thread/Needle Combinations
........................................
57
BEFORE EMBROIDERING
........................................
58
Embroidery Step by Step
..........................................................
58
Attaching the Embroidery Foot “W”
.........................................
59
Using the Optional Embroidery Foot “W+” with LED
Pointer
......................................................................................
60
Attaching the Embroidery Foot “W+” with LED Pointer
..........
60
Checking the Needle Drop Point With the Embroidery Foot
“W+” with LED Pointer
............................................................
61
Adjusting the LED Pointer
........................................................
61
Adjusting the Brightness of the LED Pointer
.............................
62
Attaching the Embroidery Unit
.................................................
62
About the Embroidery Unit
......................................................
62
Removing the Embroidery Unit
...............................................
63
USING FUNCTIONS BY CONNECTING THE
ACCESSORY TO THE MACHINE
.............................
65
Using USB Media or Embroidery Card Reader/
USB Card Writer Module*
.......................................................
65
Connecting the Machine to the Computer
...............................
65
Using a USB Mouse
..................................................................
66
Clicking a Key
...........................................................................
66
Changing Pages
.........................................................................
66
Using the Optional Dual Feed Foot
..........................................
67
Attaching the Dual Feed Foot
...................................................
67
Attaching/detaching toe
...........................................................
67
Using the Dual Feed Position Lever
..........................................
68
Adjusting the Amount of Fabric Feeding of the Dual Feed
Foot
..........................................................................................
68