Brother International IntelliFax-1860C Quick Setup Guide - English
Brother International IntelliFax-1860C Manual
 |
View all Brother International IntelliFax-1860C manuals
Add to My Manuals
Save this manual to your list of manuals |
Brother International IntelliFax-1860C manual content summary:
- Brother International IntelliFax-1860C | Quick Setup Guide - English - Page 1
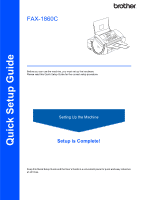
Quick Setup Guide FAX-1860C Before you can use the machine, you must set up the hardware. Please read this Quick Setup Guide for the correct setup procedure. Setting Up the Machine Setup is Complete! Keep this Quick Setup Guide and the User's Guide in a convenient place for quick and easy reference - Brother International IntelliFax-1860C | Quick Setup Guide - English - Page 2
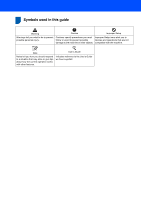
used in this guide 1 Warning Warnings tell you what to do to prevent possible personal injury. Caution Improper Setup Cautions specify procedures you must Improper Setup icons alert you to follow or avoid to prevent possible devices and operations that are not damage to the machine or other - Brother International IntelliFax-1860C | Quick Setup Guide - English - Page 3
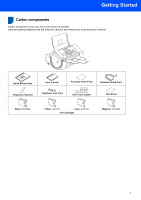
and the carton in case for any reason you must ship your machine. Quick Setup Guide Telephone Handset User's Guide Accesory Order Form Handset Curled Cord Telephone Line Cord One Touch Labels Test Sheet Black (LC51BK) Yellow (LC51Y) Cyan (LC51C) Ink Cartridges Magenta (LC51M) 1 - Brother International IntelliFax-1860C | Quick Setup Guide - English - Page 4
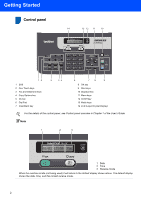
2 14 13 12 11 10 01/01 13:00 Fax 12 1 Shift 2 One Touch keys 3 Fax and telephone keys 4 Copy Options key 5 Ink key 6 Dial Pad 7 Clear/Back key 3 45 overview in Chapter 1 of the User's Guide. Note 1 2 3 01/01 13:00 Fax 1 Date 2 Time 3 Receive mode When the machine is idle (not being used) - Brother International IntelliFax-1860C | Quick Setup Guide - English - Page 5
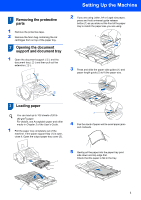
Setting Up the Machine 1 1 Removing the protective parts 1 Remove the protective tape. 2 Remove the foam bag containing the ink cartridges from on top of the paper tray. 2 Opening the document support and document tray 1 Open the document support ( ) and the document tray ( ) and then pull out the - Brother International IntelliFax-1860C | Quick Setup Guide - English - Page 6
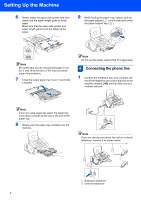
and cause paper feed problems. 7 Close the output paper tray cover (1) and slide it forward. Note Do not use the paper support flap for Legal paper. 4 Connecting the phone line 1 Connect the telephone line cord. Connect one end of the telephone line cord to the jack on the machine marked LINE and - Brother International IntelliFax-1860C | Quick Setup Guide - English - Page 7
part (1). Set the receive mode to 'External TAD' if you have an external answering machine. For details, see Connecting an external TAD (telephone answering device) in Chapter 7 of the User's Guide. 5 Connecting the power cord 1 Connect the power cord. 6 Installing the ink cartridges Warning If ink - Brother International IntelliFax-1860C | Quick Setup Guide - English - Page 8
Machine 4 Take out the ink cartridge. 6 Install each ink cartridge in the direction of the arrow on the label. Take care to match the color of the lock release lever (1) with the cartridge color (2), as shown in the diagram below. 2 5 Carefully remove the protective yellow cap (1). 1 1 M brother - Brother International IntelliFax-1860C | Quick Setup Guide - English - Page 9
continue to replace consumed ink cartridges with only Genuine Brother Branded Supplies. 7 Print quality check 1 After the cleaning cycle is finished, the LCD shows: Set Paper and q Press Start 2 Make sure paper is loaded in the paper tray. Press Color Start. The machine starts printing the Print - Brother International IntelliFax-1860C | Quick Setup Guide - English - Page 10
2.No After pressing 1 (Yes) or 2 (No) for both black and color, the LCD shows: Start Cleaning? q 1.Yes 2.No 7 Press 1 (Yes), the machine will then start cleaning the colors. 8 After cleaning is finished, press Color Start. The machine starts printing the Print Quality Check Sheet again and goes back - Brother International IntelliFax-1860C | Quick Setup Guide - English - Page 11
the current date and time, print out the Users Settings Report. See Printing Reports in the User's Guide. 10 Setting your station ID You should store your name and fax number to be printed on all fax pages that you send. 1 Press Menu, 0, 2. 2 Enter your fax number (up to 20 digits) on the dial - Brother International IntelliFax-1860C | Quick Setup Guide - English - Page 12
possible receive modes: Fax Only, Fax/Tel, Manual and External TAD. Do you use a Distinctive Ring subscriber service? Yes No See Distinctive Ring in Chapter 7 of the User's Guide. Are you connecting an external telephone or external TAD (telephone answering device) to the machine? Yes No Are - Brother International IntelliFax-1860C | Quick Setup Guide - English - Page 13
can download the Brother printer driver and PCFax send driver from the Brother Soloutions Center for use with FAX-1860C. Vist us at: http://solutions.brother.com Follow install instructions on the Driver download page. Note • Please download the printer driver first before connecting the machine to - Brother International IntelliFax-1860C | Quick Setup Guide - English - Page 14
1 When the time comes to replace ink cartridges, an error message will be indicated on the LCD. For more information about the ink cartridges for your machine, visit http://solutions.brother.com or contact your local Brother re-seller. Ink cartridge Black LC51BK Yellow LC51Y Cyan LC51C Magenta - Brother International IntelliFax-1860C | Quick Setup Guide - English - Page 15
compiled and published, covering the latest product descriptions and specifications. The contents of this manual and the specifications of this product are subject to change without notice. Brother reserves the right to make changes without notice in the specifications and materials contained herein - Brother International IntelliFax-1860C | Quick Setup Guide - English - Page 16
USA
-
 1
1 -
 2
2 -
 3
3 -
 4
4 -
 5
5 -
 6
6 -
 7
7 -
8
-
9
-
10
-
11
-
12
-
13
-
14
-
15
-
16
 |
 |

Setup is Complete!
Quick Setup Guide
Setting Up the Machine
FAX-1860C
Before you can use the machine, you must set up the hardware.
Please read this Quick Setup Guide for the correct setup procedure.
Keep this Quick Setup Guide and the User’s Guide in a convenient place for quick and easy reference
at all times.