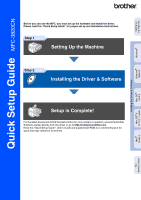
Brother International MFC 3820CN Quick Setup Guide - English - Page 6
Step1 Setting Up the Machine, 1 Removing the Protective Parts, 2 Attaching the Paper Tray and Support
 |
UPC - 012502607151
View all Brother International MFC 3820CN manuals
Add to My Manuals
Save this manual to your list of manuals |
Page 6 highlights
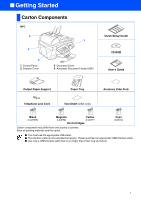
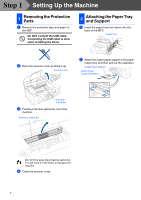
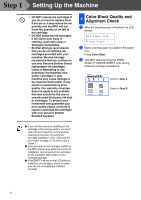
Step 1 Setting Up the Machine 1 Removing the Protective Parts 1 Remove the protective tape and paper in the ADF. Do NOT connect the USB cable. Connecting the USB cable is done when installing the driver. 2 Attaching the Paper Tray and Support 1 Insert the paper tray from above into the back of the MFC. Paper Tray 2 Open the scanner cover by lifting it up. Scanner Cover 2 Attach the output paper support to the paper output slot, and then pull out the extension. Output Paper Support Output Paper Support Extension Protective Yellow Bar 3 Pull the protective yellow bar out of the machine. Protective Yellow Bar Do not throw away the protective yellow bar. You will need it in the future to transport the machine. 4 Close the scanner cover. 4
-
 1
1 -
 2
2 -
 3
3 -
 4
4 -
 5
5 -
 6
6 -
 7
7 -
 8
8 -
 9
9 -
 10
10 -
 11
11 -
 12
12 -
13
-
14
-
15
-
16
-
17
-
18
-
19
-
20
-
21
-
22
-
23
-
24
-
25
-
26
-
27
-
28
-
29
-
30
-
31
-
32
-
33
-
34
-
35
-
36
-
37
-
38
-
39
-
40
-
41
-
42
 |
 |

4
Setting Up the Machine
1
Remove the protective tape and paper in
the ADF.
Do NOT connect the USB cable.
Connecting the USB cable is done
when installing the driver.
2
Open the scanner cover by lifting it up.
3
Pull the protective yellow bar out of the
machine.
4
Close the scanner cover.
1
Insert the paper tray from above into the
back of the MFC.
2
Attach the output paper support to the paper
output slot, and then pull out the extension.
1
Removing the Protective
Parts
Do not throw away the protective yellow bar.
You will need it in the future to transport the
machine.
Scanner Cover
Protective
Yellow Bar
Protective Yellow Bar
2
Attaching the Paper Tray
and Support
Paper Tray
Output Paper Support
Output Paper
Support Extension
Step 1