Brother International MFC 8440 Quick Setup Guide - English - Page 15
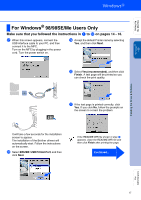
For USB Interface Cable Users (For Windows® 98/98SE/Me/2000 Professional/XP) - scan driver
 |
UPC - 012502610342
View all Brother International MFC 8440 manuals
Add to My Manuals
Save this manual to your list of manuals |
Page 15 highlights
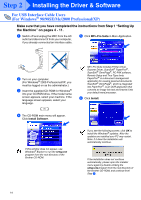
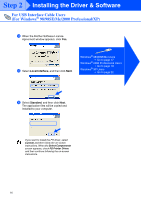
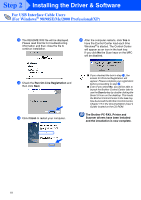
Step 2 Installing the Driver & Software For USB Interface Cable Users (For Windows® 98/98SE/Me/2000 Professional/XP) Make sure that you have completed the instructions from Step 1 "Setting Up the Machine" on pages 4 - 11. 1 Switch off and unplug the MFC from the AC outlet and disconnect it from your computer, if you already connected an interface cable. 5 Click MFL-Pro Suite in Main Application. 2 Turn on your computer. (For Windows® 2000 Professional/XP, you must be logged on as the administrator.) 3 Insert the supplied CD-ROM for Windows® into your CD-ROM drive. If the model name screen appears, select your machine. If the language screen appears, select your language. MFL-Pro Suite includes Printer Driver, Scanner Driver, ScanSoft ® PaperPort®, ScanSoft ® OmniPage®, PC-FAX software, Remote Setup and True Type fonts. PaperPort ® is a document management application for viewing scanned documents. ScanSoft ® OmniPage®, which is integrated into PaperPort ®, is an OCR application that converts an image into text and inserts it into your default word processor. 6 Click Install. 4 The CD-ROM main menu will appear. Click Install Software. If this window does not appear, use Windows® Explore to run the setup.exe program from the root directory of the Brother CD-ROM. If you see the following screen, click OK to install the Windows® updates. After the updates are installed your PC may restart. Note: If it does the installation will automatically continue. If the installation does not continue automatically, please open the installer menu again by double-clicking the setup.exe program from the root directory of the Brother CD-ROM, and continue from Step 4. 14
-
 1
1 -
2
-
3
-
4
-
5
-
6
-
7
-
8
-
9
-
 10
10 -
 11
11 -
 12
12 -
 13
13 -
 14
14 -
 15
15 -
 16
16 -
 17
17 -
 18
18 -
 19
19 -
 20
20 -
21
-
22
-
23
-
24
-
25
-
26
-
27
-
28
-
29
-
30
-
31
-
32
-
33
-
34
-
35
-
36
-
37
-
38
-
39
-
40
-
41
-
42
-
43
-
44
-
45
-
46
-
47
-
48
-
49
-
50
-
51
-
52
-
53
-
54
-
55
-
56
 |
 |