Brother International MFC-9130CW Users Manual - English - Page 152
Print Text in Black, Improve Gray Color
 |
View all Brother International MFC-9130CW manuals
Add to My Manuals
Save this manual to your list of manuals |
Page 152 highlights
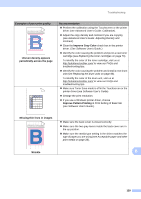
Examples of poor print quality The color of your printouts is not what you expected ABCDEFGHIJKLMNOPQRSTUVWXYZ. 0123456789. abcdefghijklmnopqrstuvwxyz. ABCDEFGHIJKLMNOPQRSTUVWXYZ. 0123456789. abcdefghijklmnopqrstuvwxyz. ABCDEFGHIJKLMNOPQRSTUVWXYZ. 0123456789. abcdefghijklmnopqrstuvwxyz. ABCDEFGHIJKLMNOPQRSTUVWXYZ. 0123456789. abcdefghijklmnopqrstuvwxyz. ABCDEFGHIJKLMNOPQRSTUVWXYZ. 0123456789. abcdefghijklmnopqrstuvwxyz. ABCDEFGHIJKLMNOPQRSTUVWXYZ. 0123456789. abcdefghijklmnopqrstuvwxyz. ABCDEFGHIJKLMNOPQRSTUVWXYZ. 0123456789. abcdefghijklmnopqrstuvwxyz. ABCDEFGHIJKLMNOPQRSTUVWXYZ. 0123456789. abcdefghijklmnopqrstuvwxyz. Color misregistration Recommendation To improve the color density, calibrate the colors using first the Touchscreen and then the printer driver (see Advanced User's Guide: Calibration). To adjust the print position of colors for sharper edges, perform an automatic color registration using the Touchscreen (see Advanced User's Guide: Auto Registration). Adjust the copy density and contrast if you are copying (see Advanced User's Guide: Adjusting Density and Contrast). Make sure Toner Save mode is off in the Touchscreen or the printer driver (see Software User's Guide). If the print quality of the black portion is not what you expected, select the Print Text in Black check box in the printer driver (see Software User's Guide). If the print quality is poor, clear the Improve Gray Color check box in the printer driver (see Software User's Guide). Identify the color causing the problem and put in a new toner cartridge (see Replacing the toner cartridges on page 76). To identify the color of the toner cartridge, visit us at http://solutions.brother.com/ to view our FAQs and troubleshooting tips. Identify the color causing the problem and install a new drum unit (see Replacing the drum units on page 86). To identify the color of the drum unit, visit us at http://solutions.brother.com/ to view our FAQs and troubleshooting tips. Make sure the machine is on a solid level surface. Perform the auto color registration using the Touchscreen (see Advanced User's Guide: Auto Registration). Identify the color causing the problem and install a new drum unit (see Replacing the drum units on page 86). To identify the color of the drum unit, visit us at http://solutions.brother.com/ to view our FAQs and troubleshooting tips. Install a new belt unit (see Replacing the belt unit on page 91). 138
-
 1
1 -
2
-
3
-
4
-
5
-
6
-
7
-
8
-
9
-
10
-
11
-
12
-
13
-
14
-
15
-
16
-
17
-
18
-
19
-
20
-
21
-
22
-
23
-
24
-
25
-
26
-
27
-
28
-
29
-
30
-
31
-
32
-
33
-
34
-
35
-
36
-
37
-
38
-
39
-
40
-
41
-
42
-
43
-
44
-
45
-
46
-
47
-
48
-
49
-
50
-
51
-
52
-
53
-
54
-
55
-
56
-
57
-
58
-
59
-
60
-
61
-
62
-
63
-
64
-
65
-
66
-
67
-
68
-
69
-
70
-
71
-
72
-
73
-
74
-
75
-
76
-
77
-
78
-
79
-
80
-
81
-
82
-
83
-
84
-
85
-
86
-
87
-
88
-
89
-
90
-
91
-
92
-
93
-
94
-
95
-
96
-
97
-
98
-
99
-
100
-
101
-
102
-
103
-
104
-
105
-
106
-
107
-
108
-
109
-
110
-
111
-
112
-
113
-
114
-
115
-
116
-
117
-
118
-
119
-
120
-
121
-
122
-
123
-
124
-
125
-
126
-
127
-
128
-
129
-
130
-
131
-
132
-
133
-
134
-
135
-
136
-
137
-
138
-
139
-
140
-
141
-
142
-
143
-
144
-
145
-
146
-
 147
147 -
 148
148 -
 149
149 -
 150
150 -
 151
151 -
 152
152 -
 153
153 -
 154
154 -
 155
155 -
 156
156 -
 157
157 -
158
-
159
-
160
-
161
-
162
-
163
-
164
-
165
-
166
-
167
-
168
-
169
-
170
-
171
-
172
-
173
-
174
-
175
-
176
-
177
-
178
-
179
-
180
-
181
-
182
-
183
-
184
-
185
-
186
-
187
-
188
-
189
-
190
-
191
-
192
-
193
-
194
-
195
-
196
-
197
-
198
-
199
-
200
-
201
-
202
-
203
-
204
-
205
-
206
-
207
-
208
-
209
-
210
-
211
-
212
-
213
-
214
-
215
-
216
-
217
-
218
-
219
-
220
-
221
-
222
-
223
-
224
-
225
-
226
 |
 |
