Brother International MFC-9320CW Network Users Manual - English - Page 165
Manually entering text, Receiving E-mail or Internet fax, Shift, Black Start, Mono Start, Stop/Exit
 |
UPC - 012502622406
View all Brother International MFC-9320CW manuals
Add to My Manuals
Save this manual to your list of manuals |
Page 165 highlights
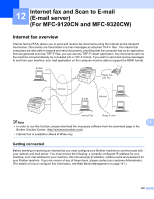
Internet fax and Scan to E-mail (E-mail server) (For MFC-9120CN and MFC-9320CW) Manually entering text 12 Press Shift and 1 simultaneously to change into the "alphabet" dialing mode. You can use the Dial Pad to enter the E-mail address. For more information, see Entering Text on page 229. Please note that also you can connect to the machine using a web browser and store the E-mail address information to a Speed Dial or One Touch location through Web Based Management. (For more information on Web Based Management, see Web Based Management on page 141.) As you enter an Internet fax address, the address will appear character by character on the LCD panel. If you specify more than 22 characters, the LCD panel will scroll the name to the left character by character. You can enter up to 60 characters. Press Black Start/Mono Start or Color Start/Colour Start to send the document. After the document is scanned, it is transmitted to the recipient Internet fax machine automatically via your SMTP server. You can cancel the send operation by pressing the Stop/Exit key during scanning. After the transmission is finished, the machine will return to standby mode. Some E-mail servers do not allow you to send large E-mail documents (the System Administrator will often place a limit on the maximum E-mail size). With this function enabled, the machine will display Out of Memory when trying to send E-mail documents over 1 Mbyte in size. The document will not be sent and an error report will be printed. The document you are sending should be separated into smaller documents that will be accepted by the mail server. (For your information, a 42 page document based on the ITU-T Test Chart #1 test chart is approximately 1 Mbyte in size.) Receiving E-mail or Internet fax 12 There are 2 ways you can receive E-mail messages: „ POP3 receiving (manually initiated) „ POP3 receiving at regular intervals Using POP3 receiving the machine must poll the E-mail server to receive the print jobs. This polling can occur 12 at set intervals (for example, you can configure the machine to poll the E-mail server at 10 minute intervals) or you can manually poll the server by pressing the Shift + Black Start/Mono Start or Color Start/Colour Start keys. If your machine starts to receive E-mail print jobs, the LCD panel will reflect this activity. For example, you will see Receiving on the LCD panel followed by xx E-mail(s). If you press the Shift + Black Start/Mono Start or Color Start/Colour Start keys to manually poll the E-mail server for E-mail print jobs and there are no mail documents waiting to be printed, the machine will display No Mail on the LCD panel for two seconds. If your machine is out of paper when receiving data, the received data will be held in the machine's memory. This data will be printed automatically after paper is re-inserted into the machine. (For European, Asian and Oceanic machines, Memory Receive must be switched On.) If the received mail is not in a plain text format or an attached file is not in the TIFF-F format, the following error message will be printed: "ATTACHED FILE FORMAT NOT SUPPORTED. FILE NAME:XXXXXX.doc". If the received mail is too large, the following error message will be printed: "E-MAIL FILE TOO LARGE". If Delete POP Receive Error Mail is ON (default) then the error mail is automatically deleted from the E-mail server. 154
-
 1
1 -
2
-
3
-
4
-
5
-
6
-
7
-
8
-
9
-
10
-
11
-
12
-
13
-
14
-
15
-
16
-
17
-
18
-
19
-
20
-
21
-
22
-
23
-
24
-
25
-
26
-
27
-
28
-
29
-
30
-
31
-
32
-
33
-
34
-
35
-
36
-
37
-
38
-
39
-
40
-
41
-
42
-
43
-
44
-
45
-
46
-
47
-
48
-
49
-
50
-
51
-
52
-
53
-
54
-
55
-
56
-
57
-
58
-
59
-
60
-
61
-
62
-
63
-
64
-
65
-
66
-
67
-
68
-
69
-
70
-
71
-
72
-
73
-
74
-
75
-
76
-
77
-
78
-
79
-
80
-
81
-
82
-
83
-
84
-
85
-
86
-
87
-
88
-
89
-
90
-
91
-
92
-
93
-
94
-
95
-
96
-
97
-
98
-
99
-
100
-
101
-
102
-
103
-
104
-
105
-
106
-
107
-
108
-
109
-
110
-
111
-
112
-
113
-
114
-
115
-
116
-
117
-
118
-
119
-
120
-
121
-
122
-
123
-
124
-
125
-
126
-
127
-
128
-
129
-
130
-
131
-
132
-
133
-
134
-
135
-
136
-
137
-
138
-
139
-
140
-
141
-
142
-
143
-
144
-
145
-
146
-
147
-
148
-
149
-
150
-
151
-
152
-
153
-
154
-
155
-
156
-
157
-
158
-
159
-
 160
160 -
 161
161 -
 162
162 -
 163
163 -
 164
164 -
 165
165 -
 166
166 -
 167
167 -
 168
168 -
 169
169 -
 170
170 -
171
-
172
-
173
-
174
-
175
-
176
-
177
-
178
-
179
-
180
-
181
-
182
-
183
-
184
-
185
-
186
-
187
-
188
-
189
-
190
-
191
-
192
-
193
-
194
-
195
-
196
-
197
-
198
-
199
-
200
-
201
-
202
-
203
-
204
-
205
-
206
-
207
-
208
-
209
-
210
-
211
-
212
-
213
-
214
-
215
-
216
-
217
-
218
-
219
-
220
-
221
-
222
-
223
-
224
-
225
-
226
-
227
-
228
-
229
-
230
-
231
-
232
-
233
-
234
-
235
-
236
-
237
-
238
-
239
-
240
-
241
-
242
-
243
-
244
-
245
-
246
-
247
-
248
-
249
 |
 |
