Brother International MFC-9560CDW Quick Setup Guide - English - Page 26
Con the wireless, settings typical Wireless, Setup in infrastructure
 |
UPC - 012502625124
View all Brother International MFC-9560CDW manuals
Add to My Manuals
Save this manual to your list of manuals |
Page 26 highlights
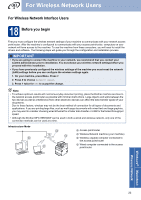
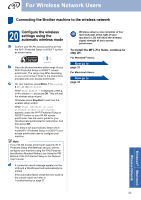
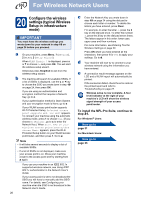
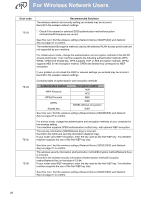
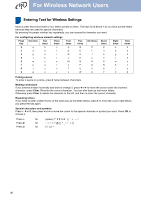
For Wireless Network Users 20 Configure the wireless settings (typical Wireless Setup in infrastructure mode) IMPORTANT You must have the wireless settings you wrote down for your network in step 19 on page 24 before you proceed. a On your machine, press Menu, 7 (Network), 2 (WLAN), 2 (Setup Wizard). When WLAN Enable ? is displayed, press a or b to choose On and press OK. This will start the wireless setup wizard. Otherwise press Stop/Exit to exit from the wireless setup wizard. b The machine will search for available SSIDs. If a list of SSIDs is displayed, use the a or b key to choose the SSID you wrote down in step 19 on page 24, then press OK. If you are using an authentication and encryption method that requires a Network Key, go to c. If your authentication method is Open System and your encryption mode is None, go to e. If your WLAN access point/router supports Wi-Fi Protected Setup, Selected access point supports WPS. Use WPS? appears. To connect your machine using the automatic wireless mode, press 1 to choose Yes. (If you choose No(Manual), go to c to enter the Network Key.) When Start WPS on your wireless access point/router,then choose Next. appears, press the Wi-Fi Protected Setup button on your WLAN access point/router, and then press 1. Go to e. Note • It will take several seconds to display a list of available SSIDs. • If a list of SSIDs is not displayed, make sure your access point is on. Move your machine closer to the access point and try starting from a again. If you use your machine in an IEEE 802.1x supported wireless network, see Using IEEE 802.1x authentication in the Network User's Guide. If your access point is set to not broadcast the SSID you will have to manually add the SSID name. For details, see Configuring your machine when the SSID is not broadcast in the Network User's Guide. 26 c Enter the Network Key you wrote down in step 19 on page 24 using the dial pad to choose each letter or number. To delete the letters you have entered, press Clear. For example, to enter the letter a, press the 2 key on the dial pad once. To enter the number 3, press the 3 key on the dial pad seven times. The letters appear in this order: lower case, upper case and then numbers. For more information, see Entering Text for Wireless Settings on page 30. Press OK when you have entered all the characters, then press 1 for Yes to apply your settings. Go to d. d Your machine will now try to connect to your wireless network using the information you have entered. e A connection result message appears on the LCD and a WLAN report will automatically be printed. If the connection failed, check the error code on the printed report and refer to Troubleshooting on page 27. Wireless setup is now complete. A four level indicator at the right of your machine's LCD will show the wireless signal strength of your access point/router. To install the MFL-Pro Suite, continue to step 21. For Windows® Users: Now go to page 31 For Macintosh Users: Now go to page 33
-
 1
1 -
2
-
3
-
4
-
5
-
6
-
7
-
8
-
9
-
10
-
11
-
12
-
13
-
14
-
15
-
16
-
17
-
18
-
19
-
20
-
 21
21 -
 22
22 -
 23
23 -
 24
24 -
 25
25 -
 26
26 -
 27
27 -
 28
28 -
 29
29 -
 30
30 -
 31
31 -
32
-
33
-
34
-
35
-
36
-
37
-
38
 |
 |
