Brother International MFC 9760 Quick Setup Guide - Page 1
Brother International MFC 9760 - B/W Laser - All-in-One Manual
 |
View all Brother International MFC 9760 manuals
Add to My Manuals
Save this manual to your list of manuals |
Page 1 highlights
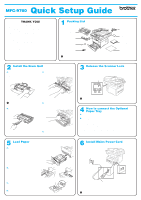
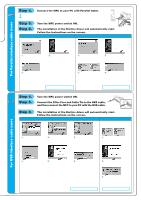
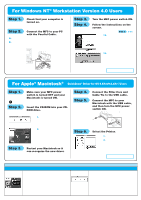
MFC-9760 Quick Setup Guide THANK YOU! ... FOR PURCHASING YOUR BROTHER MACHINE. WE ARE SURE YOU WILL BE IMPRESSED WITH THE CONVENIENT WAY THAT YOUR NEW MACHINE PERFORMS SO MANY TASKS WITH GREAT RESULTS! Follow these simple instructions in numerical order. For greater detail, consult your Owner's Manual and CD-ROM. Alternatively, if you cannot solve a problem: Refer to Frequently Asked Questions (FAQ's) on Brother Solutions Web Site: URL: http://solutions.brother.com Call Brother Customer Service at: 0161 931 2354 1 Packing List Drum Unit Assembly (With Regular Toner Cartridge) Mains Power Cord Cable Tie IEEE-1284 Compliant Bi-directioned Cable CD-ROM Owner's Manual For USB Cable Brother Quick Setup Guide Keep the packing materials for possible future transport. If you do not pack the machine properly, it may void your warranty. 2 Install the Drum Unit A. Unpack the drum unit assembly, and gently rock it from side to side five or six times to distribute the toner evenly inside the cartridge. C. Open the front cover of the machine. 3 Release the Scanner Lock Move the lever to the Unlock position as in the diagram below. Please note the location of the Blue Scanner Lock Lever from the diagram. Scanner Lock Lever To prevent damage to the drum, do not expose it to light for longer than a few minutes. B. Remove the protective part. D. Insert the drum unit assembly into the machine. E. Close the front cover. 5 Load Paper A. Pull the paper cassette completely out of the machine. Lock Unlock If CHECK SCAN LOCK appears on the LCD, check the lever is fully in the unlock position and press Stop. 4 How to connect the Optional Paper Tray A. Carefully pick up the machine and place it on top of the Optional Paper Tray (Lower Tray). B. Plug the modular cable from the Lower Tray into the modular jack on the machine. To select which tray will be used for faxes or for copies, see Lower Tray (With Optional Paper Tray Only) in the Owner's Manual and for printer setting, see Paper Source in the Owner's Manual on the CD-ROM. If you move the machine after connecting the Lower Tray, be sure to carefully lift the Lower Tray with the machine because they are not fixed together. 6 Install Mains Power Cord B. Adjust the paper guides at the right and rear of the paper cassette for the paper size you want. C. Load paper in the paper cassette. Press down on the paper to flatten it in all four corners, keeping the paper level below the guide. D. Slide the paper cassette into the machine until it locks into place. Maximum Paper Height Guide - 1 - Mains Power Cord Turn the power switch ON. Complete reading this guide before connecting the Parallel or USB cables. Version A
-
 1
1 -
 2
2 -
 3
3 -
 4
4
 |
 |