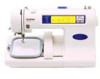
Brother International PE-170D Users Manual - English - Page 51
SEWING A BASIC EMBROIDERY PATTERN, Embroidering multi-color patterns
 |
View all Brother International PE-170D manuals
Add to My Manuals
Save this manual to your list of manuals |
Page 51 highlights
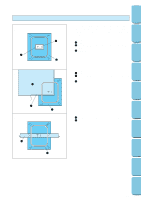
CONTENTS MACHINE KNOWLEDGE EMBROIDERING MAINTENANCE SEWING A BASIC EMBROIDERY PATTERN Embroidering multi-color patterns (1) (2) (3) (2) (3) When a pattern is selected it is broken down into color diagrams on the screen. The order of embroidering is shown left to right. The diagram on the left is for the first thread color. 1. Thread the first color. (See page 16 - 17) When the "START/STOP" button is pressed, the first part of the pattern (1) will be sewn and then the machine will stop automatically. * Be sure to raise the presser foot before changing the thread. * When embroidering is completed for this color, the screen display will automatically move to the left one position. 2. Replace the upper thread with the next color and press the "START/STOP" button. The second part of the pattern (2) will be embroidered and the machine will then stop automatically. 3. Replace the upper thread with the next color and press the "START/STOP" button. The third part of the pattern (3) will be embroidered and the machine will then stop automatically. (3) 4. Trim any excess thread. ERROR MESSAGE TROUBLESHOOTING PATTERNS EMBROIDERING USING A SMALL FRAME (OPTIONAL) EMBROIDERING USING A EXTRA-SMALL FRAME (OPTIONAL) Embroidering single color patterns 1. Thread the machine. (See page 16 - 17) 2. Install the embroidery frame. (See page 20 - 22) 3. Lower the presser foot. 4. Press the "START/STOP" button to sew the pattern: the machine will stop automatically when it is finished. 5. Raise the presser foot. 6. Trim any excess thread. 48 EMBROIDERING USING A LARGE FRAME (OPTIONAL)
-
 1
1 -
2
-
3
-
4
-
5
-
6
-
7
-
8
-
9
-
10
-
11
-
12
-
13
-
14
-
15
-
16
-
17
-
18
-
19
-
20
-
21
-
22
-
23
-
24
-
25
-
26
-
27
-
28
-
29
-
30
-
31
-
32
-
33
-
34
-
35
-
36
-
37
-
38
-
39
-
40
-
41
-
42
-
43
-
44
-
45
-
 46
46 -
 47
47 -
 48
48 -
 49
49 -
 50
50 -
 51
51 -
 52
52 -
 53
53 -
 54
54 -
 55
55 -
 56
56 -
57
-
58
-
59
-
60
-
61
-
62
-
63
-
64
-
65
-
66
-
67
-
68
-
69
-
70
-
71
-
72
-
73
-
74
-
75
-
76
-
77
-
78
-
79
-
80
-
81
-
82
-
83
-
84
-
85
-
86
-
87
-
88
-
89
-
90
-
91
-
92
-
93
-
94
-
95
-
96
-
97
-
98
-
99
-
100
-
101
-
102
-
103
-
104
-
105
-
106
-
107
-
108
-
109
-
110
-
111
-
112
-
113
-
114
-
115
-
116
-
117
-
118
-
119
-
120
-
121
-
122
-
123
-
124
-
125
-
126
-
127
-
128
-
129
-
130
-
131
-
132
-
133
-
134
-
135
-
136
-
137
-
138
-
139
-
140
-
141
-
142
-
143
-
144
-
145
-
146
-
147
 |
 |
