Brother International PE-DESIGN 11 Installation Guide for the upgrade version - Page 2
Installing the Software - software key download
 |
View all Brother International PE-DESIGN 11 manuals
Add to My Manuals
Save this manual to your list of manuals |
Page 2 highlights
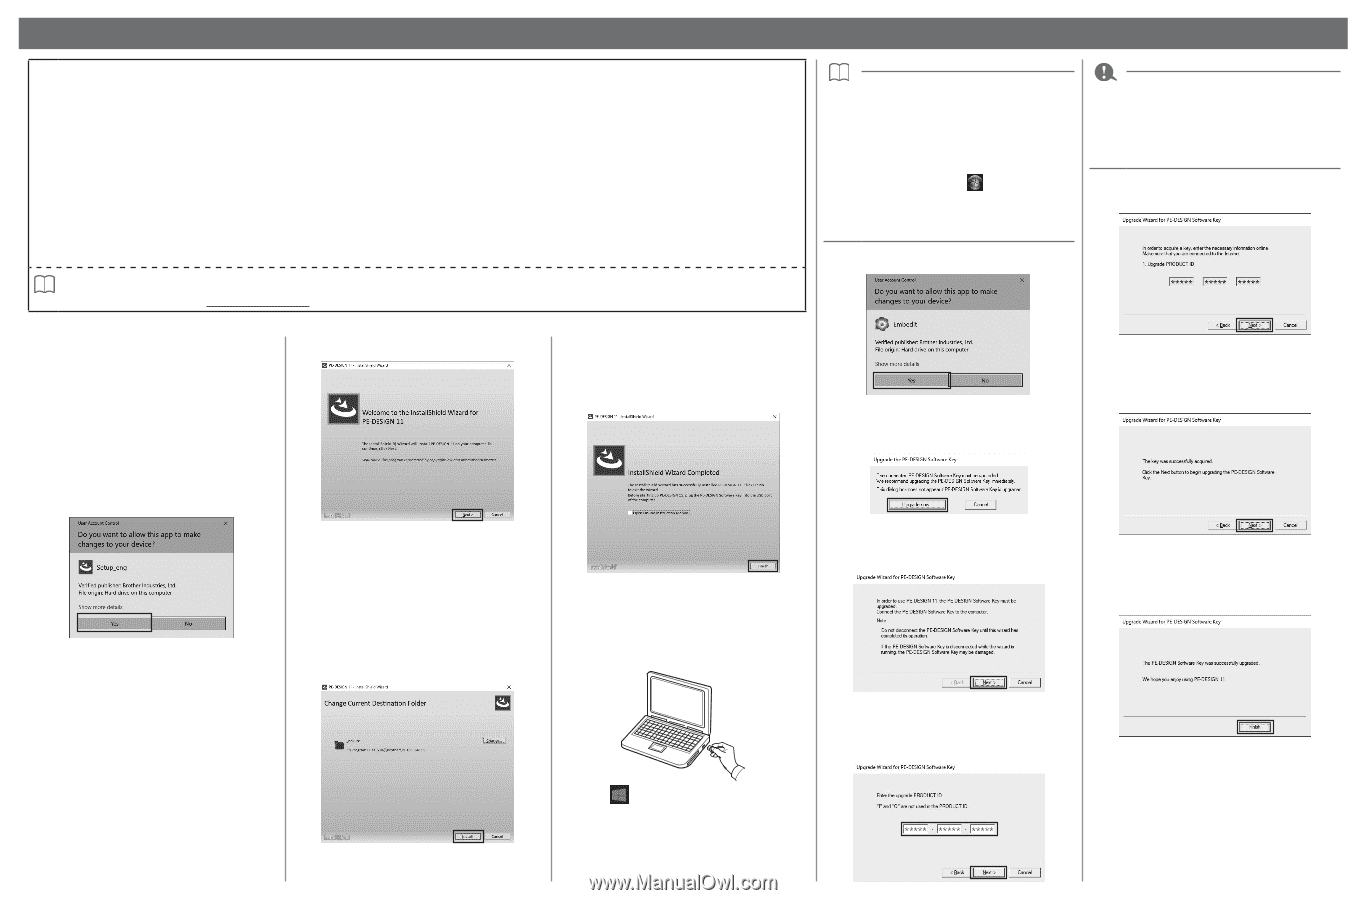
Installing the Software Please Read Before Installation • Before beginning the installation, check that the computer meets the system requirements. • In order to install the software on Windows operating system, you must log on to the computer using an account with administrator privileges. If you are not logged on with the administrator account, the password for the administrator account may be requested with Windows. Type in the password to continue the procedure. For details on logging on to the computer using an account with administrator privileges, refer to the Windows manual. • The installation procedure is described for Windows 10. The procedure and dialog boxes for other operating systems may be slightly different. • If the installation is canceled before it is completed or if the procedure is not performed as described, the software will not be installed correctly. • Do not remove the "PE-DESIGN Software Key" from the USB port of the computer while the upgrade is being performed. Remove the "PE-DESIGN Software Key" after the upgrade is completed. • In order to upgrade the "PE-DESIGN Software Key", you must be able to connect to the Internet. If you cannot connect to the Internet, contact your authorized dealer or Brother Customer Service. • If a firewall is turned on, upgrade may fail. Turn off the firewall, and then complete the upgrade. • Only one PRODUCT ID can be used for upgrading one "PE-DESIGN Software Key". A PRODUCT ID that has already been used will not be valid for a different "PE-DESIGN Software Key". • If a warning appears at any time, follow the instructions that are displayed. If you are planning to continue using PE-DESIGN 10, please make sure that you are at the most current version, before installing PE-DESIGN 11. If you are planning to continue using PE-DESIGN 10 and have already installed PE-DESIGN 11, please update to the latest version for PE-DESIGN 10 using the update on the web site at: http://s.brother/capaa/ • For Windows 8.1 users, position the mouse pointer in the [Start] screen to display the down arrow in the lower-left corner of the screen, and click it. Right-click [PE-DESIGN 11 (Layout & Editing)], which appears under the title [PEDESIGN 11]. Click [Run as administrator] in the taskbar. • For Windows 7 users, click , then [All Programs]. Click [PE-DESIGN 11] and then right- click [PE-DESIGN 11 (Layout & Editing)]. Select [Run as administrator] in the command list. • If the PRODUCT ID is incorrectly entered, the message "The PRODUCT ID is incorrect. Check that a mistake was not made during typing." appears. • The uppercase letters "I" and "O" are not used in the PRODUCT ID. 14 Click [Next] to access our server through the Internet and retrieve the upgrade key. 10 Click [Yes]. ■■PE-DESIGN 11 installation Follow Steps 1 thru 7 1 Access the URL indicated on the UPGRADE CARD. Then, download the Installer. 4 Click [Next] to continue with the installation. 2 Once the download is complete, open the downloaded folder and then double-click the [Setup_eng.exe] file. →→ The [User Account Control] dialog box appears. 3 Click [Yes]. →→ After a short while, the following dialog box automatically appears. →→ The license agreement dialog box appears. 5 Read the license agreement. Check the [I accept the terms in the license agreement] box if you agree to the terms, and then click [Next]. →→ A dialog box appears, allowing you to select the folder where the software will be installed. 6 Check the installation location, and then click [Install] to install the application. 7 Click [Finish] to complete the installation of the software. * If the [Open Online Instruction Manual] box is checked, the Online Instruction Manual will open after installation is complete. →→ After a short while, the following dialog box automatically appears. 11 Click [Upgrade now] to begin upgrade. →→ The upgrade wizard starts up, and the first dialog box, shown below, appears. 12 Click [Next]. ■■To upgrade from PE-DESIGN 10 to PE-DESIGN 11 Follow Steps 8 thru 16 8 Plug the "PE-DESIGN Software Key" into the USB port on the computer. →→ After the upgrade key has been successfully retrieved, the following dialog box appears. 15 Click [Next] to begin upgrading the "PE- DESIGN Software Key". →→ If the upgrade has been completed successfully, the dialog box shown below appears. 16 Click [Finish]. 13 Prepare the UPGRADE CARD and a coin, and then scratch the silver foil off the card. Type in the 15-digit PRODUCT ID written on the UPGRADE CARD, and then click [Next]. →→ When the installation is completed, the following dialog box appears. 9 Click , right-click [PE-DESIGN 11 (Layout & Editing)] from the application list, click [More], and then click [Run as administrator] in the command list. →→ The [User Account Control] dialog box appears.
-
 1
1 -
 2
2
 |
 |