Brother International PE-DESIGN PLUS2 Installation Guide - Page 2
Please Read Before Installation, System Requirements, Installing the Software - manual
 |
View all Brother International PE-DESIGN PLUS2 manuals
Add to My Manuals
Save this manual to your list of manuals |
Page 2 highlights
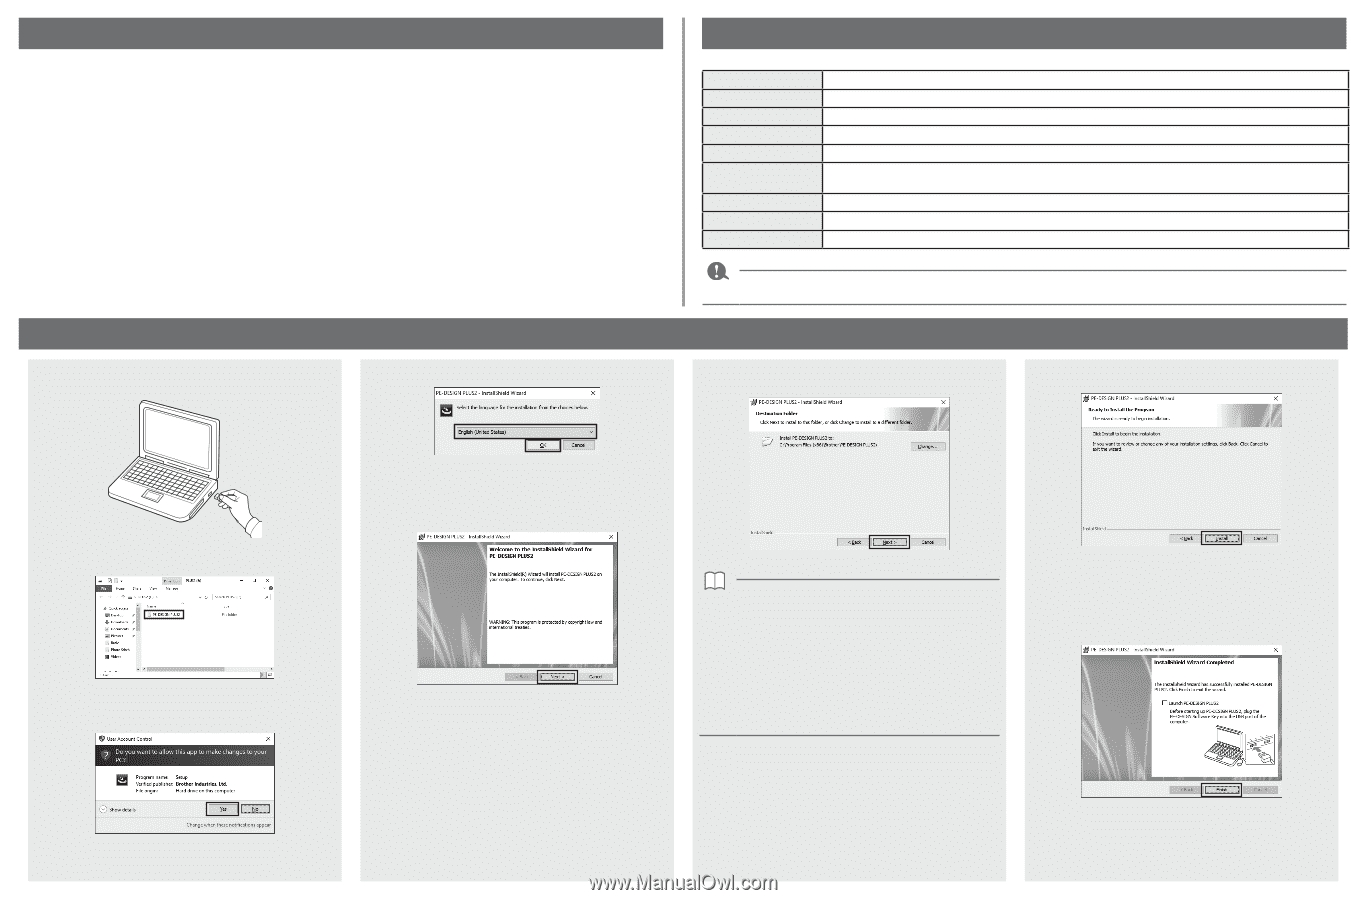
Please Read Before Installation • Before beginning the installation, check that the computer meets the system requirements. • In order to install the software on Windows® operating system, you must log on to the computer using an account with administrator privileges. If you are not logged on with the administrator account, the password for the administrator account may be requested with Windows®. Type in the password to continue the procedure. For details on logging on to the computer using an account with administrator privileges, refer to the Windows® manual. • The installation procedure is described for Windows® 10. The procedure and dialog boxes for other operating systems may be slightly different. • If the installation is canceled before it is completed or if the procedure is not performed as described, the software will not be installed correctly. • Do not remove the "PE-DESIGN Software Key" from the USB port of the computer while the installation is being performed. Remove the "PE-DESIGN Software Key" after the installation is completed. • Before beginning the installation, follow the procedure below to back up the installer onto your computer. 1) Create a backup folder on the computer. 2) Copy the entire [PE-DESIGN PLUS2] folder from the "PE-DESIGN Software Key" into the folder created in step 1). • Do not delete the data in the [PE-DESIGN PLUS2] folder on the "PE-DESIGN Software Key". Installing the Software 1 Plug the "PE-DESIGN Software Key" into the USB port on the computer. 4 Select the desired language, and then click [OK]. System Requirements Before installing the software on your computer, make sure that the computer meets the following minimum PC requirements. Operating system Windows Vista®, Windows® 7, 8.1, 10 (32 or 64 bit) Processor 1 GHz or more Memory 512 MB (1 GB or more is recommended.) Hard disk free space 300 MB Monitor XGA (1024 × 768), 16-bit color or higher Port Two or more USB ports (used for connecting the "PE-DESIGN Software Key" and for transferring embroidery data to an embroidery machine) Device Mouse Printer Graphic printer that is supported by your system (if you wish to print your images) Internet access Required for updating PE-DESIGN • This product may not operate correctly with some computers. 6 Check the installation location, and then click [Next]. 7 Click [Install] to install the application. 2 Open the [PE-DESIGN PLUS2] folder, and then double-click the [setup.exe] file. →→ The [InstallShield Wizard] starts up, and the first dialog box appears. 5 Click [Next] to continue with the installation. →→ The [User Account Control] dialog box appears. 3 Click [Yes]. →→ A dialog box appears, allowing you to select the folder where the software will be installed. To install the application into a different folder: 1) Click [Change]. 2) In the [Change Current Destination Folder] dialog box that appears, select the drive and folder. (If necessary, type in the name of a new folder.) 3) Click [OK]. →→The [Destination Folder] dialog box of the [InstallShield Wizard] shows the selected folder. 4) Click [Next] to install the application into the selected folder. →→ A dialog box appears, indicating that preparations for installation are finished. →→ When the installation is completed, the following dialog box appears. 8 Select the [Launch PE-DESIGN PLUS2] check box, and then click [Finish]. This completes the installation and starts up PE-DESIGN PLUS2. →→ After a short while, the following dialog box automatically appears.
-
 1
1 -
 2
2
 |
 |