Brother International PR-1000 Installation Guide for KIT CW PRCW1 - Page 20
Replacing the Cutwork, Needles, CAUTION
 |
View all Brother International PR-1000 manuals
Add to My Manuals
Save this manual to your list of manuals |
Page 20 highlights
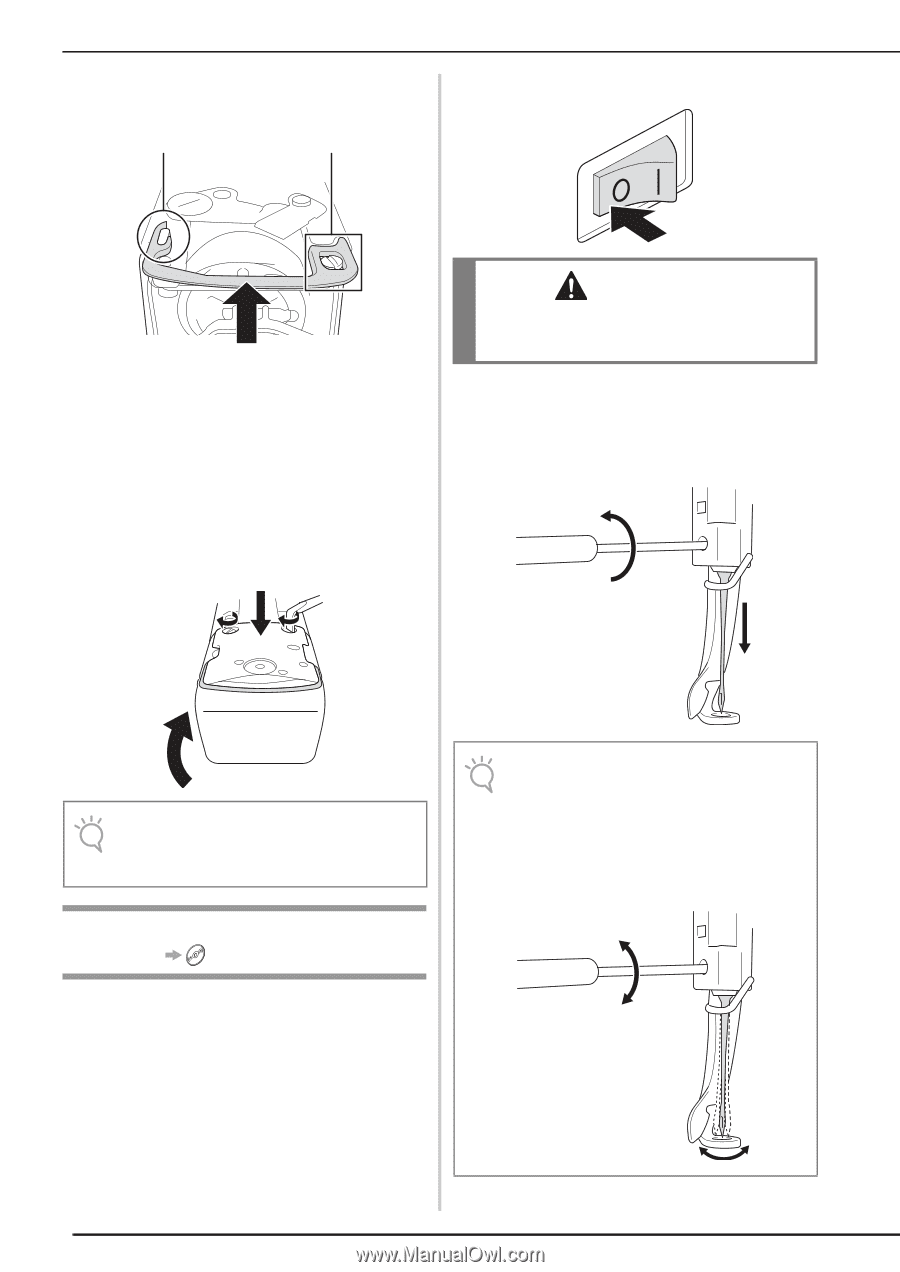
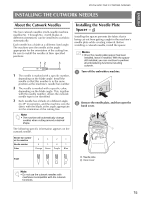
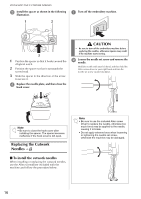
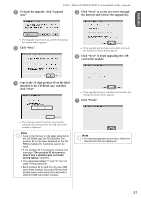
INSTALLING THE CUTWORK NEEDLES c Install the spacer as shown in the following illustration. 1 2 a Turn off the embroidery machine. 3 1 Position the spacer so that it hooks around the elliptical notch. 2 Position the spacer so that it surrounds the screw head. 3 Slide the spacer in the direction of the arrow to secure it. d Replace the needle plate, and then close the hook cover. CAUTION • Be sure to turn off the embroidery machine before replacing the needles, otherwise injuries may result if the machine starts sewing. b Loosen the needle set screw and remove the needle. Hold the needle with your left hand, and then hold the Allen screw driver in your right hand and turn the needle set screw counterclockwise. Note • Be sure to close the hook cover after installing the spacer. The spacer becomes ineffective if the hook cover is left open. Replacing the Cutwork Needles 1 ■ To install the cutwork needles When installing or replacing the cutwork needles, use the Allen screwdriver included with the machine and follow the procedure below. Note • Be sure to use the included Allen screw driver to replace the needle, otherwise too much force may be applied to the needle, causing it to break. • Do not apply extreme force when loosening or tightening the needle set screw, otherwise the machine may be damaged. 16
-
 1
1 -
2
-
3
-
4
-
5
-
6
-
7
-
8
-
9
-
10
-
11
-
12
-
13
-
14
-
 15
15 -
 16
16 -
 17
17 -
 18
18 -
 19
19 -
 20
20 -
 21
21 -
 22
22 -
 23
23 -
 24
24 -
 25
25 -
26
-
27
-
28
-
29
-
30
-
31
-
32
-
33
-
34
-
35
-
36
-
37
-
38
-
39
-
40
-
41
-
42
-
43
-
44
-
45
-
46
-
47
-
48
-
49
-
50
-
51
-
52
-
53
-
54
-
55
-
56
-
57
-
58
-
59
-
60
-
61
-
62
-
63
-
64
-
65
-
66
-
67
-
68
-
69
-
70
-
71
-
72
-
73
-
74
-
75
-
76
-
77
-
78
-
79
-
80
-
81
-
82
-
83
-
84
-
85
-
86
-
87
-
88
-
89
-
90
-
91
-
92
-
93
-
94
-
95
-
96
-
97
-
98
-
99
-
100
-
101
-
102
-
103
-
104
-
105
-
106
-
107
-
108
-
109
-
110
-
111
-
112
-
113
-
114
-
115
-
116
-
117
-
118
-
119
-
120
-
121
-
122
-
123
-
124
-
125
-
126
-
127
-
128
-
129
-
130
-
131
-
132
-
133
-
134
-
135
-
136
-
137
-
138
-
139
-
140
-
141
-
142
-
143
-
144
-
145
-
146
-
147
-
148
-
149
-
150
-
151
-
152
-
153
-
154
-
155
-
156
-
157
-
158
-
159
-
160
-
161
-
162
-
163
-
164
-
165
-
166
-
167
-
168
-
169
-
170
-
171
-
172
-
173
-
174
-
175
-
176
-
177
-
178
-
179
-
180
-
181
-
182
-
183
-
184
-
185
-
186
-
187
-
188
-
189
-
190
-
191
-
192
-
193
-
194
-
195
-
196
 |
 |