Brother International PT 1200 Users Manual - English - Page 2
Please Do Not Return Your - tape
 |
UPC - 012502525844
View all Brother International PT 1200 manuals
Add to My Manuals
Save this manual to your list of manuals |
Page 2 highlights
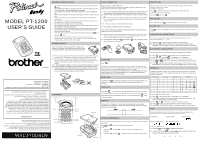
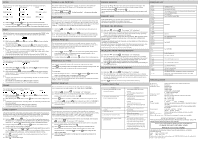
STYLE DOUBLE-LINE PRINTING PHRASE MEMORY MESSAGE LIST You can also use one of nine different print styles for the characters in your label. NORM (normal) OUTL (outline) BOLD SHAD (shadow) ITAL (italic) IT+O (italic + outline) IT+B (italic + bold) IT+S (italic + shadow) VERT (vertical) (1) Hold down and press once. The current print style is displayed. (2) Continue holding down and pressing until your desired print style appears. If you select a style other than normal, the Stl indicator on the bottom of the display comes on. FONT With the Font function, you can choose to print your text using either the "NORM" or the "TITL" font. If the "TITL" font is selected, the entire text is printed in capital letters. NORM TITL (1) While holding down , press once, and keep held down to display the current font setting. (2) While still holding down , continue pressing until the desired font setting appears. If you select "TITL", the Title indicator at the bottom of the display comes on. Note: • The "TITL" font can only be used when printing on 1/2" (12-mm)-wide tape. • If "TITL" is selected, the text is printed with the "NORM" style setting, with no frame or underline, and with a preset size setting. • When double-line printing is used, the text will be printed with the "NORM" font. UNDERLINE This option allows you to emphasize your entire text by underlining it. OFF (no underline) ON (underline) (1) While holding down , press once, and keep held down to display the current underline setting. (2) While still holding down , continue pressing until the desired underline setting appears. If "ON" is displayed, the text is underlined. If "OFF" is displayed, the text is not underlined. Note: • If a frame was chosen before selecting underlining, the frame is cancelled and the underline is printed. • The underline is not printed if the "VERT" print style is selected. • The underline is not printed if the "TITL" font setting is selected. FRAME You can decorate your text by adding a frame to it. OFF (no frame) BOX1 BOX2 BOX3 BOX4 (1) While holding down , press once, and keep held down to display the current frame setting. (2) While still holding down , continue pressing until the desired frame setting appears. Note: • If underlining was chosen before selecting a frame, the underlining is cancelled and the frame is printed. • The frame is not printed if the "VERT" print style is selected. • The frame is not printed if the "TITL" font setting is selected. LABEL LENGTH Although the length of the printed label automatically adjusts to fit the length of the entered text, there may be times when you will want to make a label with a specific length. The Label length mode allows you to set the label to a length between 2" and 9.9" (50 and 250 mm). (1) Hold down and press once. The current label length setting appears on the display. If "L---" is displayed, the Label length mode is off. When the Label length mode is on, "L" and the current setting (in either inches or millimeters) are shown. (2) Continue holding down and pressing until the Label length mode is turned on and the current setting is displayed. (3) Use the number keys or press and to enter the label length that you want to use. Press to switch the setting between inches and millimeters. When a decimal point is displayed in the setting (e.g., 2.0), the label length is shown in inches. (4) Press to display the length of the currently entered text and check that it is less than the set length. (5) Press to set the label length. This option enables two lines of text to be printed, one above the other. Double-line printing can only be used if 3/8" (9-mm) or 1/2" (12-mm)-wide tape is installed. (1) Enter the text for the upper line. (2) Hold down and press . The lower line marker (w) will appear on the display. (3) Type the text for the lower line. TAPE FEED This function can be used to leave equal margins on the left and right sides of the label: 1/6" (4 mm) when "#" is displayed, 1/2" (12 mm) when "##" is displayed and 1" (24 mm) when "###" is displayed. In addition, one label with multiple format styles can be printed using the "-" setting, which does not feed the tape after printing the label. (1) Hold down the display. and press once. The current tape feed setting appears on (2) Continue holding down and pressing until your desired setting appears. Note: After pressing the tape cutter button to cut off a label that was printed using the "#" or "##" settings, center the text within the label by cutting along the printed dots. MIRROR PRINTING This function prints your label so that the text is legible from the adhesive side of the tape. If mirror-printed labels are attached to glass, such as a showroom, or some other transparent material, they can be read correctly from the opposite side. For this application, transparent tape must be used. (1) Hold down and press once. The current mirror printing setting appears on the display. When "M: ×" is displayed, the text is printed normally. If "M: o" appears, the mirror printing function is on. (2) Continue holding down and pressing until your desired setting appears. PRINTING & CUTTING After you have changed the format of the text, you are ready to print the label. Press . The message "PRNT" is displayed while the message is being printed. The label comes out of the tape exit slot on the top end of the machine. To cut the tape: (1) If the tape margins are set to "-", hold down and press . (Refer to TAPE FEED.) The message "FEED" is displayed while the tape is fed. (2) Push in the tape cutter button on the left side of the machine. Note: In order to prevent damage the tape, do not attempt to cut it while the messages "PRNT" or "FEED" are displayed. REPEAT PRINTING This function allows you to repeatedly print the same label up to nine times. It is recommend to set the tape margins to "#" or "##". (Refer to TAPE FEED.) (1) Hold down and press . The message "1-9?" is displayed. (2) Press the number key (1-9) corresponding to the number of labels you want. For example, if you want to print nine labels, press . (3) Press and the set number of labels will be printed. If the margins are set to "-", hold down and press before cutting the tape. (Refer to TAPE FEED.) (4) Push in the tape cutter button to cut the tape, then cut along the printed dots to separate the labels. NUMBERING This function can be used to print a set number of labels in which the designated number automatically increases by 1 after the label is printed, for example when printing labels containing a date ("JULY 4, 1962", "JULY 5, 1962", and "JULY 6, 1962"). It is recommend to set the tape margins to "#" or "##". (Refer to TAPE FEED.) (1) Position the cursor beneath the number in the text to be increased, then hold down and press . The message "1-9?" is displayed. (2) Press the number key (1-9) corresponding to the last number that is to be printed. For the example explained above, press . (3) Press and the labels will be printed. Printing will be repeated, with the specified number increased by 1, until the entered number is reached. If the margins are set to "-", hold down and press before cutting the tape. (Refer to TAPE FEED.) (4) Push in the tape cutter button to cut the tape, then cut along the printed dots to separate the labels. You can use the Phrase Memory to store your most frequently used messages. Text stored in the Phrase Memory will not be deleted by the usual message deleting operation (holding down and pressing ) . You can easily recall your message from this Phrase Memory any time you want to work with it. MEMORY SIZE In the Phrase Memory you can store up to a total of 300 characters. These 300 characters can be divided into as many as nine areas. The maximum capacity for any single area is 55 characters. STORING THE MESSAGE (1) Hold down and press . The message "1-9?" is displayed. (2) Press the number key (1-9) corresponding to the Phrase Memory area that you wish to select. Your message is stored in the chosen area and the message previously shown in the working area reappears on the display. If the area you select is already being used, the error message "ERR" will briefly appear, then you will again be asked to choose an area. In this case, select a different area between 1 and 9. If messages are already stored in all nine areas, you must delete one of them before you can store your current message. Also, when 300 characters are already stored in the Phrase Memory and you try to store more, the message "FULL" will appear on the display. You must delete one of the memory areas before you can store your current message. RECALLING FROM PHRASE MEMORY (1) Hold down and press . The message "1-9?" is displayed. (2) Press the number key (1-9) corresponding to the Phrase Memory area containing the message that you want to recall. The number and the beginning of the selected message appear on the display. If you selected the wrong number, you can now press a different number key (1-9) to display the correct message. (3) Press to recall the message selected from the Phrase Memory and display it in the working area for use. DELETING FROM PHRASE MEMORY (1) Hold down and press . The message "1-9?" is displayed. (2) Press the number key (1-9) corresponding to the Phrase Memory area containing the message that you want to delete. The number and the beginning of the selected message are displayed. If you wish, you can now press a different number key to select a different message. (3) Press to delete the selected message from the Phrase Memory. TROUBLESHOOTING Problem 1. The display stays blank after you have turned on the machine. 2. The machine does not print, or the printed characters are blurred. 3. The printed characters are not formed properly. 4. Striped tape appears. 5. The memory has cleared on its own. 6. A blank horizontal line appears through the printed label. Solution • Check that the batteries are correctly installed. • Check the batteries. Replace them if they are weak. • Check that the tape cassette has been installed properly. • Check the tape cassette. Replace it if it is empty. • Check that the character size is appropriate for the width of the tape that is used. • Check the batteries. Replace them if they are weak. • You have reached the end of the tape. Replace the tape cassette. • The batteries may be weak. Replace them. • There may be some dust on the print head. Remove the tape cassette and use a dry cotton swab to gently wipe the print head with an up-and-down motion. • If dust still remains, dip the cotton swab in isopropyl (rubbing) alcohol and gently wipe the print head again. ERR BATT BATT FULL A-R? A-U? NORM OUTL BOLD SHAD ITAL IT+O IT+B IT+S VERT NORM TITL OFF ON BOX1 BOX2 BOX3 BOX4 - # ## ### L--L∗.∗ L∗∗∗ >2.0 >050
-
 1
1 -
 2
2
 |
 |
