Brother International PT-E550W Quick Setup Guide - Page 20
Getting Started, Creating A Label, Label Printing, 1a-b01 1a-b02 1a-b03 1a-b04
 |
View all Brother International PT-E550W manuals
Add to My Manuals
Save this manual to your list of manuals |
Page 20 highlights
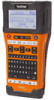
INTRODUCTION Create a label by connecting your P-touch labeling system to a computer 1 GETTING STARTED Your P-touch labeling system can be used as a stand alone handheld labeler, or it can be connected to a PC or Mac and used with the included P-touch Editor software to create more elaborate labels. To use your P-touch labeling system connected to a computer, attach your P-touch labeling system to a computer via the included USB cable and install the P-touch Editor software and drivers. • Prepare the P-touch labeling system. • Prepare the PC. P. 44 1A-B01 1A-B01 1A-B01 1A-B01 2 CREATING A LABEL • Launch the P-touch Editor Software. Enter the label text using P-touch Editor. "Editing a Label" in the User's Guide Software Help Create labels like these: 1A-B01 1A-B02 1A-B03 1A-B04 3 LABEL PRINTING • Print the label "Label Printing" in the User's Guide Software Help • Remove the labels soon after they are cut so that they do not remain in the tape exit slot. • Do not position the P-touch labeling system vertically when using it. Otherwise, the cut labels could fall into the P-touch labeling system and cause a malfunction. 20
-
 1
1 -
2
-
3
-
4
-
5
-
6
-
7
-
8
-
9
-
10
-
11
-
12
-
13
-
14
-
 15
15 -
 16
16 -
 17
17 -
 18
18 -
 19
19 -
 20
20 -
 21
21 -
 22
22 -
 23
23 -
 24
24 -
 25
25 -
26
-
27
-
28
-
29
-
30
-
31
-
32
-
33
-
34
-
35
-
36
-
37
-
38
-
39
-
40
-
41
-
42
-
43
-
44
-
45
-
46
-
47
-
48
-
49
 |
 |
