Brother International PocketJet 3 Plus Quick Reference Card - English - Page 1
Brother International PocketJet 3 Plus Manual
 |
View all Brother International PocketJet 3 Plus manuals
Add to My Manuals
Save this manual to your list of manuals |
Page 1 highlights
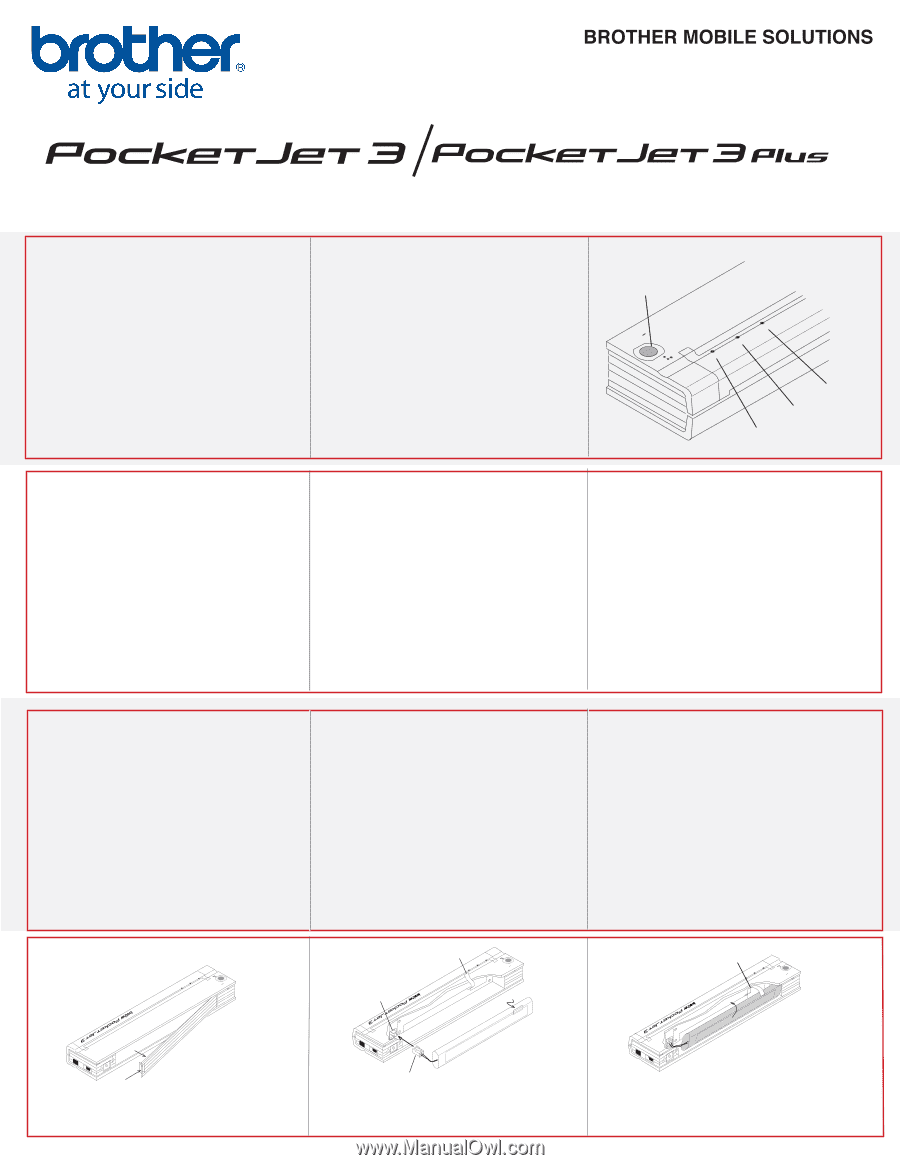
® ® Printer Quick Reference Card Main Switch Functions Power On: Push main switch once quickly while the printer is o . Power O : Push twice quickly. To Charge Battery: With the printer o , push the main switch and hold it down for two or more seconds until the POWER indicator begins to blink. The indicator will blink until charging is complete. To Power OFF during Charge mode: Push main switch twice quickly. Manual Form Feed: With power ON and paper inserted, press and hold the main switch to feed (or eject) paper. Self Test/Test Page: With power ON and no paper in the printer, press the main switch for two seconds. The red DATA light will come on. Insert a single sheet of Genuine Brother Paper and a test sheet will be printed. Program Mode: With power ON, press and hold main switch for two seconds until DATA indicator turns red. Press and hold main switch again for six seconds until the DATA and ERROR indicators blink red. Main Switch CHRAERFGREESH ONOFF POWER ERROR DATA POWER Indicator DATA Indicator ERROR Indicator Powering Your Printer PocketJet printers can be powered from either AC or DC sources. To use AC power: Plug the PocketJet AC power adapter into the PocketJet, plug the AC cord into a nearby AC power outlet (100~240 VAC, 50-60 Hz). To use DC power: Plug an appropriate power adapter cord (either with cigarette plug or hardwired) into the PocketJet and then into the 12 VDC source. Charging the Battery* 1. Make sure the printer is OFF and is connected to an AC adapter and power cord or a DC power supply. 2. Press the main switch and hold it down for a few seconds until the POWER indicator begins to blink green and yellow. This discharges the battery, then puts the printer in Charge Mode. The POWER indicator blink green until charging is completed. When nished, printer turns itself o. * Battery must be charged prior to 1st use. Tips on Using the Battery • Charging battery after it has been completely discharged takes about 120 minutes. • When you run a printer on battery power, it can print approximately 100 pages on a full charge. • Darker prints discharge the battery faster than lighter prints. Use software density control to adjust lightness and darkness. • Printer's protective vinyl case has a sleeve on the inside for an extra battery. With two batteries, you can print twice as many pages before you have to charge batteries. Driver Installation Your printer requires software drivers to communicate with your computer and print properly. The supplied driver CD contains the latest version of the software as of the date of production. The Brother website (www.brothermobilesolutions.com) contains the most current driver version. If the web version is newer (with a higher version number), we recommend that you install the web site version. Connecting Your Printer Connect to your computer in three ways: Via USB cable - please install the USB printer driver BEFORE connecting the USB cable. Via Infrared (IrDA) - no driver is required but your computer must be set properly to receive data via its Infrared port. Note that the IrDA connection will be automatically enabled if no USB cable is connected. Via Bluetooth® connection - install the Bluetooth driver and printer driver for wireless printing! Printing Once your printer is powered, any required drivers installed, and connected to your computer, turn the printer on by pressing the main switch once. The POWER indicator will light. Insert a sheet of Genuine Brother Paper into the top of the printer with the smooth, coated side toward the back, and you are ready to print. To turn the printer o , press the main switch twice. Battery Installation Removal Ribbon POWER ONOFF Removal Ribbon ONOFF CHRAERFRGEESH DATA POWER CHRAERFRGEESH ERROR DATA ONOFF ERROR POWER CHRAERFRGEESH DATA ERROR Terminal Bulge INTERFACE 2 AC ADAPT . ! 1 1. Open battery cover. 2. Swing the cover open and remove it. INTERFACE AC ADAPT . ! Battery Connector 3. Gently push the battery connector into the terminal on the inside of the compartment. INTERFACE AC ADAPT . ! 4. Hold the removal ribbon out of the way, tilt the battery and place it inside the compartment. 5. Close and latch the battery cover.
-
 1
1 -
 2
2
 |
 |