Brother International QL-700 Quick Setup Guide - English and Spanish - Page 1
Brother International QL-700 Manual
 |
View all Brother International QL-700 manuals
Add to My Manuals
Save this manual to your list of manuals |
Page 1 highlights
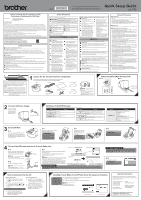
Printed in China LB9457001 Before using this machine for the first time, read this Quick Setup Guide to setup and install your machine. To view the Quick Setup Guide in other languages, please visit http://solutions.brother.com/. Quick Setup Guide QL-700 Federal Communications Commission (FCC) Declaration of Conformity (For USA Only) Responsible Party : Brother International Corporation. 100 Somerset Corporate Boulevard, Bridgewater, NJ 08807-0911 USA TEL: (908) 704-1700 declares that the products Product Name : QL-700 Model Number : QL-700 comply with Part 15 of the FCC Rules. Operation is subject to the following two conditions: (1) this device may not cause harmful interference, and (2) this device must accept any interference received, including interference that may cause undesired operation. This equipment has been tested and found to comply with the limits for a Class B digital device, pursuant to Part 15 of the FCC Rules. These limits are designed to provide reasonable protection against harmful interference in a residential installation. This equipment generates, uses, and can radiate radio frequency energy and, if not installed and used in accordance with the instructions, may cause harmful interference to radio communications. However, there is no guarantee that interference will not occur in a particular installation. If this equipment does cause harmful interference to radio or television reception, which can be determined by turning the equipment off and on, the user is encouraged to try to correct the interference by one or more of the following measures: • Reorient or relocate the receiving antenna • Increase the separation between the equipment and receiver. • Connect the equipment into an outlet on a circuit different from that to which the receiver is connected. • Consult the dealer or an experienced radio/TV technician for help. Important • The enclosed interface cable should be used in order to ensure compliance with the limits for a Class B digital device. • Changes or modifications not expressly approved by Brother Industries, Ltd. could void the user's authority to operate the equipment. International ENERGY STAR® Compliance Statement The purpose of the International ENERGY STAR® Program is to promote the development and popularization of energy-efficient office equipment. As an ENERGY STAR® Partner, Brother Industries, Ltd. has determined that this product meets the ENERGY STAR® guidelines for energy efficiency. General Information ■ Compilation and Publication Notice Under the supervision of Brother Industries Ltd., the manuals for this product have been compiled and published, covering the latest product's descriptions and specifications. The contents of the manuals for this product and the specifications of this product are subject to change without notice. Brother reserves the right to make changes without notice in the specifications and materials contained herein and shall not be responsible for any damages (including consequential) caused by reliance on the materials presented, including but not limited to typographical and other errors relating to the publication. The screen images in this guide can differ depending on your OS or printer. © 2011 Brother Industries Ltd. ■ Trademarks The Brother logo is a registered trademark of Brother Industries, Ltd. Brother is a registered trademark of Brother Industries, Ltd. © 2011 Brother Industries, Ltd. All rights reserved. Microsoft, Windows Vista, Windows Server and Windows are either registered trademarks or trademarks of Microsoft Corp. in the United States and/or other countries. Apple, Macintosh and Mac OS are trademarks of Apple Inc., registered in the United States and other countries. The names of other software or products used in this document are trademarks or registered trademarks of the respective companies that developed them. Each company whose software title is mentioned in this guide has a Software License Agreement specific to its proprietary programs. All other brand and product names mentioned in this Quick Setup Guide are registered trademarks of their respective companies. ■ Symbols Used in this Guide The symbols used throughout this guide are as follows: This symbol shows information or directions that should be followed. If ignored, the result may be injury, damage, or failed operations. This symbol shows information or directions that can help you better understand and use the machine more efficiently. Safety Precautions Read and understand all of these instructions and save them for later reference. Follow all warnings and instructions marked on the product. WARNING CAUTION Indicates a potentially hazardous situation which, if the product is handled without following the warnings and instructions, could result in death or serious injuries. Indicates a potentially hazardous situation which, if the product is handled without following warnings and instructions, may result in minor or moderate injuries, and/or property damage. The symbols used in the manuals for this product are as follows: Action NOT allowed DO NOT disassemble the product. DO NOT splash the product with or immerse the product in water. DO NOT touch a specified part of the product. Mandatory action Unplugging Alerts to the possibility of electrical shock ■ To use the machine safely WARNING Follow these guidelines to avoid fire, electrical shock, or other damage. ■ The Machine Dispose of plastic bags correctly and To avoid possible fire or electrical keep away from babies and children. shock, never disassemble the Do not wear or play with plastic bags. machine or allow it to get wet. Unplug the power cord immediately and stop using the machine if you notice any abnormal odor, heat, smoke, discoloration, deformation or anything unusual whilst the machine is in use. Do not disassemble the machine. For inspection, adjustment and repair of the machine, contact the retail outlet where the machine was purchased or your local authorized service center. Do not drop, hit or otherwise bang the machine. Do not allow any liquids, such as coffee, juice and other beverages, vase water and flower preservatives, or pet bodily fluids, to come into contact with the machine. Make sure to turn off the machine and remove the power cord from the electrical outlet when cleaning the machine. Failure to do so could cause an electrical shock or fire. Do not use the machine with foreign objects in it. Do not drop any metal objects such as paper clips and staples into the machine. If water or any foreign objects should enter the machine, unplug the power cord from the electric outlet and remove the foreign object. If necessary, contact the retail outlet where the machine was purchased or your local authorized service center. Do not use paint thinner, benzene, alcohol or any other organic solvents to clean the machine. Doing so may cause damage to the surface finish. Use a soft, dry cloth to clean the machine. Do not put any heavy objects or objects containing water on top of the machine. If water or any foreign object enters the machine, contact the retail outlet where the machine was purchased or your local authorized service center. If you continue to use the machine with water or a foreign object in the machine, the machine may be damaged or personal injury could result. Do not place the machine in a location where it could get wet, such as a kitchen, bathroom, or near a humidifier. Doing so could cause an electrical shock or fire. Do not allow organic solvents (benzene, paint thinner, nail polish remover, deodorizer, etc.) to come into contact with the machine and its connecting cables. Doing so may cause the equipment to deform or dissolve, and there may be a risk of electrical shock or fire. Follow these guidelines to avoid fire, electrical shock, or other damage. ■ Power Cord Use only the authorized power source Ensure the power cord is correctly (120V AC) for the machine. inserted into the electrical outlet. Use only the power cord included with the machine. Do not handle the power cord or plug if your hands are wet. Do not overload the electrical outlet with too many appliances or plug the power cord into a damaged electrical outlet. Do not cut, damage, alter or place heavy objects on the power cord. Regularly remove the power plug from the electrical outlet, and clean the base of the prongs and between the prongs. If you leave the power plug in the electrical outlet for an extended period of time, dust will accumulate at the base of the power plug prongs. This could cause a short circuit that may result in a fire. Do not use the power cord if it is damaged. Do not pull the power cord when removing the power plug from the electrical outlet. Doing so could cause an electrical shock or fire. Do not damage the power cord in the following ways as it may result in an electrical shock, fire or machine malfunction. • Modifying the cord • Forcibly bending the cord • Placing the cord near a hot object • Pulling the cord • Twisting the cord • Tying the cord • Placing a heavy object on the cord • Squeezing the cord into a narrow place • Hanging the cord on a metal object • Folding the cord back and forth • Pushing the cord against a wall CAUTION Follow these guidelines to avoid fire, electrical shock, or other damage. ■ The Machine The machine may malfunction if left near a television, radio, etc. Do not use the machine near any machine that can cause electromagnetic interference. Ensure that small children do not put their fingers in the moving parts or openings of the machine. The electrical outlet should be close to the machine and be easily accessible. Do not touch the cutter. Personal injury could result. Do not place the machine in areas exposed to direct sunlight, near heaters or other hot appliances, or in any area exposed to extremely high or low temperatures, high humidity or excessive dust. Doing so could cause the machine to malfunction. Do not hold or lift the machine by the DK Roll cover. The cover could come off and the machine could fall and become damaged. Do not hold the machine with only one hand. The machine may slip out of your hand. Make sure of the correct orientation and procedure when attaching the various cables and optional products. In addition, use only the specified cables and optional products. Failure to do so could cause a fire or personal injury. Follow the ■ instructions in the manual to correctly attach the equipment. Power Cord If the machine will not be used for an extended period, remove the power cord from ■ the electrical outlet. Cutter Do not touch the blade of the cutter. Do not open the top cover when the cutter is operating. ■ Installation/Storage Put the machine on a flat, stable surface such as a desk. Do not put any heavy objects on top of the machine. General Precautions ■ The Machine • The machine is a precision machine. Do not drop, hit or otherwise bang the machine. • Do not lift the machine by the DK Roll compartment cover. The cover could come off and the machine could fall and become damaged. • Do not insert any objects into or block the label output slot or USB port. • Use only the interface cable (USB cable) included with the machine. • When not in use for an extended period, remove the DK Roll from the machine. • Do not attempt to print labels while the DK Roll cover is open. ■ Power Cord • You should put the machine near an easily accessible, standard electrical outlet. ■ DK Roll (DK Label and DK Tape) • Use only genuine Brother accessories and supplies (with , marks). Do not use any unauthorized accessories or supplies. • If the label is attached to a wet, dirty, or oily surface, it may peel off easily. Before applying the label, clean the surface to which the label will be applied. • DK Rolls use thermal paper or film that can fade in color or peel off surfaces if exposed to ultraviolet light, wind or rain. • Do not expose the DK Rolls to direct sunlight, high temperatures, high humidity, or dust. Store in a cool, dark place. Use the DK Rolls soon after opening the package. • Scratching the printed surface of the label with your finger nails or metal objects, or touching the printed surface with hands dampened by water or sweat can cause the color to change or fade. • Do not apply labels to any persons, animals, or plants. In addition, never apply labels to public or private property without permission. • As the end of the DK Roll is designed to not adhere to the label spool, the last label may not be cut properly. If this happens, remove the remaining labels, insert a new DK Roll, and reprint the last label. Note: To account for this, the number of DK Labels included on each DK Roll may be more than indicated on the package. • When a label is removed after being applied to a surface, a portion of the label may remain. • Prior to using CD/DVD labels, be sure to follow the instructions in your CD/DVD player's instruction guide regarding applying CD/DVD labels. • Do not use CD/DVD labels in a slot loading CD/DVD player, for example a CD player in a car where the CD is slid into a slot in the CD player. • Do not peel off the CD/DVD label once it is applied to the CD/DVD, a thin surface layer may come off, resulting in damage to the disk. • Do not apply CD/DVD labels to CD/DVD disks designed for use with ink jet printers. Labels peel off these disks easily and using disks with peeled labels can result in loss or damage of data. • When applying CD/DVD labels, use the applicator included with the CD/DVD label rolls. Failure to do so could cause damage to the CD/DVD player. • Users shall take full responsibility for applying CD/DVD labels. Brother accepts no responsibility for any loss or damage of data caused by the inappropriate use of CD/DVD labels. • Be careful not to drop the DK Roll. • DK Rolls use thermal paper and thermal film. Both the label and print will fade with sunlight and heat. Do not use DK Rolls for outdoor use that requires durability. • Depending on the area, material, and environmental conditions, the label may unpeel or become irremovable, or the color of the label may change or be transferred to other objects. Before applying the label, check the environmental conditions and the material. Test the label by affixing a small piece of it to an inconspicuous area of the intended surface. ■ CD-ROM and Software • Do not scratch or subject the CD-ROM to high or low temperatures. • Do not put heavy objects on the CD-ROM or apply force to the CD-ROM. • The software contained on the CD-ROM is meant for use with this machine only. See the License on the CD-ROM for details. This software may be installed on multiple computers for use in an office, etc. Start Here Record your model and serial number and your date and location of Purchase below for your records. Keep this information with your proof of purchase (bill of sale) in case your Product requires service. Model # Serial # Date of purchase: Store where purchased: Location of store: Important: We recommend that you keep all original packing materials, in the event that you need to ship the machine. 1 Unpack the QL-700 and check the components. Check that the package contains the following before using the printer. If any item is missing or damaged, contact your Brother dealer. QL-700 USB Cable Quick Setup Guide DK Label & Tape Guide AC Power Cord The plug may differ by country. Documentation/Installation CD-ROM Warranty Card DK Roll (Starter roll) NOTE The Brother QL-700 includes the following two starter rolls: • One starter roll of DK Die-cut Standard Address Labels (100 labels) • One starter roll of DK Continuous Durable Tape (2.4″ x 26.2 feet) Parts Description (Main Printing Unit) ■ Front DK Roll compartment cover ■ Rear Editor Lite STATUS lamp lamp FEED Editor Lite button button CUT ON/OFF button button Electrical outlet Power cord USB port 2 Connect the Power Supply. Connect the power cord to the QL-700 and then plug the power cord into an electrical outlet. The plug may differ by country. Definition of the STATUS Lamp The STATUS lamp on the Brother QL printer indicates the current operating condition. Lamp Condition Lamp Not lit Power is OFF. Orange lamp is lit Green lamp is lit Power is ON. Green lamp is flashing Receiving data from the PC. Transferring data. Orange lamp is flashing Red lamp is lit Condition The roll cover is opened. Close the roll cover correctly. Starting reset or CUT button pressed while resetting. For details on resetting the QL-700, see the "User's Guide"(PDF). Cooling (Wait for the temperature of the print head to cool off) Reset in progress. For details on resetting the QL-700, see the "User's Guide"(PDF). The machine is booting. Lamp Red lamp is flashing Condition Indicates one of the following errors. Red lamp flashes in 1.0 second intervals: • End of DK Roll • Incorrect DK Roll installed • Feed error • No DK Roll • Transmission error • The roll cover is opened (While running) • Data image deployment error Red lamp flashes 0.9 seconds OFF, 0.3 seconds ON, 0.3 seconds OFF, and then 0.3 seconds ON: • Cutter error Red lamp flashes in 0.3 second intervals: • EEPROM error 3 Set the DK Roll. 3-1 Press and hold the ON/OFF button ( ) to turn the QL-700 off. Hold the Brother QL-700 by the front of the machine, and firmly lift the DK Roll compartment cover to open the cover. 3-2 Put the spool into the spool guides in the DK Roll compartment. IMPORTANT • Make sure that the spool arms are inserted firmly in the spool guides on the left and right. • Insert the spool with the DK Roll located on the right hand side of the Brother QL-700. 3-3 Thread the end of the DK Roll into the slot until it aligns to the area shown on the right. IMPORTANT Align the end of the roll with the upright edge of the label output slot. 3-4 Close the DK Roll compartment cover. IMPORTANT When you press the ON/OFF button ( ) to turn the Brother QL-700 on, the end of the DK Die-cut Label is aligned automatically. 4 Connect the USB cable and launch P-touch Editor Lite. For Windows Vista® For Windows® XP 4-1 Turn on the QL-700, then press and hold down the Editor Lite button until the green Editor Lite lamp lights up. NOTE Editor Lite is set as the default mode. 4-2 Connect the USB cable to the PC. NOTE If you are connecting the printer via a USB hub, it may not be detected correctly. Editor Lite lamp Editor Lite button 4-3 After the USB cable is connected, a dialog box appears on the PC display. (The following screens may differ depending on the operating system on your PC) Click P-touch Editor Lite. NOTE • If you do not see the dialog box, it may be hidden behind an open software program window. Minimize all windows to show the dialog box. • It will take longer than usual to start P-touch Editor Lite when connecting the P-touch labeler to your computer for the first time. If the software does not start automatically when you connect the machine, you may launch it from MyComputer. Start P-touch Editor Lite by double-clicking PTLITE10.EXE. For Windows® 7 When using Macintosh Click Open folder to view files. Double-click PLITE10. P-touch Editor Lite is not available for Macintosh. The [QL-700] icon is displayed when the QL-700 is connected to a Mac in the Editor Lite mode. Open [QL-700] from the desktop, and then execute [Start Here Mac]. If P-touch Editor 5.0 and the QL-700 printer driver are not installed, a message advising to install is displayed. Install them, and use P-touch Editor 5.0. When using Windows Vista® When connecting the device for the first time, perform the scan and then select the Always do this for software and games check box on the dialog box displayed when the scan completes. P-touch Editor Lite will start automatically the next time you connect the QL-700. 4-4 P-touch Editor Lite starts. IMPORTANT Do not turn off the power or disconnect the QL-700 while using P-touch Editor Lite. How to disconnect the QL-700 When using Windows®: 1. Exit P-touch Editor Lite by clicking on the in the top right corner of the window. 2. To disconnect the QL-700, click the icon in the computer's task bar ( , , or ). 3. Click Safely remove USB Mass Storage Device. When using Macintosh: 1. Select [QL-700] on the desktop, and then perform one of the following: • Select [Eject] from the Context menu • Drag and drop it in the Trash 2. When a message indicating that the device can be safely removed is displayed, turn off the QL-700 and disconnect the USB cable. 4. When the message indicating that the device can be safely removed is displayed, turn off the QL-700 and disconnect the USB cable. Installing P-touch Editor 5.0 and Printer Driver (for advanced functions) IMPORTANT Confirm the Editor Lite is turned off before connecting the QL-700 to your computer with the USB cable. Press and hold down the Editor Lite button until the Editor Lite lamp turns off. 1. Start the computer and put the CD-ROM into the CD-ROM drive. (The screen on the right appears.) 2. Install the software by following the instructions on screen. NOTE For details of the software, see the "Software User's Guide" (PDF). When using Windows® When using Macintosh Important Information Should you have questions, or need information about your Brother Product, we have avariety of support options for you to choose from: USA-Customer Service: Customer Service 1-877-BROTHER (1-877-276-8437) Customer Service 1-901-379-1210 (fax) Website www.brother-usa.com Supplies / Accessories www.brothermall.com or 877-552-6255 BROTHER INTERNATIONAL CORPORATION 100 SOMERSET CORPORATE BLVD. BRIDGEWATER, NEW JERSEY 08807-0911
-
 1
1 -
 2
2
 |
 |
